 |
| Roman Candle |
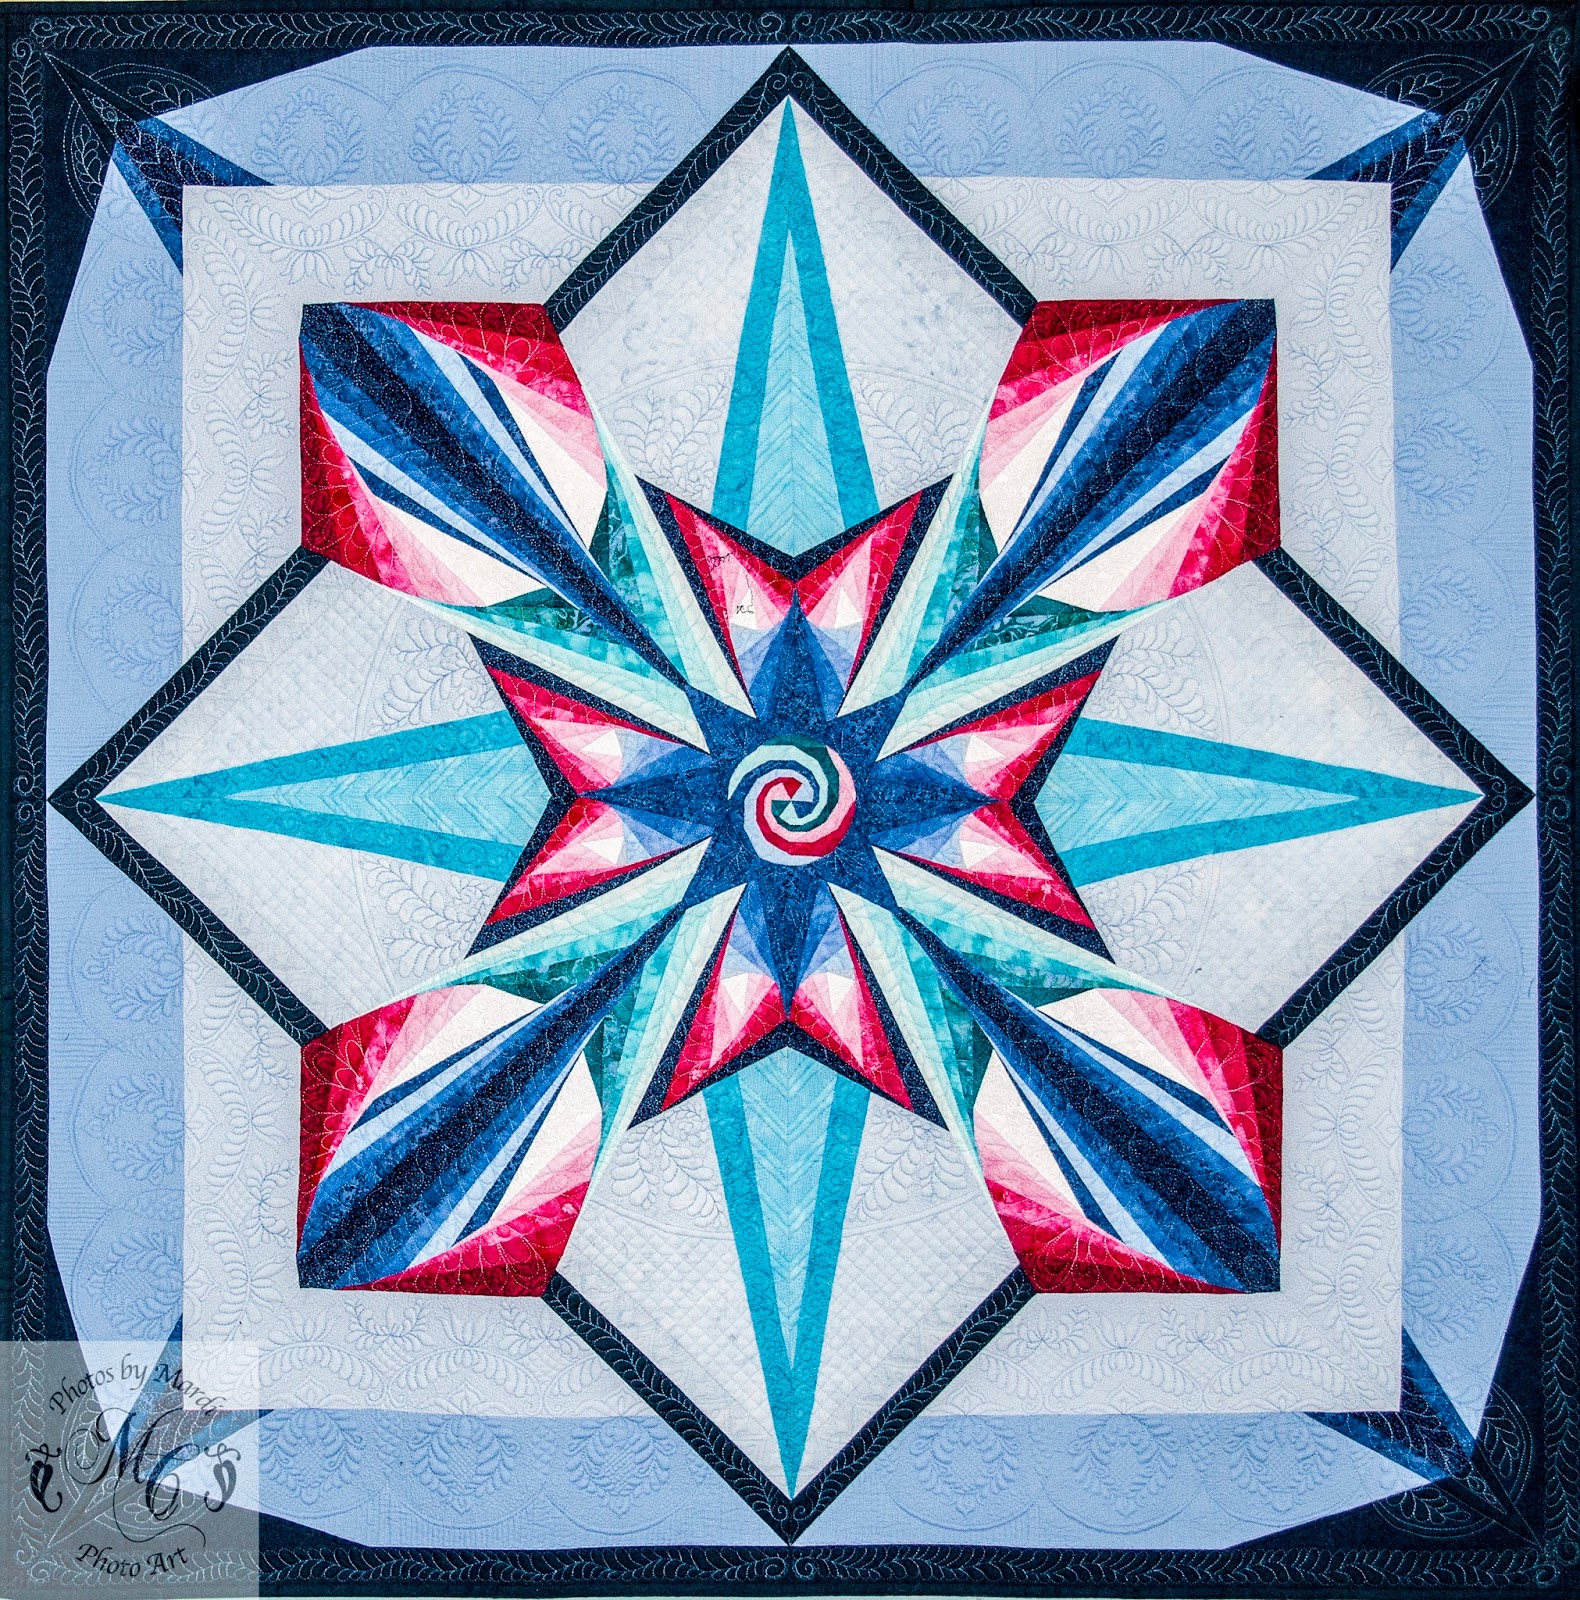
Sunday, July 30, 2017
IT'S A WIN!!
The quilt that filled so many blogs for the past year was juried in to the Quilt Odyssey Show in Hershey, PA. I looked at the pictures that filled their FB page and figured I was way out of my league, but at least was juried in. Imagine my surprise when the quilt arrived back home with a Third Place prize ribbon tucked inside. I am ecstatic to say the least, and now I can show it to you, all finished.
Sew some happy seams this week. Do your very best and you will always be a winner!
Monday, July 24, 2017
Point Problem
I can plan and plan and plan. I make patterns three or four times to get the kinks out. It looks like I am ready to roll so I start making blocks. After 5 blocks I discovered some things that needed attention.
Problem #1. I have some critical points that should meet at the seamline. They meet OK, but can't be sewn. One in particular has four points coming together (that is 16 layers of fabric at the point) and the piece to which it is seamed is the same so now there are 32 layers of fabric. Oh Boy! My machine took one look at that and decided to fudge the seam allowance. So now the points don't match and the fabric buckles slightly, but too much for my taste. A rosette on the back won't work because the seams on both big triangles all go the same way because of the order of stitching.
I consider this a design flaw so back to the drawing board. There is still a point now (below), but it doesn't come all the way to the seam. It sews nicely and the design is not affected by the minor change.
Problem #2. My pattern involves sewing two pieced triangles together to make a square block. There is a piece of fabric at one point of the triangle. When sewn together these two end pieces look like a half square triangle. No problem with that, except my pattern does not have that line on a 45º angle. Thank goodness I noticed it this early in the game, because in my adaptation that is a critical design flaw. I can fix the few completed blocks pretty easily and redraw the pattern, but what a nuisance.
PS. I just looked at the pattern in the book. I drew it wrong. Book is right. Oops! Now I pay for that seemingly minor mistake.
Those are my personal negatives, but are related to the pattern not the process. I would never have seen it without my design wall to stare at.
I must say, that so far the paperless paper piecing is going beautifully. I now have a system. I love the fact that I can see the block all together before sewing it. I am finding that the paperless method is more precise than paper piecing. I haven't had to redo any points except as related above. Sewing it is easy, but does take some mental gymnastics to get it right at first so there have been a few stitches to pick out here and there. It is a new way of thinking. Another thing I really like is cutting the pieces to the exact size, plus seam allowance of course. Almost no waste and each piece fits right in place with no guessing. With paper piecing I almost always had a few pieces that ended up too skimpy and had to be done over in spite of lots of experience with that process.
Does it take longer? I don't really know and I am getting speedier the more I do. A major plus is that once the block is together it is done. No picking out paper.
This process is a keeper!
Sew some happy seams this week. I wish you straight seams always, except when they are supposed to curve.

Problem #1. I have some critical points that should meet at the seamline. They meet OK, but can't be sewn. One in particular has four points coming together (that is 16 layers of fabric at the point) and the piece to which it is seamed is the same so now there are 32 layers of fabric. Oh Boy! My machine took one look at that and decided to fudge the seam allowance. So now the points don't match and the fabric buckles slightly, but too much for my taste. A rosette on the back won't work because the seams on both big triangles all go the same way because of the order of stitching.
 |
| Too many points together at the seam |
 |
| See how the point is moved over a little bit? Problem vaporized. |
PS. I just looked at the pattern in the book. I drew it wrong. Book is right. Oops! Now I pay for that seemingly minor mistake.
 |
| Red line is the way I drew it. Blue line is 45º angle. Have to redo the pattern slightly. |
 |
| Two blocks not sewn together yet. See the light and dark triangles in the middle at the bottom? Together they should be a half square triangle with STRAIGHT lines. |
I must say, that so far the paperless paper piecing is going beautifully. I now have a system. I love the fact that I can see the block all together before sewing it. I am finding that the paperless method is more precise than paper piecing. I haven't had to redo any points except as related above. Sewing it is easy, but does take some mental gymnastics to get it right at first so there have been a few stitches to pick out here and there. It is a new way of thinking. Another thing I really like is cutting the pieces to the exact size, plus seam allowance of course. Almost no waste and each piece fits right in place with no guessing. With paper piecing I almost always had a few pieces that ended up too skimpy and had to be done over in spite of lots of experience with that process.
Does it take longer? I don't really know and I am getting speedier the more I do. A major plus is that once the block is together it is done. No picking out paper.
This process is a keeper!
Sew some happy seams this week. I wish you straight seams always, except when they are supposed to curve.
Monday, July 17, 2017
Climbing the Learning Curve
Paperless paper piecing is done with glue basting before sewing. The cut fabric pieces are put down in the reverse order of paper piecing on a freezer paper template with said fabric backside up. You fold up the seam allowance of the first piece on one side, line it up in place on the template, and put glue (Elmer's school glue) on the folded-back seam allowance. Then you set the next piece onto it so the seam allowances are together. Press. Each piece has one turned up side. Now you are all confused so please take a look at this tutorial. I made a couple of throw away testers to get the hang of it.
See the underlying template in the photo below? The pieces are marked by number in the order they are to be applied. The red dotted line shows which edge of the piece will be turned up. The glue will be applied to that bit of seam allowance. The next piece is laid down with the fold exactly on its black line and with its other sides pressed on top of the glue on the previous piece. The blue line (see #10) tells me to cut that side with about 1/4 inch extra fabric. BTW: I make the templates and pattern pieces in Illustrator and print them, but they could be drawn by hand. When all pieces are glued down you sew the seams in the reverse order from which you glued. The learning curve is a little steep at that part.
Problem: I glued my block into a corner that couldn't be stitched.
Analysis: Oops!
Solution: Redo the order of construction. That did the trick. It takes a little practice to get your head in the right place for planning so it can be sewn. Start on something simpler than this.
Problem: My points were too close to the edge where two triangle blocks were sewed together.
Analysis 1: Did I put it together sloppily?
Solution: Since it is only glued so far and not stitched, maybe I can unglue a tiny bit, fudge a little and re-glue. The only problem here is that the points have to match with those on the other half of the block so too much fudging might distort the whole block.
or
Analysis 2: Did I trim the finished block too much? That turned out to be the problem.
Solution: I made a template of clear plastic, marking all the seam lines and outside seam allowance. I can lay it over the top of the finished block now and mark the trim lines. I also made a mark on the main template and the individual piece templates to remind me to allow a little extra fabric on the outside edges (blue line).
TIP: I used to trim by laying a ruler over the plastic template and cutting with a rotary cutter. Unfortunately, I discovered that it is too easy to shave little by little off the template until accuracy is impaired. Now I mark by hand, remove the template, and then cut only fabric with the rotary cutter.
Problem: One of my fabrics was not right. It was too dark and didn't show up against the black fabric next to it.
Solution: Of course >>> go to the fabric store! I had fabrics, purse and keys in hand when DH mentioned that the road is closed. Whaaaaat? A dump truck went off the road and over the edge of a steep canyon (150 ft down). Road closed most of the day. How about the other road? Nope, a car went over a steep embankment on a tight curve. Road closed the rest of the afternoon. The only road left to take me out of our mountain valley would involve too much extra travel. Not worth it. So I worked on another tester and will wait for open roads to go out for fabric.
Problem: Again, seam allowance skimpy. This time after sewing.
Analysis: Apparently the stitching tightened up the block, shrinking it slightly.
Solution: Cut extra fabric on all outside edges. Don't trim until after sewing. Try finer thread.
There is definitely a learning curve. My first block had a major difficulty about which I will write next week. The latest was wonderfully successful. It took me about three hours to cut paper pattern pieces (reusable), cut fabric pieces, press, glue, and then sew two triangle blocks and stitch them together. An assembly line will really help speed up the process, but the accuracy is fantastic except for the occasional pilot error.
Sew some happy seams this week. I wish you gentle learning curves this week.

See the underlying template in the photo below? The pieces are marked by number in the order they are to be applied. The red dotted line shows which edge of the piece will be turned up. The glue will be applied to that bit of seam allowance. The next piece is laid down with the fold exactly on its black line and with its other sides pressed on top of the glue on the previous piece. The blue line (see #10) tells me to cut that side with about 1/4 inch extra fabric. BTW: I make the templates and pattern pieces in Illustrator and print them, but they could be drawn by hand. When all pieces are glued down you sew the seams in the reverse order from which you glued. The learning curve is a little steep at that part.
 |
| Just getting started. Excess glue is white, but washes out. |
 |
| Templates for individual pieces. Note the red dotted lines and blue line on them too. |
Analysis: Oops!
Solution: Redo the order of construction. That did the trick. It takes a little practice to get your head in the right place for planning so it can be sewn. Start on something simpler than this.
Problem: My points were too close to the edge where two triangle blocks were sewed together.
Analysis 1: Did I put it together sloppily?
Solution: Since it is only glued so far and not stitched, maybe I can unglue a tiny bit, fudge a little and re-glue. The only problem here is that the points have to match with those on the other half of the block so too much fudging might distort the whole block.
or
Analysis 2: Did I trim the finished block too much? That turned out to be the problem.
Solution: I made a template of clear plastic, marking all the seam lines and outside seam allowance. I can lay it over the top of the finished block now and mark the trim lines. I also made a mark on the main template and the individual piece templates to remind me to allow a little extra fabric on the outside edges (blue line).
 |
| One triangle block completed, untrimmed. |
 |
| Clear plastic template with finished size of block marked. |
Problem: One of my fabrics was not right. It was too dark and didn't show up against the black fabric next to it.
Solution: Of course >>> go to the fabric store! I had fabrics, purse and keys in hand when DH mentioned that the road is closed. Whaaaaat? A dump truck went off the road and over the edge of a steep canyon (150 ft down). Road closed most of the day. How about the other road? Nope, a car went over a steep embankment on a tight curve. Road closed the rest of the afternoon. The only road left to take me out of our mountain valley would involve too much extra travel. Not worth it. So I worked on another tester and will wait for open roads to go out for fabric.
Problem: Again, seam allowance skimpy. This time after sewing.
Analysis: Apparently the stitching tightened up the block, shrinking it slightly.
Solution: Cut extra fabric on all outside edges. Don't trim until after sewing. Try finer thread.
Sew some happy seams this week. I wish you gentle learning curves this week.
Tuesday, July 11, 2017
Enough is Enough
In my last two posts I have complained and complained, giving lots of reasons for not being able to sew. Ha! I finally came to terms with the real reason. I couldn't yank up any enthusiasm for finishing my thread painted portrait. This is my third try, but the eyes aren't quite right, the nose is too big and the lips look awful. I finally admitted that I don't want to work on it and may not be geared for fabric portraiture. Bummer! Mind you, I am usually a finisher. I don't collect UFOs so this really goes against the grain. However, there are times in sewing and in life where you have to stop and admit that THIS IS NOT WORKING.
I cleaned up the sewing room and began to move on to the new. I grabbed the key and went out to my stash shed to fondle fabric and make choices. I will need to buy a little, but most of the quilt will come from what I have already stockpiled.
I finished my design and am so excited to get working on it. It is all paper pieced and I am going to try my hand at paperless paper piecing. It will take more time up front, but there won't be time spent at the end pulling out paper. I won't have to buy the water soluble paper that I like to use. There will be a learning curve, but I plan to make a couple of trial blocks before I use my chosen fabric. I understand the process and have tried it a time or two, but now I have a fairly complicated block and am still trying to figure out how I will make it work...thus the trials. Practice, practice, practice. I am sure I will speed up the process as I gain competence and establish an assembly line.
TIP: Interested in something new? Try it! Sometimes it works for you, other times it doesn't. It keeps your brain alive and healthy, so test it. Stay tuned!
Here is the block I am planning to use from from Carol Doak's "50 Fabulous Paper-pieced Stars" page 122 (yeah, I know...you saw it last week). Variety on the blog is hard when you haven't been doing anything! It will make a nice star as is (see last week's post), but I will finish with 36 blocks and numerous color changes. The final product does not even look like stars, but rather like a colorful, square mosaic. Quilting in the ditch will eventually show the stars on the back. My plan is to use Prairie Points instead of the standard binding. Another new process for me.
The basics are together. Now to figure out how to construct it. Back to the Internet to read the tutorial again.
I have also calculated fabric amounts in Illustrator by drawing a rectangle around each piece representing the amount of fabric for that piece with seam allowance. Then I duplicate that rectangle as many times as I need for the whole quilt. Each color is on its own layer. The document is 40" (about fabric width with a little leeway) and the height is 36," but can easily be made longer if necessary. This process is a little tedious, but is all accomplished on the computer and really didn't take too long. It is very accurate as long as the pilot doesn't err. I work on a grid in Illustrator, which doesn't show up in the example below, but it helps determine the right size rectangle for the odd shaped pieces. Note that one red piece below will be used 72 times in the quilt! Illustrator also has rulers on the side and top, which tell me how many inches I am using, thus I can calculate yardage.
I found out one thing. Prairie points take a lot of fabric, but they will look so pretty on my quilt and are a unique finish.
Sew some happy seams this week. I wish you a jump start on your current or next project.

I cleaned up the sewing room and began to move on to the new. I grabbed the key and went out to my stash shed to fondle fabric and make choices. I will need to buy a little, but most of the quilt will come from what I have already stockpiled.
I finished my design and am so excited to get working on it. It is all paper pieced and I am going to try my hand at paperless paper piecing. It will take more time up front, but there won't be time spent at the end pulling out paper. I won't have to buy the water soluble paper that I like to use. There will be a learning curve, but I plan to make a couple of trial blocks before I use my chosen fabric. I understand the process and have tried it a time or two, but now I have a fairly complicated block and am still trying to figure out how I will make it work...thus the trials. Practice, practice, practice. I am sure I will speed up the process as I gain competence and establish an assembly line.
TIP: Interested in something new? Try it! Sometimes it works for you, other times it doesn't. It keeps your brain alive and healthy, so test it. Stay tuned!
Here is the block I am planning to use from from Carol Doak's "50 Fabulous Paper-pieced Stars" page 122 (yeah, I know...you saw it last week). Variety on the blog is hard when you haven't been doing anything! It will make a nice star as is (see last week's post), but I will finish with 36 blocks and numerous color changes. The final product does not even look like stars, but rather like a colorful, square mosaic. Quilting in the ditch will eventually show the stars on the back. My plan is to use Prairie Points instead of the standard binding. Another new process for me.
 |
| One block for "Desert Mosaic." |
 |
| Outline for the piecing. |
I have also calculated fabric amounts in Illustrator by drawing a rectangle around each piece representing the amount of fabric for that piece with seam allowance. Then I duplicate that rectangle as many times as I need for the whole quilt. Each color is on its own layer. The document is 40" (about fabric width with a little leeway) and the height is 36," but can easily be made longer if necessary. This process is a little tedious, but is all accomplished on the computer and really didn't take too long. It is very accurate as long as the pilot doesn't err. I work on a grid in Illustrator, which doesn't show up in the example below, but it helps determine the right size rectangle for the odd shaped pieces. Note that one red piece below will be used 72 times in the quilt! Illustrator also has rulers on the side and top, which tell me how many inches I am using, thus I can calculate yardage.
 |
| Red fabric Planning Sheet - I need 1 yard of red fabric. |
Sew some happy seams this week. I wish you a jump start on your current or next project.
Tuesday, July 4, 2017
Best Laid Plans
The sewing table is ready, but I still haven't gotten back to sewing. We have cheatgrass in the yard, which is pretty, but terribly invasive. It dies off and turns brown by early July and does not provide adequate nutrition for the deer and elk, so it goes ugly fast. DH weed-whacked most of the wild grass (no formal lawn here), but I am pulling the cheatgrass by hand from about 1/4 of the yard. Then, we wait and see what happens next year. Why am I telling you this? My poor body is getting badly abused from grass pulling and dandelion digging. Machine quilting forces the body to be in one fairly intense position without much moving around even if you have a good chair, table the right height, etc. Stiff necks are very common, but right now it is my whole body that is stiff in spite of my daily exercise routine, stretching and walking the dog.
So what do I do when I am not sewing? Cleaning house goes only so far. I don't bake because we have cut out sugar and carbs as much as possible. So I design. I lay in bed in the morning free motion thinking as I awaken, and slowly the ideas are coming together for another quilt. I killed time some months ago between projects making four paper pieced stars, each different. Then I moved on and let them sit. They have given me a start for new ideas. As for the stars I don't use, I am thinking I might cut them into 2" strips and use them for part or all of a border. I don't know if that will work or not, but it will be fun to try. I should be able to make this quilt from my stash. Won't that make DH happy?
I started with a design from Carol Doak's "50 Fabulous Paper-pieced Star" page 122, which I drew in Illustrator. You can do this on paper, but I like working it out on the computer. I changed the slant of one line just because. I drew a hexagon for the center.
Then I created a star by putting the two star pieces together and rotating the whole by 90 degrees three times to get all eight points.
Next I rotate the whole star three times until I have four stars. Then I begin to take design pieces to add to the outside. From here I just play. For the center, a hexagon (6 sides) in an octagonal (8 sides) star? Yes! It doesn't "fit," but can be worked in a way that adds a slight bit of visual tension, which also adds interest.
TIP: Don't be afraid to break the rules. Many rules are mere guides.
 I got this to a point where I sort of liked it, but wasn't truly happy. I played with colors. I put the hexagon in the center, which was a glowing success after I colored various, surrounding pieces so it looks like it flows out into the greater design (not shown here). Once I was happy with a version of the whole I began to change colors here and there until I finally ended up with something that spoke to me. As I changed colors in different places I found designs within designs and nested boxes.
Another way to play with designs is to create a line drawing and fill it with color. That's what all those colored pencils are for - right?
 So far I have been playing, looking for design and color and sometimes my computer precision goes wonky. Before I begin a quilt I will go back to the beginning and make sure that every line and connection is precise so I don't end up trying to sew things that got distorted and no longer fit together. You are welcome to copy and enlarge the above and color it in if you want to. I would love to see what you come up with.
TIP: Simplicity. Remember the whole design is nothing but one pieced triangle in a right and a left version. Like the cells of your body make you a complex whole, so is a quilt design.
Sew some happy seams this week or have fun drawing out your creative ideas.
 P.S. My final design, because of color changes, shows no evidence of having begun as stars!!
So what do I do when I am not sewing? Cleaning house goes only so far. I don't bake because we have cut out sugar and carbs as much as possible. So I design. I lay in bed in the morning free motion thinking as I awaken, and slowly the ideas are coming together for another quilt. I killed time some months ago between projects making four paper pieced stars, each different. Then I moved on and let them sit. They have given me a start for new ideas. As for the stars I don't use, I am thinking I might cut them into 2" strips and use them for part or all of a border. I don't know if that will work or not, but it will be fun to try. I should be able to make this quilt from my stash. Won't that make DH happy?
I started with a design from Carol Doak's "50 Fabulous Paper-pieced Star" page 122, which I drew in Illustrator. You can do this on paper, but I like working it out on the computer. I changed the slant of one line just because. I drew a hexagon for the center.
 |
| Two spokes of a star. One hexagon. |
Then I created a star by putting the two star pieces together and rotating the whole by 90 degrees three times to get all eight points.
 |
TIP: Don't be afraid to break the rules. Many rules are mere guides.

Another way to play with designs is to create a line drawing and fill it with color. That's what all those colored pencils are for - right?

TIP: Simplicity. Remember the whole design is nothing but one pieced triangle in a right and a left version. Like the cells of your body make you a complex whole, so is a quilt design.
Sew some happy seams this week or have fun drawing out your creative ideas.
Subscribe to:
Posts (Atom)
Bagged the Bag
My first attempt at a picnic bag was a fail. You saw the pictures last week. I kept revising the design. I clipped where I shouldn't ...

-
 You probably noticed that I changed my blog theme...again. The "new" one was so pretty, but drove me crazy - I didn't like wo...
 -
 While I was gluing and sewing all those small pieces I had moments of thinking that it would take FOREVER to finish them all. Lo and behold...
 -
 I have been very busy lately putting together a family reunion, which will occur next week. In spite of all the busy work and planning, I s...