Wednesday, July 27, 2022

Bagged the Bag

My first attempt at a picnic bag was a fail.  You saw the pictures last week.  I kept revising the design.  I clipped where I shouldn't have, but fixed it with a ziz-zag.  Finally I was trimming an edge and cut it too deep.  I was thoroughly frustrated!!!!!!!   

I am very goal oriented and don't give up easily so I got busy hunting through my patterns and found another pattern that I had done before as a knitting bag, which I love.  I made a few revisions to accommodate the fabric in the my stash and the needs of a picnic bag and got busy on it.  I cannibalised the failed bag for a few parts and added them where I wanted them.  It is finished ready for our next road trip.  

THE Bag!

Inside with paper plates stowed.

Inside showing the rest of the stuff.


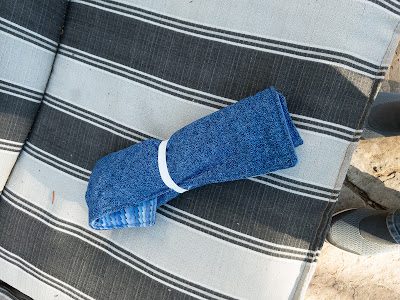
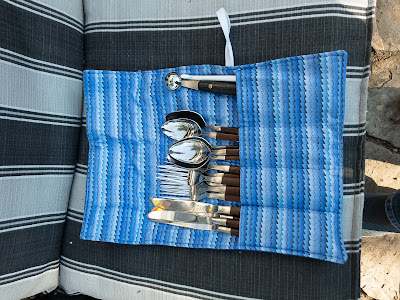
I made a flatware roll, which I expect to love.  I have always carried the flatware in a plastic bag and it was a pain.  I found a simple design on the Web.  It only took me a morning to make and will work great.  Next time I will make it a little bigger, but this will do the job for now.

Roll rolled up.

Roll opened up.


I am ready to travel!.  Meanwhile my poor quilt sits abandoned.  My daughter decided to make a quilt and got a kit in Hawaii.  She wants to make this quilt for her home in Southern CA.  She is not a quilter, but did a lot of sewing many years ago.  She looked at the cutting directions and threw up her hands in despair.  I have the quilt now and have spent two days sorting through the cutting directions and organizing them so she can hopefully figure it out.  It is really simple, but she is worried that she will get something off-grain and is generally afraid to cut.  Remember those days?  I will help her get started and she will end up with a lovely quilt I am sure because she is very capable.

Go out and have a picnic.  It is still summer!


Sunday, July 17, 2022

Travels and The Bag

 I started a post the other day about the quilt I am working on.  It will have to wait.  You don't want to read about the hours of ripping I just finished....yet!

We drove to Seattle the first week in July.  It is a 2-day drive so we spent one night in a motel that knows us now and always gives us the same room on the ground floor and accommodates our dog.  Our grandson married his sweetheart two years ago on the Courthouse steps because of COVID.  Now that things have opened up their families threw a big party for them to take the place of the Wedding Reception that they couldn't have.  We spent a week there enjoying family, Fourth of July celebration and the Wedding Party.

I digress.  When we travel we carry our own food so we don't have to go hunting for a restaurant when we are tired  and impatient.  Thus we take a picnic bag that holds utensils, paper plates, etc, and a cooler with our simple supper.  The bag is made from a circle folded in half with a zipper around the round edge.  It opens flat, but is a nuisance as everything is topsy-turvey.  Time to build a new bag.

Old bag.

 Where to start?

Daughter #1:  "What do you want the bag to be like?"

Me:  "I don't know."

Daughter #1:  "Well, Mom, it is a little hard to make a bag if you don't know what you want!"


Daughter #5:  "Well, Mom, lay out everything you want in it, and plan from there."

Me:  "Jackpot!  Now I have somewhere to start.  AND I DID!"


So, my current project is the new bag:

1.  I found a simple, free pattern, well illustrated and explained. 

2.  I figured it out (mostly) went to gather fabric from my stash.  I found some heavy-duty canvas,               which may be waterproof in my stash, and fabric for the lining.

3.  Went to Joann's to pick up heavy stabilizer, webbing for handles and a zipper.

4.  Nothing to do now except follow the directions and get it done.

5.  As I work I am thinking:  "I may wish that it was bigger.  I may want the top to open wider (longer zipper).  Will the pockets work for my needs?  The webbing for the handles is a bit too wide I think.  Oh well, it is an hour's drive to Joann's so I'll push ahead with what I have.  We will try this one out and see  if I need to do a revised 2nd version."

6.  I cannibalised the old bag for some wide elastic and a mesh pocket.

Pieces of half the bag.
Outside is black, lining is blue.  I am ready to attach the handle straps.

7.  Finally, I will make a cutlery roll to organize the flatware and drop it into the bag


Sew some happy seams this week.  Try something new just for the fun of it.


.


Sunday, June 26, 2022

Gaillardia

First post complete.  Now, what have I been doing for the last 2 years?  I am always busy.  I am a flea on a hot stove.  I am not averse to creating complicated quilts, but they take a long time to make, so I am not terribly productive when compared to some quilters I read about.

I was out walking after a rainstorm several years ago.  We have gaillardia growing all over the place.  I don't know whether they strayed from planted seeds or whether they are part of our normal flora here.  I took photos of a bunch of flowers that day, and got to the place where I was taking pictures just to take pictures.  I saw a very bedraggled gaillardia at the end of its beauty and somewhat the worse for wear after the storm, but the light was great.  I snapped the shot and when I saw it later I loved it.  That flower was colorful, dramatic and artistic.   I thought many times that I would like to do a quilt of it, but was always into some other project.  Now I had finished my latest and I did not have any UFO's.  I do not ever have UFO's.  I finish or toss.

Bedraggled gaillardia.


I even converted it to black and white.

Off to the computer where I had already developed my idea, but needed to create a pattern.  My method was fused appliqué, which I love doing.  I can create so many details that can't be pieced.  I don't think I even had to buy any fabric as I have a pretty substantial stash.  So... it was done!

I
Gaillardia quilt.

I did not succeed in showing the pokey things that come out of the center.  Maybe next time.
  Just for laughs here are some other photos I have taken of this bright and moody flower.


Sew some happy seams this week.  Have fun with your needles, threads and fabrics.


Friday, June 17, 2022

 I am wondering if I have any readers left.  I quit blogging when Blogger went over the top with so many changes and many of them did not work properly.  I hope that has changed so I will give it a try.  I think it has been about two years and I have been busy.  I may have stopped blogging, but I never stop sewing, dreaming sewing, creating sewing, and...well you get the drift.

I believe I left off when I was working on the Mayan Mask.  I finally added a new section to my mosaic quilt to solve a problem.  I put the mask on the new top part along with some colorful bird graphics.  Then I bound the quilt with the fancy prairie points.  This was binding with a facing and I love that method.  I do dislike doing traditional binding and I found this much easier.

King's Mosaic

Prairie Point Binding


This is the best I can do with photos on Blogger.  Still frustrated by that.  These show the various interesting points on the quilt and some of the quilting.

Enjoy a great week, summer weather, and summertime activities.

Mardi

Thursday, October 1, 2020

Summertime: When?

This summer has been busy.  Since COVID destroyed all of our travel plans DH built a vegetable garden at waist height.  Wow, I don't even mind weeding it.  It is so easy when you are not bending over or crawling on the ground.  The cucumber died, but the zucchini made up for the loss. My rhubarb, which has struggled for 4 years, "dying" every summer, survived one more transplant into the "box" and is loving it there.  I have great hopes for rhubarb pie next year.  Then we had 22º weather and a snowstorm in the first week of September.  So much for the garden!

One of my beautiful iris (now gone).

I tried to blog during the summer, but Blogger redesigned their blogs and nothing was working.  Most frustrating.  It seems better now so we will see.  In the meantime summer is gone, but I am still hanging clothes to dry out on the clothesline.  Fall is really iffy weather-wise and we have had much smoke with a big fire north of us.  

Smoke cloud at sunset.

My garden:  I lost most of my beans in a very early frost.  I got two meals worth of beets and enough zucchini for two loaves of zucchini bread.  Many of my seeds did not germinate; I will buy them elsewhere next time.  Great hopes for next year!

Sewing went out the window.  Our granddaughter was hired to be a counselor at our local camp, but their whole program had to be redesigned and even the counselors were not allowed out on their days off.  However, they had five short sessions and no COVID.  The downside was that we didn't get much time with our girl.  Then the timing went out on my sewing machine so into the shop it went.  That was a circus when we found out later that the store was going out of business. I was very worried about getting my machine back.  It did get returned and the things that had been wrong all work now.  We had three weeks of happy times with family visits and the sewing room turned into a guest room most of the summer.


Bridal mask with silver sequins like her dress.

  I made masks for the small, private wedding of another granddaughter.  It was fun to make a bride's mask and decorate it with motifs left over from wedding dresses that I made many years ago.  Both of our summer brides had to cancel their weddings, but each couple chose to go ahead with a small wedding (immediate family only) and they will renew their vows next year and have the big party then.  Smart kids.

I am back working on the never-ending quilt.  It has been fraught with problems

and I am just doing my best to finish it.  It will be awesome when it is done, but not show quality where the judges are VERY fussy.  In the meantime I am working on the next two quilts within my brain.  I also have two small ones yet to quilt and bind.  


COVID has not affected us very much.  We are not big socialites so staying home is pretty much our usual way of life.  We have done less shopping, we wear our masks, and so far have remained in good health. 

As always we enjoy the local wildlife. 

Hummingbird


Tired fox squirrel

Feeding the birds


Moose and calf.


Stay safe and healthy this week and sew if you can.  (PS.  Blogger is still a mess)


Monday, June 15, 2020

Stitching Fancy Prairie Points

Time has usurped my sewing options.  I had a wonderful week with a daughter and two of her adult children.  One was to be Assistant Director at a local camp.  Sadly, camp was cancelled the day before she was to report.  The rest of the family had departed so she is now spending a mountain summer here in my sewing room.  However, that could never stop a lifetime sew-er like me.  I just moved on to a different part of my quilt.  I still need to do some fusing and quilting before I am ready to bind, but it is never too early to start making Prairie Points for the binding.

I have never done Prairie Points.  I have never done a faced binding.  I never worry about doing something new. The exciting part is that I have decided to design my own off-beat points and they require a great deal more time to make than the common ones.  I just got the idea and was off and running.  I started with some measuring and manipulated paper until I had patterns that I could transfer to card-weight manila folder. I love using manila folders for templates because I have a huge supply after digitizing a lot of paper.  They work great and don't have to last forever anyway.  Less plastic in the landfill!

Example of an idea.

This is my plan.  I will be using 4 colors alternately in the black points.  The binding will be orange like the temporary strip in the photo.  I will explain how I am making the black points today.  I will address the construction of the turquoise point in another post.  My finished black points will be  1.25 inches tall above the binding and the point is a 90º angle.

In the meantime, here is a photo of all the stuff I have been hauling around to make them since my sewing room is not available.


1.  Start with a 3 inch square of the main color (black in this case).


2.  Fold it in half and iron (no fusible on this piece).  Cut the triangular colored insert and iron fusible web to its back.  My personal choice is SoftFuse.


3.  Now stick a pin in the center of the folded edge of the black fabric.  This will be the point of the triangle. Fold the two sides to the center, make sure they line up evenly and that the point at the top is crisp.  Press the side folds firmly with your iron.

Look hard to see the folded edges from the point to the bottom of the triangle.

4.  Open the side flaps and lay the colored triangle, fusible side down in the center.  I trimmed the edges of the triangle a little so they did not add bulk to the side folds.  Fuse the colored triangle to the black fabric.  Run a 1/2 inch long line of Elmer's Clear Glue along the white lines (in the photo below) on each side.

The fold lines are shown in red.

5.  Fold the edges of the black fabric exactly to the center keeping a sharp point on tip. Press with the iron to adhere the glue so the flaps will stay in place when you sew.


6.  When folded down properly and stitched there will be no color visible along the center line until you create the peek-a-boo hole (step 7).  Using an erasable marker (I used SewLine ceramic marker) mark some guidelines:
     a.  Seam line 1/4 inch above the bottom (this is seam allowance).
     b.  Line at top where you want it to close (I used 1/4 inch) and where you will sew one bead.
     c.  Line somewhere in the center where you want the widest part of the peep hole and where you will 
          stitch two of the beads.


TIP:  Roll a piece of painter's tape and place it on top of your spool of thread or some convenient surface.  Stick some of your beads on the tape for easy access.


TIP:  I bought the only beading needles I could find and they are quite short.  I think longer ones will work better to hide knots within the folds, and when I want to run it within the folds to avoid having to start a new thread.  I have ordered longer ones that should work much better....I hope.  I also used Superior Bottom Line thread, which is very fine (60 wt).  The beads are quite small.

7.    The first stiches need to close the center folds at the bottom and top marked lines.  Then you can fold back one side of the black fabric at the center line to expose the color below.  On this size triangle my fold is a scant 1/8 inch deep at the center mark and tapers to the top and bottom.  Stitch down with a hem stitch and attach beads if desired.  Repeat for the other side of the peek hole.

Finished triangle with the excess edge of the the peek-a-boo fabric trimmed 
away outside of the bottom seam allowance.

Sew some happy seams this week.  I wish you fun trying a new project.


Sunday, May 17, 2020

Filling in the Time

We are all getting a bit tired of COVID19 running our lives, but I feel lucky.  As a retired couple we don't go out much in normal times.  As a recent meme on Facebook said, "You realize how anti-social you are when a pandemic hits and things don't change that much for you."  I guess we are a bit introverted with our own activities that we enjoy.  We did break out for a trip to Costco, which netted us about 1/3 of what we had on our list.  They are having trouble filling their shelves because of supply problems.  Who would ever dream?  Meanwhile I clean, garden, sew, play on the computer, and enjoy the local wildlife.  I can walk in the early morning without a mask because I rarely meet anyone else.  I passed 18 curious, but non-threatening, deer on my walk the other morning.  Below is a huge elk that decided to sunbathe and chew his cud in our yard.  He is losing his winter coat so looks pretty scruffy at the moment.

Bull elk.
Several months ago I was all excited to finally buy a ruler foot that comes with a small ruler.  I tried it out on a sample square and was delighted.  Couldn't wait to use it on my quilt.  I have a wide border already quilted on my quilt and wanted to finish it off with a quiet border of piano keys.  I found that using the ruler and its accompanying foot wasn't working well with a heavy quilt to drag around.  Disappointing.

Solution:  Rip-it.  I decided to do the lines with my regular FMQ foot and was able to maintain the 1/4 inch distance between lines with the edge of the foot as a guide.  I also drew a straight line every so often with my Sewline marker to keep from wandering off at an angle.  Great way to learn to FMQ straight lines!   The lines are not as perfect as they would be with a ruler, but that is OK.  Do the best you can.

TIP:  Instead of using black thread on black fabric try a very dark, colored thread or dark charcoal.  It is much easier on the eyes than black on black and unnoticeable.  I thought my lines were quite perfect until I took this photo.  Clearly I was looking at them with "rose-colored glasses."

Piano Keys
I have also been working on the Mayan mask that will will be the show stopper at the top of the quilt.  I am stitching all the fused edges down with blanket stitch of various sizes.  I find this so satisfying.  It demands close attention as I go around corners and curves so it never gets boring.  In some spots I have stitched with clear, mono-poly thread and in others I have chosen appropriate colors or gold, metallic thread.  There is a narrow band under the eyes where I wanted to simulate the glow of animal eyes.  Gold thread was too much.  Yellow and orange were too much.  Tan didn't show up at all.

Silk thread under the eye.
Solution:  I finally settled on silk thread that is almost the same color as the fabric, which is actually a tan print (not orange as in the photo).  It is perfect.  It creates the glow with its sheen and adds the perfect bit of interest, but also blends.

Gold metallic on red.
Sew some happy seams this week.  I wish you straight lines, but no worry if they wiggle a bit.


Bagged the Bag

My first attempt at a picnic bag was a fail.  You saw the pictures last week.  I kept revising the design.  I clipped where I shouldn't ...