Showing posts with label practice. Show all posts

Monday, February 26, 2018

Marking Plans

I was asked last week how I will mark my quilt so here goes.  I made some changes to my design, but only added some more detail.  Then I drew it all over again!  By drawing the design on paper you build muscle memory, but it is not quite the same as working on the machine.  In the recent issue of AQS magazine RaNae Merrill has an article on how to use a plastic guide to practice your quilting before you try it on the machine.  Next, using sandwiched samples you practice your design with the sewing machine before you let the needle puncture your quilt.

I made templates of the shapes that have to be perfect.  Shapes that I can't free motion without a guide.  I had a bunch of poster board that I don't  anticipate using in the next 50 years so I drew the template shapes on them, except for one.  I don't know, but suspect that template plastic is more expensive and certainly less available in my small town.

Templates for internal shapes in my design.
The one template that is made from plastic shows 1/4 inch guidelines that mirror the outer shape (the curved triangle-ish one above).  This will be used to mark the grid that will fill it.  I don't have the fancy rulers being used for ruler work, nor do I have the necessary foot.  I can do this just fine without them as long as I have a drawn line to follow.

1/4" guide for a grid.  I'll clean off the pencil smears before using it.
I find I can follow lines with the needle quite well, but I can draw them better by hand, so I mark anything that has to be fairly perfect.  I need to mark this design (scroll down to last week to see the unfinished drawing) on an 8 inch black border.
     *Blue wash-away pen won't show.
     *Purple air-dry pen won't show.
     *Pouncing chalk makes a mess and smears.
     *White pen does not work for me.  It always disappears too quickly.
     *Frixion pens leave chemicals that come out to play if the quilt gets cold (winter mail).
     *I hate messing with that thin tissue you can sew through and find it imprecise.

My choice is my Sew-Line ceramic/chalk marker.  I love it.  It works like a mechanical pencil and rubs off if necessary. It comes with an eraser on the top, which is great for small goofs. However, if I have a big goof I put on my machine quilting gloves and rub the error out with those.  I have never had it stay if I didn't want it to.

Sewline marker and refills.
TIP:  As I mark around a template the line is a little thicker than a pencil line so when I quilt I stitch at the inside edge of marked lines.

Of course there is a downside.  It will eventually rub off as you manipulate your quilt.  The solution?  I mark as I go.  By the time I need to mark my quilt it will all be stabilized with ditch stitching. The internal part of the quilt should be totally free motion with little or no need to mark anything except grids.   For the border I will mark 1/8 of the border at a time.  At this time that is the plan.

For the feathers I mark only the spine and then do the feather loops free hand.

The feather spine is the curvy line on the bottom.  Looks strange without the
feathers, but it will do the job.
TIP:  Practice your feathers.  Soon you too will be able to mark only the stem and freehand the feathers with your needle.  You can also draw a freehand guide line for the outer edges of the feathers to keep them contained.

I am eager to get going on this and I got my batting and backing fabric, but I think I will finish my collie dog first.  She is very close to done.

Sew some happy seams this weeks.  I wish you time to practice your quilting skills this week.


Saturday, November 8, 2014

How to Practice FMQ

How do you learn and continue to improve your free motion quilting?  Every teacher, every book, every online tutorial has thoughts on this process so this post reflects my own journey.  When you sit down at the machine for the first time you'll find that the quilting foot doesn't hold the fabric down,  the foot pedal wants to send the machine into outer space, your eye doesn't know what to look at, your hands are helpless, and the quilt bulk is totally unmanageable.  At least that is the way I felt.

1.  CHALLENGE:  Back and neck get stiff and sore.
CAUSE:  Poor posture.  Chair and machine don't meld to maintain good posture.
SOLUTION:  Get a good chair.  Plant your feet flat on the floor with thighs parallel to said floor.  Forearms parallel to the floor from elbow to sewing table.  Sit straight.  I found it helpful to get an unstable cushion (yoga cushion).  It takes some getting used to, but will strengthen your back and help you sit straight.

2.  CHALLENGE:  Body and brain tension.
CAUSE:  FMQ is intense because there is a lot to think about to get it right.
SOLUTION:  Take periodic breaks, walk around and stretch.  Drink water.  You will learn to relax as you do more FMQ.

3.  CHALLENGE:  Quilting doesn't look like the planned design.
CAUSE:  Inexperience.  Design may be too difficult at this stage.
SOLUTION:  Practice your design with paper and pencil before sewing.  This helps build muscle memory and eye-hand coordination.  It really works!  Doodle.  Doodle with the sewing machine.

4.  CHALLENGE:  I don't know what designs are best to learn with.
CAUSE:  Inexperience
SOLUTION:  Draw, then quilt some loops like the letter "e" and start with those.  Medium size is best for learning.  Keep practicing with any letter of the alphabet - it is OK to backtrack.  In fact that is a useful skill.  Look at books and online tutorials.  Leah Day has over 400 quilting motifs and has arranged them so that you can find the ones for your level of expertise.  She has short videos with each of them.  Practice on them.

5.  CHALLENGE:  I don't want to ruin my quilt with my imperfect skills.
CAUSE:  Lack of experience and practice.
SOLUTION:  Make at least a dozen 12-inch square sandwiches of fabric-batting-fabric.  I used muslin that I had, but you can raid your stash, buy fat quarters or whatever.  Pin the sandwiches together so they are ready when the mood strikes, or for daily practice sessions.

6. CHALLENGE:  My needle has a mind of it's own and doesn't always obey.
CAUSE:  Inexperience.
SOLUTION:  Keep your eye about 1/4 inch in front of the needle and it will follow.  Amazing, but true!  There is some kind of mystic connection between the eye, the hands and the needle.  Don't try to move your hands at the same time you are moving the fabric under the needle.  Stop, rearrange and start again.

7.  CHALLENGE:  My hands and feet don't coordinate.
CAUSE:  It takes some getting used to.  Sometimes your foot makes the machine go when you are not ready and that can cause havoc.  Sometimes the puppy steps on the foot pedal - urrghhhhh!
SOLUTION:  Work on keeping the machine going at a steady speed.  Listen to the machine.  You can hear when you are getting irregular.  Take your foot all the way off the pedal when you stop and don't put it back until you and your hands are ready to stitch.  It is not cool to stitch a finger.

8.  CHALLENGE:  After stopping then starting again the needle jogs off to the side.
CAUSE:  The fabric is pulling.
SOLUTION:  This is tricky because it is hard to get started along the same line again without a jog when the weight of the quilt is not supported.  Arrange the fabric in a nest around the machine so that you have complete control of the portion around the needle.  Bring the needle up then move it down almost to the fabric by hand so you are sure it will land in the right place.  Do a stitch in the same hole where you stopped, then start slowly as you move the fabric carefully.  You have to hold the fabric very steady as you start.  Practice this regularly on your little squares, but realize that managing a big quilt will be a bit more difficult...but you can do it.

9.  CHALLENGE:  Stitching in the ditch to anchor the quilt.
CAUSE:  It is intense and difficult to stay in the ditch.  It just is!
SOLUTION:  Stitch two inch squares together into a 12 inch "quilt," batting and all.  Practice sewing right in the ditch.  Be careful at intersections where the seam allowance may be switching to the opposite side.  When done correctly the thread will bury into the seam and be essentially invisible.

TIP:  I'd rather stay positive, but I must warn you about a couple of things.  Stippling is one of the hardest stitches to master.  Straight lines are also hard to manage until you have more control.  These are important to learn, but not critical at first so get your feet wet with easier designs.

When you feel reasonably confident with the alphabet, look at some books with patterns.  Most quilting books have some ideas and there are designs all over the Internet.  Before you know it you will gain competence with eye-hand-foot coordination and will notice that you can follow a line.  When I was finally able to follow a line exactly, I realized I could do just about anything with a needle and quilt.

TIP:  I found it great fun to quilt on medium to large floral fabric, following the edges of the flowers and leaves.  It great for beginners because the occasional misplaced stitches are not obvious.  Looks pretty too.

What are my recommended goals at this stage of the game?
*Maintain good posture.
*Strive for a regular, steady speed with the machine.  Some people go fast, some slow.  Some
machines have the option of a slow, set speed.  Decide what works for you.
*Aim for stitches that are all the same length.  No one is perfect, but it is an admirable goal.
*Keep your eye ahead of the needle.
*Learn to stop and start in the same place without the needle going off to the side.
*Draw designs.  Doodle.  Practice 15 to 20 minutes each day on the machine.
*Have fun with it.

TIP:  You learn to quilt by quilting.  With some practice under your belt go ahead and quilt your quilt.  Most people won't even notice the imperfections.  I promise you will get better with each quilt.

Here is one of my early quilts.  I tried my hand at FMQ and thought it looked so awful that I ripped out ALL the quilting and started over.  That is probably not the best way to practice quilting, but when I went back to it, I did a much better job.  I did simple, large flower petals in the plain areas and followed the border design in the fancy spots.  You really can't see the quilting in the border areas.  That is real advantage on this quilt!  I got a lot of practice doing this, and you know what?  The quilt is not ruined!

Crossings


Sunday, November 2, 2014

Some Thoughts about FMQ

I can't remember when I started FMQ (free motion quilting), but at some point I decided I was going to have learn.
       My fingers refused to cooperate when quilting by hand.  
       Quilting by hand takes too long.  
       Having someone else quilt for me is too expensive.
       I don't want someone else to finish the quilt I have created.

In order to start the learning process I took a class at the local sewing machine store.  I was told that I had to sew fast.  Every time the teacher came by my table she said, "Speed up, you are going too slowly."  When I speeded up I immediately lost control.  It was like my running:  if I run too fast I fall flat on my face.  What did I get out of that class?  Discouragement, a mess on the fabric, and a fierce determination to quilt only straight lines with my walking foot.  
    
Walking Foot Quilting
The walking foot quilting looked fine and was easy, but terribly boring.  I really needed to tackle FMQ again.  I had the opportunity to take a beginner's class with Harriet Hargrave, the lovely lady who began the FMQ movement many years ago.  She was a rebel, but persisted and taught others her craft.  Her philosophy is that you can go any speed you want as long as you keep the machine running at the same, regular pace...your pace.  Ah, that fit so much better with my psyche.

Now I was on my way.  All I had to do was:
       *Keep my foot steady on the pedal.  Riiiight!
       *Use my hands to move the quilt through the machine in such a way that the stitches were all the same length.  Riiiight!!  (It helped to discover that my machine has a slow speed button.)
       *Keep my eye ahead of the needle.  I was promised that my hands and needle would follow. Riiiight!!!
       *Manage the bulk of the quilt so it doesn't pull, doesn't hang up on a corner somewhere, doesn't fall off the machine, and goes through the harp neatly and smoothly.  Riiiight!!!!
       *Prevent needle breakage and thread shredding.  Riiiight!!!!!
       *Somehow do all the quilting without ever stopping because when restarting, the needle created an unsightly jog off onto a new trail of its own choosing.

...and so it went for awhile.

Early FMQ
The quilt above fits a double bed, and the quilting is all FMQ on my domestic machine.  I spent half my time changing broken needles and broken thread.  The other half of my time I was manhandling the quilt trying to maintain some control.  There wasn't much time left for sewing.  The stitches were not terribly even, and the quilting didn't follow my imaginary lines.  I hadn't marked my design because I was not able to follow the lines anyway.  I finally finished, was happy to be done, and learned a great deal about how to manage the process.  Although not exquisitely beautiful, it is functional, I did it, I got a little bit better.

TIP:  Be gentle on yourself.  I know you would like to be another Leah Day or Diane Gaudynski, but give yourself time.  Don't quit.  You'll never improve unless you practice, practice, practice.  Watch tutorials.  Read books.  Practice, practice practice.  Concert pianists didn't become professionals by sitting on the couch wishing for music technique to be assimilated by osmosis.
       
Does all this sound familiar?  Please don't get discouraged.  I caught on and you can too.  Tune in next week and I will share with you the things that have most helped me become a better FMQer.

TIP:  Did I mention that PRACTICE is the single most important ingredient in learning to FMQ?  

Saturday, June 7, 2014

Learning to Quilt

By definition a quilt must have a top, a filler (batting, flannel or, as in pioneer days, an old blanket), and a backing.  The sandwich must be fastened together.  A simple option is to tie it together with thread or yarn in multiple places.  Alternatively, the layers can be hand stitched with a varying amount of complexity.  A nicely done hand quilted quilt is a beauty to behold with a quality that cannot be duplicated by a sewing machine.  Today, with the world in such a big hurry, we want to speed up the process, so machine quilting has been reluctantly accepted and is also stunning when well done.

As with anything else, there is a learning curve.  Even a baby has to learn to feed itself and the first attempts can be pretty messy.  It takes time and practice to learn to coordinate the foot pedal, hand movement, machine speed, and even the movement of your eyes.  You can and should research the process via classes and/or reading, but YOU have to experience it yourself and practice.  You must learn about thread and needles in order to rein them in to work for you without causing alarming noises from your machine or broken needles and thread. You must learn what your machine likes and dislikes, and how to adjust the tension properly.  Lots to think about.

TIP:  Practice, practice, practice.  Start with paper and pencil to develop muscle memory of a design.  Make up fabric sandwich squares and spend some time each day to develop coordination.  Mark designs and learn to follow the lines.  Learn to stitch in the ditch.  Learn to do curves then straight lines.  Learn to draw freehand with the needle.  Inundate your brain with quilting ideas and improve your performance one step at a time.

Finally, the appliqué on Hallelujah Rhapsody was done.  It took a very long time.  I quilted it with numerous filler patterns, and that took a long time too, but I believe that on this quilt I became more competent than ever before, and I turned the corner into becoming interested in doing the quilting.  I always loved the sewing, but dreaded the quilting, because it never looked good enough.  They say that the quilting should be planned in the design process as it is an integral part of the quilt.  I knew that, but didn't yet know how to even think of quilting designs that wouldn't be executed for months yet.

TIP:  Before you begin quilting you should quilt around the outside of the appliqué.  I don't remember if I knew that when I made this quilt, but it is great FMQ practice and really improves the look of the quilt.  You can do it with invisible thread if you are worried about possible imperfections.

I quilted the Hallelujah Rhapsody on the fly with different filler designs.  There was no room for anything bigger.  I had chickened out on feathers and added them as appliqué.  Was that insane or what?  I have posted this picture before, but this time note the different fillers.


I learned how to do pebbles.  They are not easy, but invite a rhythm and commit you to strive to follow previous stitching lines perfectly.  They are a great exercise for developing control of the myriad parts that must interact in the process of quilting on a machine.  Among some of the pebbles I inserted flowers.  That was fun, and they make the quilting more interesting.  You will learn to either draw freehand with the needle or follow the marked lines, depending on your personal inclination.  I stippled some.  Did you know that stippling is one of the most difficult filler designs?  You have to constantly move in many directions and this is hard for a novice.  After finishing Hallelujah Rhapsody I found myself thinking about quilting ideas as I designed my quilts rather than as an afterthought.  Definitely a step in the right direction.

TIP:  In your early attempts at quilting try a more defined pattern and leave the stippling until later.  Don't distress too much over your imperfections.  If I had done so on this quilt it would still be in the UFO (Unfinished Objects) pile.

This quilt was my first to be juried into not one, but two shows.  I learned how to enter a show!  I was most gratified to have my quilt accepted even though it didn't win anything.  The judges offered several suggestions regarding my quilting:  attention to tension, strive for even stitches, watch starts and stops.  These comments were not unexpected as I was still very much a novice quilter so I worked on the areas in which I was judged deficient.

TIP:  Don't be discouraged by feedback such as this.  Just work on getting better.  The judges aren't mean, but they are very experienced, and I have found that even their negative findings are couched in positive terms on the evaluation.  Remember that you have achieved some level of competence to be juried into a show.  Very exciting!

Friday, May 30, 2014

How to Machine Appliqué

Before I talk about blanket stitch appliqué I must spend some time explaining a few things about satin stitch, which will also apply to blanket stitch.  First of all the appliqué fabric is heavily starched, fused to fusible material, then the appliqué designs are cut and fused to the background fabric.  See my earlier post.

TIP:  Starching is optional, but I find it helps control the fabric.

Satin stitch is simply a zig zag stitch squashed tightly together to form a solid, edge around the appliqué.  This takes the right machine and some practice to get it even and uniform. I haven't gotten there.  I haven't practiced.  Someday I will learn to do it nicely, but right now it clings to the bottom of the bucket list.  Below is the anatomy of a satin stitch.


Finally, your choice of stabilizer is affixed to the back of the background fabric.  I use safety pins.

Satin stitch with no stabilizer
Satin stitch on cotton with two layers of stabilizer
As you can see, stabilizer makes a world of difference in the appearance of satin stitch, and equally so with blanket stitch.  In these examples you can see why I don't do satin stitch:  my machine does not allow the stitches to be any closer together.  The skinny example (far right) was done twice and I still am not happy with it.

TIP:  Using the same fabric and materials as in your quilt start stitching, adjusting tension, stitch length and width until you are satisfied with the result.  It is difficult to rip out this kind of stitching and it is hard on your fabric and your mental stability to do so.  Mark this tester scrap with your final choice of settings and put it on your design wall where it won't get lost or land in the wastebasket.

The fabric preparation for blanket or buttonhole stitch is the same as for satin stitch, including the practice sample...especially the practice sample.  The stitching runs along the edge of the fabric, tossing out a sideways stitch or two regularly as in the example below.

Blanket Stitch
Batik is a great fabric for blanket stitch appliqué, but more loosely woven fabrics can be used if they are not prone to heavy fraying.

TIP:  If you are using a fabric with some small tendency to fray you can treat the edges with Fray Block.  The tube has a fine tip, but this product is very juicy so I apply it with a toothpick to the very edges of the appliqué after fusing it to the background.  It is a form of plastic so I want it only on the edges.  It seems to work well and is invisible.  I also check for any fray threads as I stitch and either pull them out or snip them.  This is fussy stuff, but if you plan to show a quilt the judges will notice unattractive fuzz.

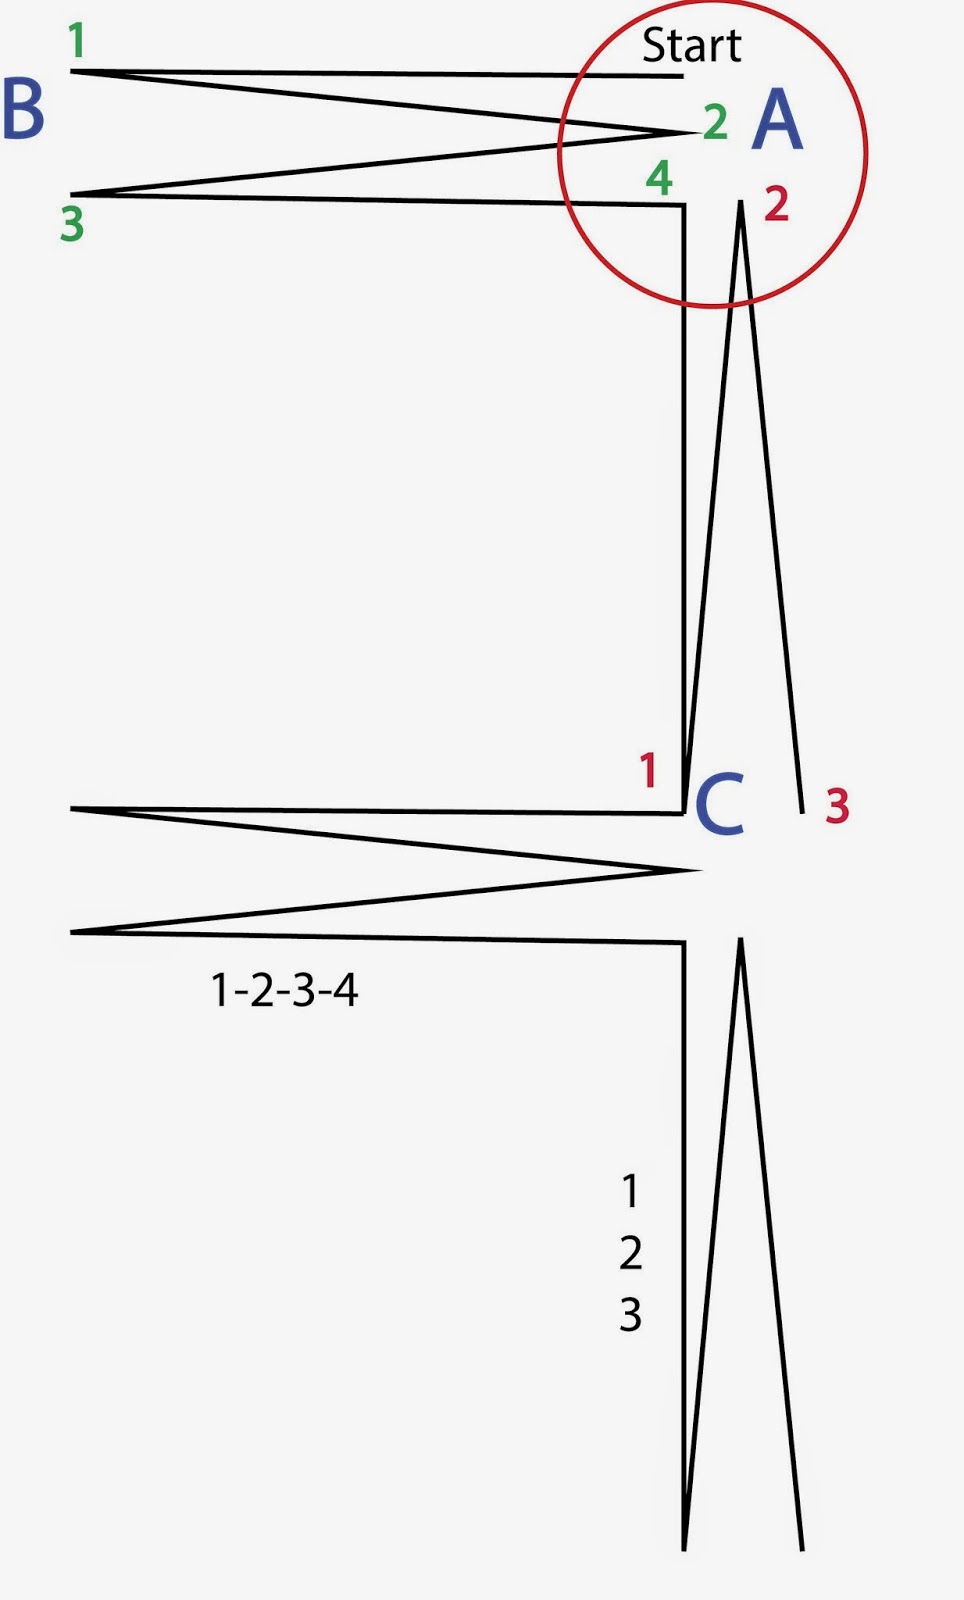
The machines I have used and heard about take several stitches in place sideways and then several stitches forward and backward.  Machines differ in the specifics of their blanket stitch, but below is the anatomy of the blanket stitch on my Viking Sapphire.


I start with about 5 tiny straight stitches to lock the thread.  Then the needle goes in at A, left to B(1), right to A(2), left to B(3) and right again to A(4).  Next it goes forward from A to C (1), back to A(2), forward to C(3).  You can name or number these steps any way you choose, but you need to establish a rhythm, and it helps to name each step.  When you get to points or corners you need to know where you are in the sequence.  BTW,  the needle goes into the same hole every time you come back to A, B or C (I opened it up in the diagram so you could see the steps).  Points A and C are right at the edge of the appliqué and should form an attractive, smooth finish.   There is a lot of stopping and turning as you negotiate curves and points so this is a perfect place to use the needle-down function if your machine has one.  The A to B stitches must be perpendicular to the edge of the appliqué.

TIP:  Slow your stitch speed to low if you can.  As you learn to do this stitch on appliqué I suggest that you turn off the tv, turn off the audio book, turn off the music, and turn off the kids.  You need to concentrate until you understand the rhythm of your stitch.  Why not music?  Music is all about rhythm, but it rarely, if ever, syncs with your sewing machine stitch, leaving you all mixed up crazy.  Say the names of the steps out loud with your variation of names and needle sequence:  1,2,3,4-1,2,3.  You have just created new music with the needle as your drum!

Finish with 5 tiny, locking stitches, which can be buried nicely in previous stitching.  Pull the threads to the back and cut, leaving a 1/2 inch tail.

TIP:  If the thread tails might show through the fabric to the front, pull them through some stitches on the back before cutting.

The points and corners will take some maneuvering. Slow down.  You may need to shorten the width of the sideways stitch sometimes, and you may need to lengthen or shorten the lengthwise stitch even to 0 on occasion.  So much depends on your machine so remember the old mantra:  practice, practice, practice.  This is where you need to remember where you are in the stitching sequence or you will find the needle flying off in the wrong direction.  Ask me again how I know!!  My seam ripper has a long and varied history.

TIP:  Save time and reduce pilot error.  Once you have your settings established, and if you can do this on your machine, program your stitches so you can select them automatically.  The appliqué I am working on now has two different width settings depending on what part I am working on so those are each programmed separately.  The third stitch I program is the tiny straight, locking stitch because it needs to be offset to the right to match the start of the blanket stitch (A). 

When you get the hang of this you can turn on your choice of noise.  However, I suggest you send the kids outside to play in a safe place or put them down for naps.

Wednesday, March 5, 2014

Rocky Trails

Rocky trails have been a staple of my life as summers were always spent hiking in the Rocky Mountains where the land is mostly rocks.  My grandfather bought a tiny cabin in 1938, and using it as our base camp, I spent happy, sunny days playing and picnicking among the pines and wildflowers, climbing rocks and later mountain peaks.  In time this little cabin full of memories became my husband's and my retirement home.  Life cannot get fuller!

In one of the two bedrooms was an antique, iron, double bed.  It is plain, and had always been a light green.  The paint was scratched and scruffy so I decided to refinish it.  After some online research I stripped all that paint off and prepared it for its new look.  After canvassing the family as to color, we decided I would paint it red.  Three coats later it looked beautiful and I was so pleased.  We set it up in the bedroom, stacked the springs and mattress on it, added bedding, and then I realized…I don't have a bedspread or quilt that will go with my wonderful scarlet bed.  Being a quilter I knew just what to do, and here is the result:

Rocky Trails
The photo is kind of funny because my husband, although long-limbed, could not reach the corners.  The quilt is for a double bed and has enough length to wrap the pillows and hang over the sides.  It looks wonderful on the bed.  The pattern is a simple log cabin with two-inch strips as I was going for quick and easy.  Easy, yes, quick no!!  I made all my blocks and set them out on an empty double bed, which was pretending to be a design wall.  My arrangement was not satisfactory so, running back and forth around the bed, I began to rearrange and this is the result.  The color is perfect and the design turned out to mimic Indian designs; not really, but sort of, and fits with our western living style.

The quilting is obviously the work of my beginner self.  My choice of filler is not great, the lines are wiggly, and travel stitching rarely travels along the planned route.  I did break out and use red thread instead of trying to hide my stitching so it really shows my inexperience.  I broke needles and thread regularly and when I got too frustrated, I just walked away for awhile.  Sometimes that is all it takes to get back on track again.


TIP:  Use your design wall or suitable substitute to test your block arrangement.  You may want to look at it with fresh eyes over a couple of days.

TIP:  Go ahead and quilt regardless of your inexperience.  You will find that you get better with every quilt.  Check out Leah Day for filler ideas, great videos, and a post on ways to manage the learning frustrations.  Practice, practice, practice.

TIP:  Broken needles can be due to pulling the quilt a little too hard at the wrong time so the needle hits the throat plate.  Try to figure out what is putting so much strain on the needle, and move the quilt gently and smoothly.

TIP:  Broken thread can be due to poor quality thread, but usually is the fault of the needle.  I have learned that Topstitch needles are great for quilting as they have a large eye, which allows the thread to flow through.  Maybe you need a larger needle. I sometimes use a 90/14 if there are a lot of seams to go through.  Don't worry about making bigger holes in your quilt.  They will be filled with thread!

Tuesday, February 25, 2014

Puzzle Quilt

Here is a quilt that was just plain fun.  It is called a Puzzle Quilt from the book "Puzzle Quilts:  Simple Blocks, Complex Fabrics by Paula Nadelstern.  She is another very talented fabric and pattern designer and quilt maker.  The idea is to cut triangles from different, interesting fabrics, and she gives direction as to what is likely to work best.  In doing this I learned a lot about which fabric motifs create movement and make a block more interesting.  I also fussy cut some of the triangles.  My finished blocks were to be 12 inches square so I cut a piece of cheap, plastic tablecloth about 16 inches square, set it on my ironing board, and arranged triangles on the flannel back until I got a pleasing design.  Ms. Nadelstern suggests several main arrangements with variations for each, but your fabric choices are what will make your quilt.  She also shows photos of several finished quilts.  I loved playing with the fabrics and even dragged my husband in for his opinion now and then.  Since his head works very differently than mine, I got some interesting opinions, many of which were very useful.

TIP:  Avoid open windows and fans or you might get a colorful snowstorm of triangles.

Puzzler
I read the book fairly completely before I did the quilt, but I missed a critical element.  I wondered why she called it a "puzzle quilt."  Later I read that you are supposed to make your blocks so that there are two of each pattern, for which you use different fabric choices.  If you number my blocks like you read a book then #2 and #6 are the same pattern.  The idea is for an admirer to try to find the blocks with the same pattern.  I didn't do that, but instead just played, had fun, and love this quilt that now resides on the back of my sofa.  It is the perfect size to use for decoration or as a lap quilt.

For quilting I used the Baptist Fan design.  This link takes you to a website that shows a very clever way to draw the design.  I happened to use Adobe Illustrator on my computer.  Once I had the design printed I copied it onto one piece of  Golden Threads tracing paper.  Then I cut 12 pieces of the tracing paper, each large enough for a block, stapled them securely together and machine stitched through the pile without  thread.  This left holes as guide lines.  You can also stitch through only one if you want to use pouncing chalk.  I suppose you could use your walking foot to do the quilting, but I decided to try my hand at free motion so I could avoid turning the quilt so much.  I did OK, got a lot of practice, broke a few needles and broke the thread sometimes, but those frustrations can provide motivation if you can figure out what caused them to happen.  I quilted a simple design in the sashing, but still used the tracing paper to keep it regular. (Sorry the photography is not up to snuff here, but the quilting is pretty much background noise and doesn't show much even on the quilt itself.  Great way to learn!

TIP:  Read the books you buy!  It is amazing how much you can learn when you think you already know how to do something.

TIP:  Triangles have a bias edge and you must treat it with gentle hands and move it through the machine without stretching if you plan to have a quilt with straight edges.  Please be sure that the straight edges are on the straight and crosswise grains of the fabric or you might have an unpredictable mess when you put the quilt together.

TIP:  Cut the triangles a smidge large, then carefully measure and trim each square after sewing two together, making sure the diagonal line of the ruler lines up with the diagonal seam.  That way the 12 inch block will come out to be the proper 12 1/2 inches (that includes 1/4 inch seam allowance).


Wednesday, January 29, 2014

Orion Star

I loved the design of this quilt called Orion Star and found a bunch of batik fat quarters in my favorite colors.  This is one of those quilts that I did for the fun of it.  It is not hard and was great to take to a quilt retreat when you have noise and confusion around you.  I prefer not to have to think very hard in that venue.  I saw it in a magazine advertised as a quilt made with "Thangles."  Thangles are a method of making half-square triangles using pre-printed paper as a cutting guide.  You can learn about Thangles here and get the pattern and Thangles here.  Since I tend to jump in and get all wet before buying more stuff, I just designed it myself by looking at the quilt in the advertisement.  Mine is much smaller (about 36" x 48") than what they sell in the kit, but it served its purpose for me.  The biggest challenge was working on my design wall to arrange the colors in a way that pleased my eye.


TIP:  You can have a fancy design wall or use your bed.  I hang a flannel-backed tablecloth on my wall, flannel side out and use it.  It is easy to put up, take down and store, and it does the job just fine for very little money.

TIP:  Arrange the blocks the way you think you like them, then leave it for awhile.  Wander into the room now and then and look at it again, rearrange and go away again.  You can get a lot of house cleaning done or dishes washed during this process.  Do this for several days.  Fresh eyes see things that were missed.  When you are sure you are happy, crank up the sewing machine and sew it together.

I had gotten comfortable free motion quilting flowers with big, simple petals and that design served well on this quilt too.  More practice.  I still wasn't loving it, but I didn't want to pay someone else to do my quilt.  It takes motivation, determination, and lots PRACTICE, to get the hang of free motion quilting whether you are working on a longarm or sit-down machine.  Don't get discouraged.  It will come.

Sunday, January 26, 2014

Paper Piecing

It was right about here in my journey that I learned how to do Paper Piecing, also called Foundation Piecing.  It is not hard, and once you catch on, it allows you to piece a block or shape with amazing precision.  You can piece tiny, little pieces that would otherwise be impossible.  You can look at a good video tutorial on Foundation Piecing if you don't know what I am talking about.  You can start with some simple practice blocks such as the triangle sashing blocks in this quilt.  The sashing is 2 inches wide so they really don't have to be paper pieced, but I found that the bias edges of the triangles were much easier to control with paper piecing.  I loved the way everything lined up straight and measured correctly when I put the quilt together.


Here you see again that I have a penchant for fussy cutting and kaleidoscope design.  The feature fabric is a symmetrical, border fabric that screamed for action.  The large blocks also have bias edges to work with, and they must be sewn carefully without stretching.  It may help to pin if the edges are long.  If you find that you must sew a bias edge to a straight edge it works best to keep the bias edge on the bottom as you sew and again, you probably would do well to pin first, but please do not sew over the pins.

If you look carefully you can see that I branched out to some easy free motion quilting on this quilt.  My first attempt was so awful that I ripped it all out and did it over again.  Yes, ALL the quilting!  This is frustrating, time consuming and discouraging, but I urge you to rip if you don't like the results.  You will never learn to like that quilt if you aren't happy with the job you did.  You can save yourself a lot of grief by making some 12 inch quilt sandwiches out of your chosen fabric and batting on which to practice your design.  Either way you will have practiced and learned to machine quilt a little better.

Bagged the Bag

My first attempt at a picnic bag was a fail.  You saw the pictures last week.  I kept revising the design.  I clipped where I shouldn't ...