Sunday, August 28, 2016

Time Off for a Show

My daughter and I went to the Rocky Mountain Quilt Festival.  This is where the Hoffman Challenge traditionally displays all the entries that were accepted into the show.  Imagine our surprise to find hardly any of the Challenge...maybe 15-20.  I didn't count.  No dolls.  No apparel.  No booth for information.  On the way out we asked about it, and apparently Hoffman has changed things around and this was all they sent.  The lady at the ticket table said they were as surprised as we were.  What a disappointment.  I did take a few photos of some of those Challenge quilts, which struck my fancy.  I did not look that closely at technique; that's for the judges.  I apologize to the quilters whose hard work created the following.  The labels were so small I could barely read them, let alone take photos of them.  The chosen fabric was littered with butterflies in many colors, and there was a "light" colorway and a dark colorway from which to work.  At the Hoffman Challenge website you can see the winners' quilts and if you scroll way down will find the butterfly fabric.

The following is a selection of those we viewed in person:

There were lots of butterflies within butterflies.
I found this one charming.
Unusual, interesting.
Lots of color.
Accessory fabrics within the stained glass framework.
Neat idea that spoke to me.
Love the precision.  Nicely executed.
Ten individually bound mini-quilts stitched to the turquoise background.
Like an entomologist's display.  Clever.
I like the overlaid embroidery on this one.
This one made me laugh.  Cute idea.
I must say that standing within a booth with five or six butterfly quilts I began to feel like there were too many bugs buzzing around.  Weird sensation, but the quilters really created their quilts with realistic butterflies on the brain.  Very few used the fabric only for color or texture.

The rest of the show was made up of exhibits by different groups.  The highlight for me was a booth with three of Sharon Schamber's beautiful quilts.  The detailing was spectacular.  I could have stood there for the next hour just taking in her incredible workmanship.  This particular show is not juried so there were no individual entries or prizes.  The exhibit I liked best was done by the Rocky Mountain Creative Quilters.  I didn't think to take any photos.  I must have left my brain at home.  They have a fine bunch of talented quilters in that group.  I don't know that I could have chosen any that I liked best - they were all amazing.

Caveat:  You may note some quilts that look like they are hanging poorly.  You are right!  The bars they were hanging from sagged in the middle.  This made the quilts slide toward the center so fold lines were accentuated, which made some quilts look crooked and bent.  Many of the bed-size quilts were dragging on the bare floor.  What a shame!

Next week I will get back to the saga of my binding redo and share a gorgeous binding on one of Sharon Schamber's quilts.

Sew a happy seam this week.  I wish you inspiration from the quilts above and others that you may encounter.

Saturday, August 20, 2016

Time out for Binding

Yes, the title says "binding" not "bonding" although bonding with other quilters is usually fun and often informative.

I sent my Phoenix quilt to two shows and it won a Faculty Choice, a Judge's Choice and an Honorable mention.  The judges all mildly dinged me on the binding, but of course didn't say what was wrong with it.  Frustration!  It has been juried into a show in October so I decided to take the faulty binding off, re-watch Sharon Schamber's U-tube video on straight binding, and bind the quilt over again step-by-step from the video.  It was hard to take time off from the present WIP, but I am hoping to achieve something closer to perfection...or at least something the judges like better.  Sharon uses starch, glue, careful cutting and pressing to achieve the bindings on her award-winning quilts.   I have watched this several times and am still practicing.

TIP:  This level of perfection is really not necessary for your everyday bed or baby quilt, but is expected in a show quilt.  The judges check the binding and backing very carefully in choosing the ultimate winners.

In lieu of a boring photo of binding I am inserting this little visitor who came to dine in my wildflower garden this week.  Talk about perfection!

TIP:  Get up from the sewing machine from time to time to enjoy nature's beautiful gifts.

Mule deer fawn.
Sew a happy seam this week.  I wish you perfection in at least one of your endeavors.

Sunday, August 14, 2016

Spinning Spirals

Spirals are so named because the construction triangles are placed in rings within a shape.  However, in triangles, squares and rectangles they don't look like they spin.  They do better in a pentagon (5-sides), but in a hexagon (6 sides) or an octagon (8 sides) they can be pretty spectacular.

I was working along on my quilt wondering what to do with the center where I have 8 points with a seam down the center of each converging at the same stitch.  I suppose this might be sewn into a perfect intersection, but I am not even going to try.  If it is not perfect, it has to be redone, repeat, repeat... ad infinitum.  Eventually you have spent too much time and become frustrated and discouraged.  To top it off those bias or partial bias points have become stretched and frayed.  Now it is really impossible.  My solution is to put something pretty in the center.  My present quilt does not lend itself to a star or floral solution so maybe something more geometric.  Brilliant solution:  I will make a spiral spiral!!

I love Illustrator as I can try out my ideas in detail and even put them on the virtual quilt.  First I tried a hexagon.  I liked it so I sewed it and it was OK for a couple of days on the design wall, but then it began to bother me that I was trying to fit a hexagon on a square quilt that has all the design elements in multiples of four.  Poor design choice.  Back to the computer.

Hexagon
OK.  Let's try an octagon.  The problem here is that the internal triangles are more shallow and when they get too small to sew there is is still a very large center that I don't like for this quilt.  It is a prettier, finer spiral, but that doesn't make it look better for my purposes.  I didn't sew it!

Octagon
Well, how about cutting off the corners of the hexagon to make a circle?  Nope, can't be done.  Brilliance strikes:  what about putting a hexagon inside a circle of the same dimensions?  So that is what I did:

The outer ring ends up as narrow, dome shapes instead of triangles.  The rest of the rings are made of triangles whose long dimension stretches from the center of one side of the hexagon to the center of the next side.  Each ring repeats the pattern until the triangles get too small.  There is still the center to deal with, but it is proportionately smaller.  I simply divided it into six 60º triangles.
Diagram of hexagon in a circle.

Once you get the triangle diagram drawn, it is just a matter of coloring the triangles so they make a spiral that spins:
How color makes the spiral spin.

Now, there is still the center to deal with and it is the first thing you must resolve.  Although you draw the pattern from the outside to inside, you sew from the center out.    You can choose a single piece of fabric or get fancier.  I made the center of 60º triangles carefully stitched to a single point - not paper pieced.  This is simple with only 6 points to deal with, and I found it easy to start the paper piecing so that it matched up with the colors in the center.

TIP:  Remember that the finished block is opposite to the front of the paper pattern.  My first attempt turned out backwards because I forgot that little tidbit and I had to do it over.

TIP:  For a center like mine sew three of the triangles together, then the other three.  The stitching lines all end at the same spot of each point.  Press the seams all one direction.  Now, place the two sets of triangles right sides together to sew the center seam.  Put a pin straight up through the centers to align the pieces so the stitches converge at one spot.  GLUE the seam together with Elmer's School Glue, press and check.  If it doesn't line up with a perfect center you can pull the glued edges apart easily and reposition.  Sew when it looks perfect.  Press the seam the same direction as the others, then open the little center rosette and press so all those seam ends in the center lay flat.

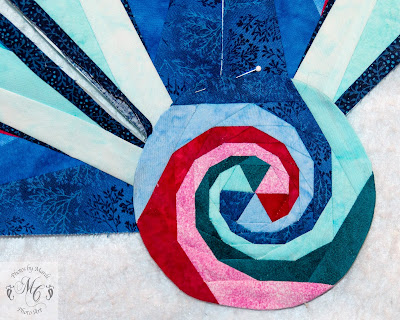
The beauty of my little, center spiral is that it is round.  You don't even notice any discord with the fact that it is basically a hexagon sitting on a quilt that is divisible by four.  I will hand appliqué it in place when the quilt is all sewn together, and cut away all the center spaghetti from beneath it.  So happy.


Four-inch circular hexi-spiral pinned to pieces of the quilt on my design wall.

Sew a happy seam this week.  Try drawing a spinning spiral.


Monday, August 8, 2016

Spiralling Fussiness

I designed my new quilt on Adobe Illustrator and then used the computer to stretch the drawing a bit here and there.  My previous spirals have mostly been mandalas, or circles.  Check the Gallery.  This one will be new, fresh and different.  It is almost a little modern, but since I love curves and curlicues I will do a bunch of those when I quilt, so not so modern after all.

The first spiral is long and skinny so the paper patterns have to be taped together as they can't be printed on 8.5 x 11 inch Sulky Paper Solvy.  I thought surgical paper tape was the perfect answer, but my old tape globbed up the presser foot.  I bought a new roll, but sadly discovered that it does the same thing.  Maybe it would work if I put it on the back of the paper, but I gave up and went back to plain old scotch tape.  I have had no problems since.  I sure wasted a lot of time on that idea!!

TIP:  Go ahead and try your ideas.  Sometimes they work, but sometimes they don't.  Oh well, the world continues to turn either way.

Pattern printed in three pieces shown cut apart.

Taped-together spiral pattern with fabric sewn to it.

I chose to use solid colors with the support of two of my biggest fans.  I bought all the Kona solids that I would need, sat down and started sewing.  Unfortunately, the result was so flat and uninteresting and the gradations left something to be desired (my bad).  At that point I lost my momentum.  This can happen when you design your own quilts, as I do.  None of the complications have been addressed and solved by others.  After a day or two I went to my fabric stash and pulled a bunch of prints that would give me the gradations I needed in three colors.  I will use 3 or 4 of the solid fabrics as well.  My tester sample looks so nice, warm, friendly and vibrant compared to the one with solids only.  Now I am excited to work on it again.

Patterned fabric on left; solid fabric on right
(piecing incomplete - one more ring to be added)
TIP:  If you lose your momentum it may be because you are not happy with the results.  Give it a little time, and think about what else you might do to recover the excitement.  Something inside will tell you when it is right.  Even when discouraging things happen, I still turn back to sewing.  It truly is my therapy.

It has been awhile since I have done a spiral and I was immediately reminded of how important it is to get the points right.  That means sharp, smooth and in exactly the right place.  If they don't hit exactly right it is well worth your time to redo them immediately.  Later on you won't be able to get in there to do a fix.

Circle denote places where points are critical.

Good points!!  They are each nestled perfectly into the corner.
Why did your point miss the mark?
  • The previous fabric was not pressed tightly back at the seam, which left a tiny pleat over the stitching.
  • Your stitching got away from the sewing line on the pattern.
  • The fabric had a wrinkle that you didn't catch.
  • God's finger got in the way!
Usually the problem is easily fixed.  Take out the stitching carefully trying not to tear the paper for about an inch over the offending point.  Using tweezers pull the point fabric in line and glue it.  Make sure it makes a straight line.  If it wants to curve, tear out a few more stitches of the point fabric as well as the covering fabric and try again.  Lay the covering fabric over the point, check it, glue it, stitch it.

TIP:  Use Elmer's School glue, which is harmless, doesn't show when dry, and washes completely out.

If the problem is a poorly pressed seam you might have to take out more of the stitching so you can re-press the offending part of the seam and try again.  You have to work very carefully to keep the paper intact, but if it tears, just tape it together with scotch tape - carefully.

Sew a happy seam this week.  I wish you perfect points.

Bagged the Bag

My first attempt at a picnic bag was a fail.  You saw the pictures last week.  I kept revising the design.  I clipped where I shouldn't ...