TIP: Starching is optional, but I find it helps control the fabric.
Satin stitch is simply a zig zag stitch squashed tightly together to form a solid, edge around the appliqué. This takes the right machine and some practice to get it even and uniform. I haven't gotten there. I haven't practiced. Someday I will learn to do it nicely, but right now it clings to the bottom of the bucket list. Below is the anatomy of a satin stitch.
Finally, your choice of stabilizer is affixed to the back of the background fabric. I use safety pins.
 |
| Satin stitch with no stabilizer |
 |
| Satin stitch on cotton with two layers of stabilizer |
TIP: Using the same fabric and materials as in your quilt start stitching, adjusting tension, stitch length and width until you are satisfied with the result. It is difficult to rip out this kind of stitching and it is hard on your fabric and your mental stability to do so. Mark this tester scrap with your final choice of settings and put it on your design wall where it won't get lost or land in the wastebasket.
The fabric preparation for blanket or buttonhole stitch is the same as for satin stitch, including the practice sample...especially the practice sample. The stitching runs along the edge of the fabric, tossing out a sideways stitch or two regularly as in the example below.
 |
| Blanket Stitch |
TIP: If you are using a fabric with some small tendency to fray you can treat the edges with Fray Block. The tube has a fine tip, but this product is very juicy so I apply it with a toothpick to the very edges of the appliqué after fusing it to the background. It is a form of plastic so I want it only on the edges. It seems to work well and is invisible. I also check for any fray threads as I stitch and either pull them out or snip them. This is fussy stuff, but if you plan to show a quilt the judges will notice unattractive fuzz.
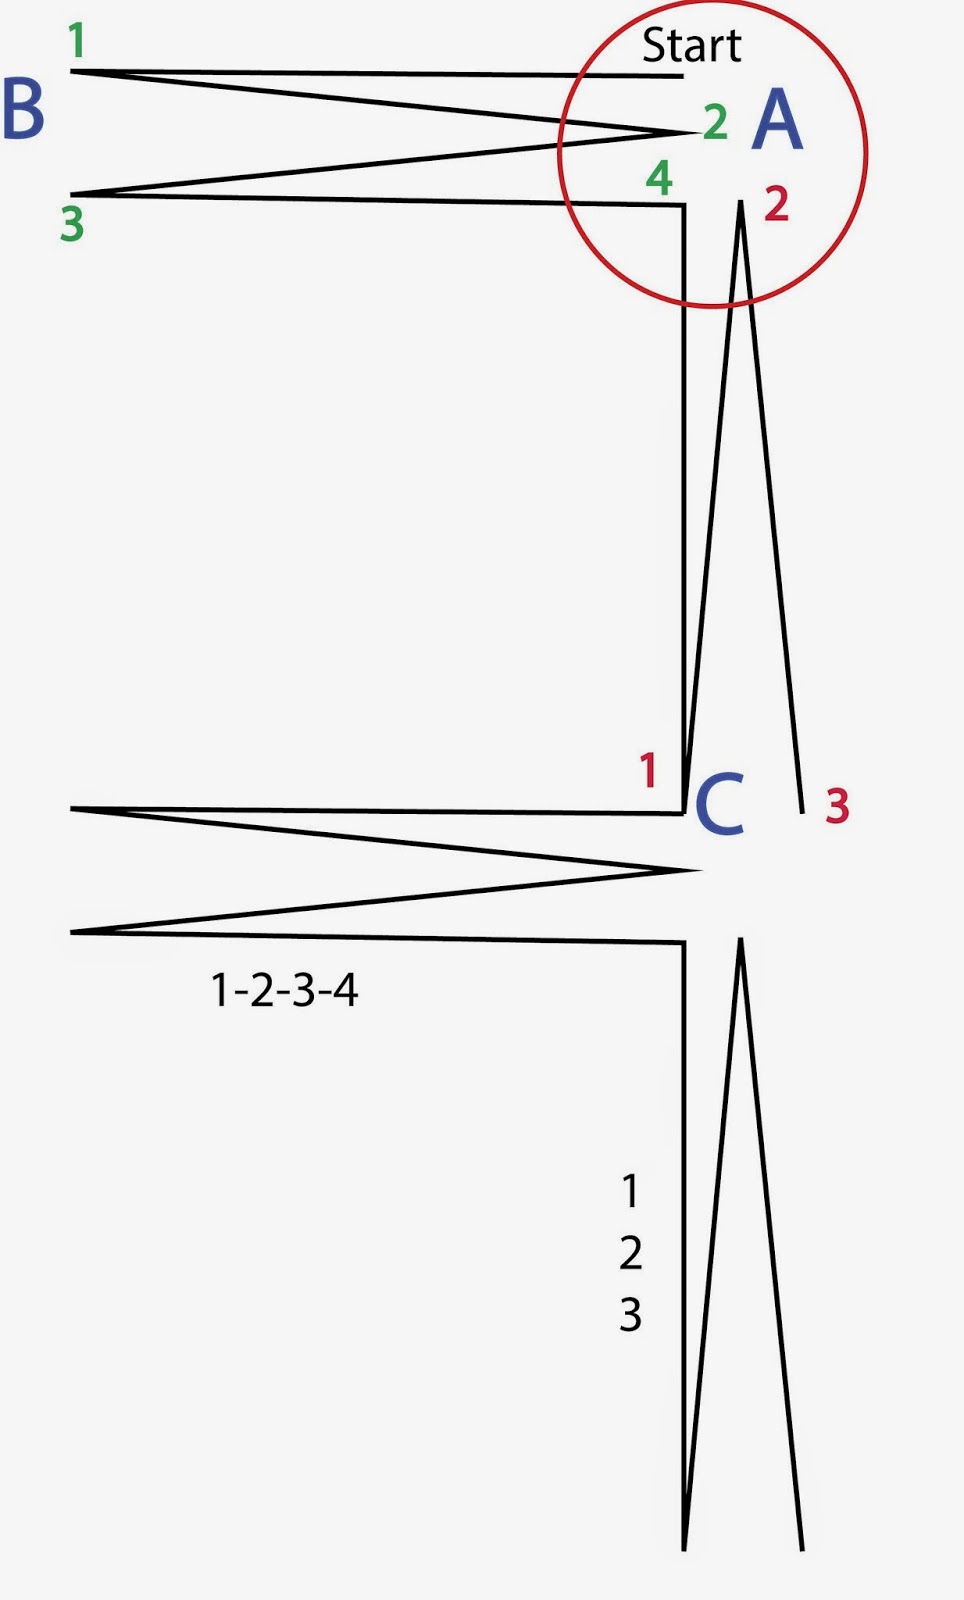
The machines I have used and heard about take several stitches in place sideways and then several stitches forward and backward. Machines differ in the specifics of their blanket stitch, but below is the anatomy of the blanket stitch on my Viking Sapphire.
I start with about 5 tiny straight stitches to lock the thread. Then the needle goes in at A, left to B(1), right to A(2), left to B(3) and right again to A(4). Next it goes forward from A to C (1), back to A(2), forward to C(3). You can name or number these steps any way you choose, but you need to establish a rhythm, and it helps to name each step. When you get to points or corners you need to know where you are in the sequence. BTW, the needle goes into the same hole every time you come back to A, B or C (I opened it up in the diagram so you could see the steps). Points A and C are right at the edge of the appliqué and should form an attractive, smooth finish. There is a lot of stopping and turning as you negotiate curves and points so this is a perfect place to use the needle-down function if your machine has one. The A to B stitches must be perpendicular to the edge of the appliqué.
TIP: Slow your stitch speed to low if you can. As you learn to do this stitch on appliqué I suggest that you turn off the tv, turn off the audio book, turn off the music, and turn off the kids. You need to concentrate until you understand the rhythm of your stitch. Why not music? Music is all about rhythm, but it rarely, if ever, syncs with your sewing machine stitch, leaving you all mixed up crazy. Say the names of the steps out loud with your variation of names and needle sequence: 1,2,3,4-1,2,3. You have just created new music with the needle as your drum!
Finish with 5 tiny, locking stitches, which can be buried nicely in previous stitching. Pull the threads to the back and cut, leaving a 1/2 inch tail.
TIP: If the thread tails might show through the fabric to the front, pull them through some stitches on the back before cutting.
The points and corners will take some maneuvering. Slow down. You may need to shorten the width of the sideways stitch sometimes, and you may need to lengthen or shorten the lengthwise stitch even to 0 on occasion. So much depends on your machine so remember the old mantra: practice, practice, practice. This is where you need to remember where you are in the stitching sequence or you will find the needle flying off in the wrong direction. Ask me again how I know!! My seam ripper has a long and varied history.
TIP: Save time and reduce pilot error. Once you have your settings established, and if you can do this on your machine, program your stitches so you can select them automatically. The appliqué I am working on now has two different width settings depending on what part I am working on so those are each programmed separately. The third stitch I program is the tiny straight, locking stitch because it needs to be offset to the right to match the start of the blanket stitch (A).
When you get the hang of this you can turn on your choice of noise. However, I suggest you send the kids outside to play in a safe place or put them down for naps.


