Monday, March 26, 2018

Inspiration Needed!

Oh my.  Here is Monday again and I have no post and no inspiration except that my walk this morning was so lovely:  clouds, fog, blue sky and sunshine intermingling and frisking around the mountains.

I finished my SID (stitch in ditch).  I thought it would take forever, but it didn't and now it is done.

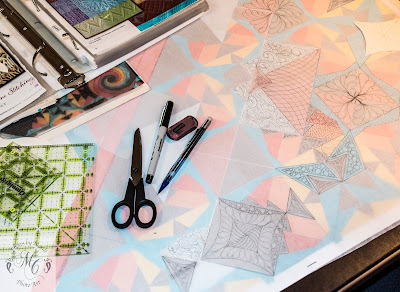
I tried something new this time by designing my quilting on a 15 x 15 inch version of my quilt from the computer.  I drew what I thought was a really nice design.  However, when I compared the drawing to the full sized quilt it was clear that my designs were no good on the larger format.  Back to the drawing board, literally.

The drawing table.  Designs still subject to lots of changes.
I printed out one quarter of the quilt full sized.  This took quite a few pieces of paper and the time to tape them together.  I stapled tracing paper over the top and sat down with audiobook, pencil, eraser and a few ideas.  When you get one idea going, others begin to flow.  I find it relaxing to draw.  Another day or two and I will be ready to actually stitch.  I have tried out a few ideas with needle and scraps and so far they are satisfying.  I don't think the quilting will get tedious because I will be doing lots of different things.

This is all part of sewing a quilt.  I drag it out.  I don't do deadlines so what is the hurry?

Sew some happy seams this week.  I wish you time to play, reflect and create.


PS.  A photo from this week's lower elevation hike.


Sunday, March 18, 2018

Why Stitch in the Ditch?

Why stitch in the ditch (SID)?  Well, you don't HAVE to, so let's review the choices that impact the decision.

Have you ever noticed what a tied quilt looks like?  Big, fluffy bunches between ties.  Same thing happens when a sandwich is pinned with safety pins.  This is not bad or good.  It just is.  It looks like this photo of the ice from my hike last week:

The ice on Dream Lake.  The wind blows it as it freezes,
but we still hiked across the lake on the ice.
The question is:  Are your seams going to bubble up this way?  Do you like the piecing seams to behave this way?  They will if you are quilting designs into areas defined by the seams.  On the other hand, an all-over design will cross seams in an irregular way and keep them from bunching and creating unsightly ridges.

So...why bother?
Stabilization.  Basting will stabilize your quilt.  I hate basting, but I do pin.  I SID to stabilize the quilt before doing the fancy quilting.  The pins can all be removed and there is no worry about the quilt going wonky when you are concentrating on the decorative free motion quilting (FMQ).  Once the quilt is stabilized you can work anywhere you want without distortion.  I stitch with Superior MonoPoly thread (clear or smoky) for SID.  This can be a great way to learn to control your FMQ technique.  You can also use any thread of a color that disappears into your fabrics.  For straight lines and borders I use my duel feed foot, and it is awsome. It gobbles up excess fabric and smooths it all into the puff.

No bubbly seams, tucks or puckers.  I have 28 pieces in each block of my quilt and they will mostly be quilted with enclosed designs.  I do not want seam ridges so I am SID-ing in every single seam.  Time consuming, yes, but WOW does it ever make it look nice.  My quilt would look fine with only the SID, but since I like the fancy stuff I know I won't have to worry about the antics of recalcitrant seams or tucks or puckers.

Before:  Rumpledy, bumpledy before SID


After:  All seams stitched down.
Straight borders.  Borders look best when they are nice and straight.  Show judges will nail you for crooked borders every time.  SID will set the borders nice and straight from the get-go whether you quilt on them or not.

You want to show your quilt.  Take careful note of all of the above because the judges will be looking for straight seams and borders, smooth curves, no crumples and perfection in the hanging.  This is impacted by blocking after all is done, but you can't block out internal wiggles after they are set in stone....errr thread.  They will notice the track of your SID especially any stitches that stray from the ditch, so if you choose to do it, learn and practice to do it well.  There are many online tutorials so I am not going into the "how to."

Don't bother:
If your quilt will be a "dragger" to be loved and washed repeatedly.  It won't matter.  The exception would be if you choose to do all the quilting SID and don't want to mess with the fancy stuff.

If you are going to quilt an all-over design that tramples and ignores seams.  In this case the seams generally disappear into the quilting motifs.

If you don't show your quilts.

If you don't care....and that is OK.  It is your quilt.  Do what suits your style, your time, your passion.

Sew some happy seams this week.  I wish you time to practice some stitching-in-the-ditch.
PS.  Last week's hike:
Hallet and Flattop peaks from Dream Lake.  Rocky Mountain NP.


Monday, March 12, 2018

Pinning the Sandwich

Last week I wrote about how I will mark the black border on my quilt.  Seredipitously (is that a word?) Jenny Lyons of Quilt Skipper wrote her blog last week on marking black fabric.  She did a lot of research on numerous markers and her discoveries are well worth reading.  Guess what:  her choice is the Sewline pencil...same as mine!  Always nice to be validated.

I have spent the last couple of weeks doing just about everything except sewing although I got my quilt sandwiched and pinned.  I have a long, narrow table (22" x 60") fitted up as an ironing surface, but when it comes to putting my sandwich together I take all the cushy covering stuff off and work right on the plywood so I don't pin the ironing cover into my quilt.  How do I pin a quilt on such a narrow surface?  It is not hard.

1.  I carefully mark the center of my table with two pins covered by masking tape so I can feel them through the fabric.  That way backing, batting and quilt top are all in the right place in the center.  


Pins secured to mark center and touch sensitive.
TIP:  Batting and backing should be at least 2 inches bigger than the quilt top on all sides.

2.  Use office clips to secure the backing to the table centering it over the pins.  Align the ends exactly parallel with the table ends and perpendicular with the long edges of the table.  I also have pencil marks on the plywood as guides.  Secure the backing fabric snug and smooth, but don't stretch it tight.  If necessary use painter's tape to secure places where you can't use clamps (the end of my table).

Office clamp in place.
3.  Add the batting.  Center it over the pins and make sure the edges are straight.  Pat it out gently to eliminate all the bumps.  DO NOT STRETCH.

4.  Follow the same procedure in placing the quilt top.  Be sure it is centered, straight and does not overlap the edges of backing and batting.  Smooth it.

5.  Now the fun begins!  Starting at the center place safety pins 2-4 inches apart, working out toward both sides, top and bottom.

6.  Now the tricky part.  When you have covered all you can with pins, fold the top and batting toward you as far as the pins allow.  Undo all the office clamps, front and back.  Now carefully slide the whole thing toward you the width of the table and once again clamp the backing to the back of the table.  Unfold the batting and pat it down.  Everything nice and smooth.  Gently lay the quilt top over the batting.  No need to clamp the forward part of the quilt because the pins add enough weight to maintain adequate tension on the backing.

7.  Pin your heart out and repeat if necessary.  When half of the quilt is pinned let it drop off the back of the table.  Smooth and clamp the backing to the front of the table, pat the batting and quilt top down and pin.

All pinned (clamps are for the photo only to keep it from slipping
now that the job is all done).  Light spots are sun from the window above.
When I am done I toss the pinned quilt upside down on my bed to make sure I have no puckers in the backing.  I have never had any.  The only downside is having to take the ironing cover and padding off and replacing it, but what a great opportunity to wash it if necessary.

8.  The final step is to fold the excess batting and backing over the quilt top edges, enclosing the batting within the backing fabric.  Pin it down.  This keeps the batting from leaking fibers all over the quilt. See the fibers on the black fabric above?  It can be a mess.  I use a lint roller constantly as I quilt.


An aside:  Clearly, I use pins.  I do not like the adhesives or fusible because I don't trust them.  I wrestle my quilt all over the place when I quilt on my domestic machine and dread the horror of anything that might not hold together. I also secure all the seams with stitching in the ditch with invisible thread.  All the pins, except the edge come out when that is done so the quilt isn't so heavy and the fancy quilting is much easier.

Sew some happy seams this week.  Remember, you don't have to crawl all over the floor to pin a quilt sandwich (unless you want to).


Sunday, March 4, 2018

Dead Space

Some weeks it seems that nothing gets done.  We pulled out some boxes, unpacked them, photographed everything, put the photos into a pdf and sent it off to our daughters to find out who wanted what.  The house is a stack of boxes and packing paper. The floors need attention, but I made my high fiber, sourdough bread and the bathroom is clean. What more can a girl ask?

Sewing machine went to the shop, down the canyon almost an hour away.  Next day DH picked it up and nothing had been wrong with it...so my repairman says.  The "broken" button is working OK now, so I just feel foolish, but that button didn't work when I took it in!!!!

Finished quilting the dog, but not completely happy.  Learning.

Measured my quilt top.  All measurements varied, but the average for both directions was exactly the same.  That's what happens when there are so many pieces.  I'll have to be careful to keep my quilting even.  It is ready to sandwich.  Yay!

I topped the week off with a hike.  Add that to the 1/2 mile dog walk and I clocked 4 miles that day.  Really stiff the next day, but it is getting better.  We had a bluebird day, some snow and ice on the trail, but a magnificent time outdoors with my sister.

Gem Lake iced over.  Lenticular clouds that I wanted to pet.
Partial view from the trail.  This is where I live!
Not much sewing, but there are some weeks like that, and my brain has been busy.  My ancestry takes me back into the nobility of England, Europe, Scandinavia and Russia.  My great grandfather from England had a coat of arms (COA) of which he was most proud.  I became interested in the art of heraldry from seeing a bookplate of his COA, and found that I could create one that incorporated many appropriate families from my ancestry.  There are strict rules as to which families you can display.  Anyhow, you can see my digital rendition on my other, lazy, blog with a brief explanation.  I think it would be fun to make a quilt of this.  Each block would be 6-7 inches square.  I will appliqué, paint, stencil and piece.  I don't know whether this is do-able or not, but I'll have fun dreaming, planning and trying it out.  It will probably be a lifetime piece.

Sew some happy seams this week.  Give yourself permission to get outdoors, play, dream and create.


Bagged the Bag

My first attempt at a picnic bag was a fail.  You saw the pictures last week.  I kept revising the design.  I clipped where I shouldn't ...