How does it happen? It begins with the laying out of the backing when preparing the sandwich. The backing is laid down first and must be secured snuggly. Not too loose. Not too tight. Just right. If you work on a carpet you can pin the edges down. I work on my uncovered ironing board, on plywood. I tape the edges with blue painter's tape. It works like a charm...mostly.
I don't know how I blew it this time, but fortunately it was a very tiny pleat about 1 mm deep. It was the result of a little too much backing fabric in that area. When I stitched in the ditch it got doubled over and pulled some other bias-wise wrinkles in as well although they didn't pleat. I was lucky it happened along the straight line of a border strip. I hadn't done any fancy quilting there yet.
My fix required un-stitching about 3-4 inches along two seams, tying off the threads and straightening the fabric. Then I carefully pinned the fabric in place, attached the duel feed foot, changed the thread and replaced the ditch stitching.
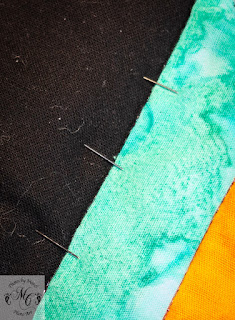
Specifically, I held the sandwich together, easing out the backing fabric with my fingers. Then I pinned the sandwich together from the back with 1/2 inch of pin showing on the front across the seam. They were about 3/4 inch apart.
 |
| Pins in the back smoothed the backing |
 |
| Pins as seen on the front of the quilt |
WARNING: Never sew over pins. You can throw your machine out of timing and cause a great deal of expensive damage as well. I could have basted with needle and thread, but I didn't. Instead I used extreme care and was using the dual feed foot. I did not attempt this with FMQ. That would have spelled disaster and would have looked a mess (at least for me).
Success! The pleat is gone although there was a fair amount of puffiness in the area that looked more like easing than anything else. The affected border was quilted with piano keys and the stitching took up a lot of fabric. It looks perfect after all is done, and I don't anticipate any more problems, but I will be watching.
 |
| The piano keys ate up all excess fabric with no pleating |


So can you fix the "pleats" on my face like this?? LOL Great job of getting that pleat out. I hate pinning and quilting with my DSM...that's probably why I bought a longarm 8 months after piecing my first quilt! Now, are you sure you don't have a similar solution for my pleated face?
ReplyDeleteBelieve me, If I had a solution for facial pleats I would happily share it!! Got the same problem.
ReplyDeleteI had a pleat in the back of a quilt once that I didn't find until the entire quilt was finished. It was a pain to fix. I'm glad you found yours before there was too much stitching to unpick!
ReplyDeleteI agree. I was very lucky. It was a pain to fix, but really didn't take too long and was successful. That's the most important!
DeleteYou are lucky it was a relatively easy fix. I recently had the same thing happen and I had to take out all of the stitching. It was only about a third of the way quilted. But still a PITA. The quilt is still in time out.
ReplyDeleteYes, I was lucky. These things happen sometimes no matter how careful you think you are. Hang in there. I am sure your quilt is worth finishing. Mine is in time out too but that is because I am temporarily under the influence of a virus. I think I would rather have a pleat...well maybe!
Delete