Tuesday, May 30, 2017

This 'n That


My brain is working on other things this week.  I am varnishing trays that my mother painted 50 years ago.  With usage over the years there has been some damage to the finish.  The only place I can varnish is my sewing room because I can keep it somewhat free of dust and dog hair by closing the door.  Meanwhile my thread painted portrait languishes because varnish, mineral spirits, brushes and paint have taken over its space.
What a mess!
This is a great time to take the sewing machine to my service person for its annual cleaning and adjusting.  I highly recommend that you do the same.  I sew 2-3 hours most days and it is ready for its check-up every May.  You get the best results when you take good care of your machine.  Just like a car.

Remember my post on folding fabric?  Well it looks great, but when I went to add a couple more fabrics I found it difficult to manage the long, folded pieces (about 10" x 6").  It is just hard to maintain the fold on both ends while squashing the rest of pieces in the drawer to make room for the new.  The most efficient way to do it is to remove the drawer, set it on its side, add the new fabric and replace the drawer.  Nuisance.

Long fold turned out to be inefficient.
Solution:  Fold each long piece of fabric in half.  This makes a smaller, fatter package individually, but doesn't take up any more space.  Much easier to manage.  I can go through a drawer and make the extra fold on all the fabrics in about 5 minutes.  When there is significant yardage it is hard to make this fold so I just leave it long.  It is thick enough to manage easily.

Much easier to manage.
I'll just do a drawer each time I go to my fabric storage shed.


Sew some happy seams this week.   I wish you a modicum of efficiency.


Sunday, May 21, 2017

Spring Sprung a Snowstorm

We were hammered last week as the sky darkened and snow fell for almost 36 hours.  I have never seen so much snow.  Our fence was buried and we had snow sculptures on everything sitting in the yard.  BBQ sculptures.  Birdhouse sculptures.  Bird feeder sculptures.

BBQ Sculpture
The trees were gorgeous with laden branches and pristine snow around them.  Dixie quickly took care of that as she dashed around enjoying being a "snow-dog."  The downside was loss of the Internet and since our phone is Vonage, an internet connection, we were incommunicado.  How dependent we are on the Internet.  It is wonderful, but also a chain.  What do you do when you don't have the Web?   Sew!  That worked until I ran out of thread and there was no way I was going down the winding, slippery, mountain road to get a spool of thread.  I wasn't even going into our little town, which is only one mile away.

The African violets know it is Spring, but someone forgot to tell the weatherman.
I took pictures.  I shoveled snow.  I dug a path to my sewing storage shed and hauled in some more fabric to fold.  I made bread.  I straightened out some of the messes on my computer.  I watered my new airplants.  Truly, if you get creative, you can find plenty to do and still enjoy the snow.  It is so beautiful.  I do worry about the little swallows and nuthatches that have nested in our big birdhouse, but is hasn't been very cold, only enough to turn a lot of rain into snow.  Now the sun is out and I am sure it will melt away quite fast...unless more is on the way.

Deck Sculpture
I read an article in the latest "Discover" magazine about how our brains need solitude, meaning time without analytical, technical thinking.  Some call it "flow," others call it daydreaming, and I call it free motion thinking.  I do this most mornings as I lie in bed waking up.  I don't have to get up until I want to, but am usually out of bed by 6:30.  My mind wanders around when I am walking the dog or shoveling snow.  I do it when I don't have the Internet.  It is a time for letting your thoughts go where they want to, even to bizarre places, but it is a time when creative ideas seed the other part of thinking, which is the part that puts the pieces together.  It is important to use both kinds of brain work to stay balanced.  Your brain needs go off to strange places sometimes.  You are not being lazy, you are maintaining mental health and fostering creativity.

Birdhouse
 Sew a happy seam this week.  I give you permission to relax and do some free motion thinking.

A little bit of whimsy.
(Ancient birdhouse on driftwood with white, snow hat
)

Tuesday, May 16, 2017

Spring Has Sprung

I sit down to write about quilting, but must admit that I haven't sewed a stitch this week.  We have had our first bout of nice weather and just had to get out in the yard.  We emptied all the rocks out of our faux pond and cleaned them off.  Next we will lay down landscape cloth and put the rocks back.  It will be so nice to see the pond without weeds.  We have occasional heavy rains here in the mountains so we designed the pond as a catch basin to slow the water down and reduce erosion.  Normally it is fake with no water in it.  While DH does the rocks, I dig dandelions.

As the yard improved the sewing room disintegrated.  Now I have to go in and straighten things out to get ready to sew again, but I can carry on for blog purposes with the next steps of creating my thread painted portrait.

I now have three copies of the design (scroll down to last week's blog to catch up).  The copy on mylar I leave on the foam core board, and set it up for viewing and checking as I progress.  I am going to cut out fabric pieces along the lines drawn on the paper patterns.  The beauty of this method is that you can see what the portrait looks like before you thread paint.  If a color is wrong, you can replace it with a different fabric before it is too late.

Copy #2.  The one that does not have the little red markings I place on my light table and cover it with a silicone pressing sheet.  Tape the paper pattern to the back of the pressing sheet or secure both paper and pressing sheet to the light table.  The point is to avoid slippage of either one while you work.

TIP:  I use a plexiglass sewing machine extender table as my light box.  The light is provided by an OTT light folded out flat.

TIP:  Set out another pressing sheet on your regular ironing surface for use with fusing, and for ironing freezer paper patterns to the fabric.  I even have a protective cover for my iron.  All this is to reduce the amount of errant fusible gumming up my equipment.

Protective cover on my iron.  Pressing sheet on the ironing board (left).
I also keep a little Clover iron hot for tiny pieces.
sub-TIP:  Keep the ironing space separate from the cutting space if you can (I didn't).  See below what happened to my extra pressing sheet.  Next time I will tape it to the ironing board (at least at the front) so the scissors can't slip underneath and slice it while I nonchalantly cut my fabric.

Oops!!
Copy #3 is going to be cut into pieces as patterns for cutting the fabric.  I cut only one piece at a time, starting with the lightest value.
**Roughly cut a piece of fusible (I like Soft Fuse) a little bigger than your pattern piece and fuse it to the wrong side of your chosen fabric.

**Then on your protected ironing surface, lightly press the paper pattern shiny side down to the right side of the fabric.  The fusible side sticks to the pressing cloth, but pulls right up leaving the fusible where it belongs - on the back of the fabric.

**Lift up the fabric and paper pattern as a unit and cut the fabric around the pattern.  The first pieces are those of lightest value.

**Any edges with red markings will need about 1/8 inch extra fabric, seam allowance so-to-speak, in order to slip under the next darker fabric.

**Proceed as described moving to darker and darker fabrics.

Once you have finished cutting your first piece, pull off the freezer paper pattern and stash it where you can find it.  I collect all my cut pattern pieces in a pie tin and set it aside where it won't get dumped.

Pattern pieces in case I need them again...and I did!
Place the fabric piece on the pressing sheet aligning it carefully into its special place as guided by the paper pattern guide underneath.  Lightly touch it with the iron in a couple of places so it adheres to the pressing sheet.

TIP:  Be careful:  your light table surface is probably not designed to be an ironing surface.

Below see the start of the fabric part of the design.  It is on the pressing sheet, which is over the paper pattern, all of which is taped to the light table.

Getting started.
  I didn't like the grayish tone of the swirly fabric.  Lips are too pink.  I removed those offending fabrics and ran to the fabric store where I found a perfect white to brown ombre.  Glad I saved the pattern pieces and didn't have to make new ones.

Below is the finished fabric creation of my portrait.

Success!  Ready to thread paint.
Sew some happy seams this week.  I wish you good sewing and some time outdoors.

Monday, May 8, 2017

Redux

I have tried twice unsuccessfully to create a thread painted portrait.  The thread painting went great.  I find it easy and relaxing.  Color choice was the issue.  I took a class from Lea McComas awhile back and she suggested doing the portrait on fusible Pel-tex (or Tim-tex).  No quilting required except maybe the background.  I fused background fabric onto it,  printed my portrait on fabric and fused it down.  Everything was fine until I got to the shadow side of the face.  Way too dark.  By the time I knew I didn't like it, it was too late to take it out.  Thread painting is a bear to remove so I didn't even try.  I did the whole portrait twice and still didn't get it right.

TIP:  You've heard me say it before.  Let it sit and percolate.  So I did.

Lea McComas does her big, photo-realistic quilts by fusing fabric down onto four layers:  background, canvas, batting and backing.  As usual I am using her basic method with a difference.  Sometimes I don't follow directions well.  In order to avoid ruffling at the outer edge resulting from heavy stitching I am stitching the face on canvas.  I have made a separate background, which I will quilt.  Then I will cut out the finished, stitched portrait and stitch it to the quilted background.  I have done this before and have been pleased with the results.  That is the overview of my plan.

TIP:  You don't  have a design wall?  Try a flannel-backed tablecloth.  You can see mine with the bottom turned up in the photo below.  Why turned up?  Only because my sewing machine is right there and the fabric being stitched sometimes gloms onto the flannel and knocks the whole thing catty-wampus and then I have to crawl under the table to pick up fallen pieces.

Now to start.  There is a lot of prep work for a project like this so I will give you the short version of my method for a 12x 16 inch portrait.  If you want more in-depth instruction I recommend Lea McComas' book, "Thread Painted Portraits."

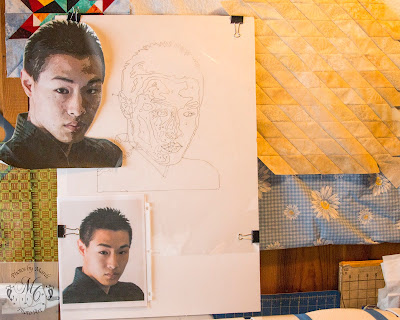
Photo, posterized full size photo, mylar drawing on foam core board;
unquilted background in the back to the right.
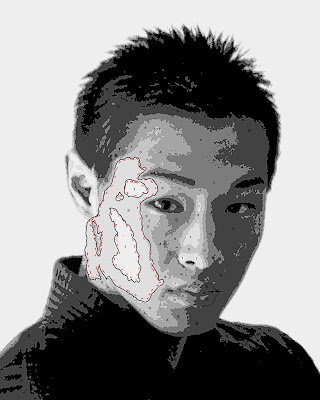
1.  Create a full-sized, black and white, posterized version of your portrait with 4-6 value divisions.

TIP:  If you want you can do your posterized version in color, but drop the opacity way down so the color doesn't distract you.  That is what I did in the above photo.

2.  Tape the posterized photo to a foam core board and cover with a sheet of mylar.  Using a black, fine tipped Sharpie draw around all the lines delineating the different values.  The pen lines can be erased with a little rubbling alcohol on a Q-tip so don't panic if you make a mistake.

TIP:  The fine tip Sharpie is the only one to use (so I am told) because the others don't erase with alcohol.  I had some that wouldn't come off from my last project and found that "Goo Gone" does the job too.

3. Trace the lines from the mylar to freezer paper.  You can see through easily to trace.  Give each value a number:  #1 = very light.......#5 or 6 = the darkest value, and write that number in the appropriate spaces on the freezer paper.  Make another freezer paper copy exactly the same.  (See - it is a lot of busy-work, but believe me it is worth it.)

4.  All the pattern pieces are now marked except the itty-bitty ones.  On one paper copy, starting with the lightest value, use a red pencil and make tiny arrows wherever that piece bumps up against a darker value.  This will be a guide to remind you where to add a little extra when cutting your fabric so it will go under the darker fabric.  Don't worry about the itty bitty pieces.  We'll deal with those later.

Pattern pieces defined and marked.
Shows the posterizing better.  I tried doing all the labeling
on the computer.  Forget it.  I went stark, raving mad!
Now you have two copies and the one on mylar.  You will find that you use them all.  That should do you for this week.  Check back next week to see how I use all those copies.

Sew a happy seam this week or do some drawing instead.

Monday, May 1, 2017

Apropos of Appraisal

I promised to write on the subject of quilt appraisal.  My daughter is a Certified Appraiser and sent me her brochure so I admit I am using much of her information as inspiration for this post.  With my first show entry I had my quilt appraised because it was going to be away from home in the hands of strangers and the post office. It is an interesting process and I now have all my show quilts appraised and those appraisals are registered with my insurance company.

Why?  If your quilt is damaged or stolen you will have documented proof of its value.  If you donate your quilt to a non-profit organization, or are gifting or selling it you need proof of its value for tax purposes.  An appraisal will also be needed for estate valuation.  "Insurance companies require a written appraisal done by a certified appraiser to document losses due to fire, flood, theft, damage, or loss." [Elli Molstad].  Most quilt shows also require documentation of your quilt's value.

Does it cost money?  Yes.  My daughter charges $45 in WI and my appraiser in CO charges $50.

What is the background of a certified appraiser?  They spend at least two years learning about and practicing with both new and old quilts.  They know fabrics, threads, history, current market value and are qualified to ascertain workmanship as well as many other factors.  Their knowledge is amazing.  They become certified after passing rigorous testing, both written and practical.

How do you prepare for an appraisal?  You must keep track of the hours you spent making your quilt (ripping and redoing don't count!).  You must keep track of the products you use and their cost.  Is the design original?  If not, by whom was it created?  Is your work done by hand or machine?  What methods have you employed (piecing, appliqué, painting, etc).    You also prepare a list of your quilt awards and sales.  I have a little notebook beside my machine for keeping track.  Below is the template that I prepare for my appraiser.  All this data is applied in the formulation of an opinion of the value of the quilt.

Template in Excel
Finally, make an appointment and enjoy the process.  Most shows have qualified appraisers on hand to evaluate your quilt(s).  It takes about 30 minutes to go over a quilt and do the documentation.  My appraiser has a little printer on hand so I can walk out with a 3-page documentation in hand.  Some appraisers mail you the paper after the fact.

The value is determined by replacement cost, but there is no guarantee that an insurance company will give you the appraised value, nor does it guarantee that you can sell it for that amount.  It does provide information for recovery or sale, and is proof that your quilt is not just a bedspread purchased from the nearest big box store.

The first quilt I had appraised is only 40 x 40 inches (below).  I was stunned in 2011 when the appraiser valued it at $2975.00.  I had no idea quilts could be so valuable.  Suddenly my husband began to take note of my quilting with far greater appreciation!

Reverie 40 x 40
So, now you have the scoop on appraising a quilt.  I urge you to consider your works of quilting art as candidates for an appraisal.

Sew some happy seams this week.  I wish you time to appraise the true value of your hard work.


Bagged the Bag

My first attempt at a picnic bag was a fail.  You saw the pictures last week.  I kept revising the design.  I clipped where I shouldn't ...