Saturday, February 15, 2014

Creativity and a Red and White Design

I am finishing the quilting on one quilt.  Another quilt needs to be blocked and bound.  A third one has been in the planning stages for 3-4 years, and I got started on it when I got stymied on the other two waiting for a couple of online orders to arrive.  You'd think all those UFOs would keep me busy enough, but the mind is a strange confusion of nerve connections and molecules, and they are always yelling at me, "What are you going to do next?"  I respond to my brain, "I don't know, but something will turn up, turn over, or arise from under the layers of my stash."  While one idea was formulating in the wings, I came across a Red and White Design Challenge tossed out by SewCalGal.  She is challenging her readers to create a new design and does not require that you make the quilt.  You can do that in Phase III if you choose to.  I am stimulated and inspired when the gauntlet is tossed onto my sewing floor.  I have to pick it up because my physical space is so limited.

The requirement is that the design be your own, but it must be red and white ONLY.  These are not really my colors, but I found the idea exciting and I have quite a few reds and white-on-whites in my stash.  You can use many shades of red and of white, but nothing else.  Below is what I came up with:
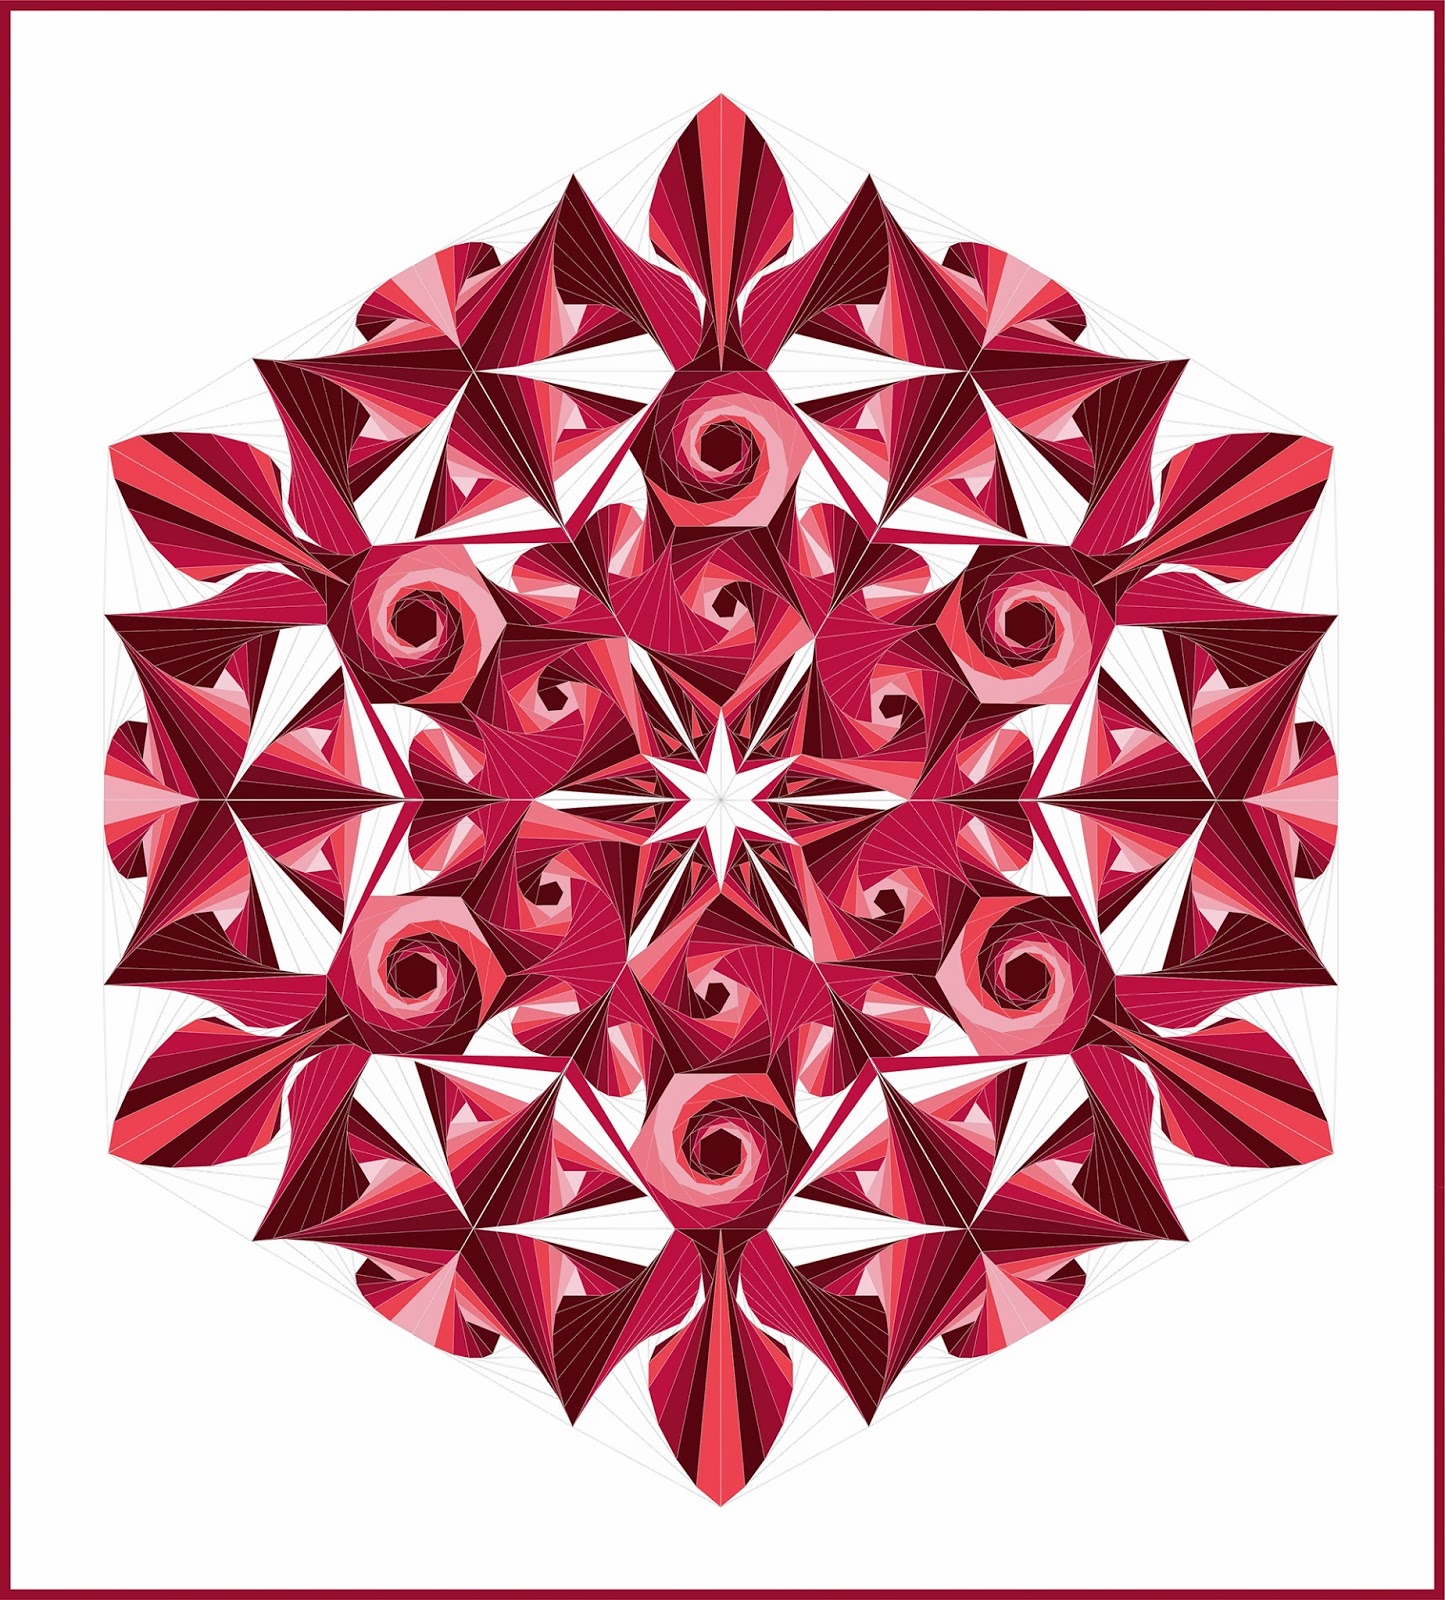
Red Galaxy
This quilt is all paper pieced using techniques for design and construction from "Simply Amazing Spiral Quilts" by RaNae Merrill.  I work on a Mac using Adobe Illustrator, which I like very much and because I think doing it with pencil and paper would be far more difficult.  I would have to own an eraser company.  I can also preview colors and fabrics on the computer, make changes quickly, and easily manipulate the design.

The finished quilt is 51 x 56.5 inches.  The Challenge rules also require that I post the amount of fabric needed so here it is:

Very dark red = 2 1/2 yards
Dark red = 1 1/2 yards
Scarlet red = 3 1/4 yards
Bright red = 1 1/4 yards
Dark pink = 1 1/4 yards
Light pink = 3/4 yard
Very light pink = 3/8 yard
White (can be various fabrics) = 2.5 yards
White for background (all same) = 1 3/4 yards

TIP:  Accept Challenges as they help you grow.  Try new colors as they expand your color perceptions.  Even when you don't win anything you learn new techniques, which you can use in other quilts.  You learn more about what you like to work on and what you are good at.  Sometimes you find out about things that you don't care about doing, and then you reevaluate and redirect your energy.


Friday, February 14, 2014

Fussy Necessity

I was finished with all my works in progress.  What to do.  I have to have a sewing project.  I love Jinny Beyer's unique patterns and use of color so I went to her website and found a free pattern called "Coraline."  (I see that it is no longer free.)  I had a beautiful border fabric, but it was a bit short of the amount required for the quilt.  I did a lot of fussy cutting, measuring, making one pattern piece into two, scratching my head and rethinking.  I managed to chop the fabric up enough to complete the quilt with very little left over.  This is the final result of my version of  "Coraline."  I have mixed emotions about it because I really didn't have my heart in it.  I just wanted a project. The best part was that most or maybe all of the fabric was teased out of my stash.


 This pattern allowed freedom to do some more formal and ambitious free motion quilting than I had done before.  Unfortunately my photo does not show what I did. I have decided that photographing the quilting is a must as I look back at my quilts and can't remember what I did.  I must get those quilts out of storage!  Still too much snow and ice!  It is also a testament to my lack of confidence in my free motion quilting.  I still hadn't discovered Leah Day but did have couple of  Hari Walner's books of patterns.  The thread choices were made to fade into the quilt:  white on white, blue on blue, etc.  That way my wiggly lines and uneven stitches would not be as noticeable.  Perfection is an admirable goal, but probably unrealistic for most of us.  Keep on plugging.  It only gets better if you practice.

Tuesday, February 11, 2014

Asian Window

I love Asian fabrics and designs.  I don't know what exactly attracts me, but I always stop in the Asian section of any quilt store I visit and I have made several quilts with an Asian theme.  I fell in love with every aspect of this fabric:  birds, colors, moon, volcano.  It just spoke to me and kept calling for awhile as it sat in the closet begging to be released.  I have also liked the look of the "Attic Window" pattern, but this fabric needed something bigger than traditional, little windows.  I sat down at the computer and drew out a perspective view of a series of windows on Adobe "Illustrator," my go-to design program.  Once the design was on the screen I printed out the various parts and pieces, which became the cutting patterns.  From there it was just a matter of cutting my beautiful fabric (oh how hard that was!) in a way that would showcase the design elements.  Did I succeed?

Birds through the Window
My Asian grandson walked into my sewing room and saw the pieces partially arranged on my design wall, and he said, "Wow, Grandma!  That is cool."  Ultimately I gave it to him as he loves all things Asian.

The window sills and frame were quilted in straight lines, close together with a walking foot, but I went all out in a new direction by quilting around the birds' feathers.  This was the first time I attempted anything so detailed and intricate and it was my first time with metallic thread.  Quilting around fabric designs is a fabulous way to learn to control machine quilting.  Somehow, you will know when you are ready for this.  The background behind the birds is quilted with long, flowing flame stitches that follow the lines of color.   The stitching on the volcano follows the path that lava might flow and the moon has some squiggly, curlies on it.


Sunday, February 9, 2014

Kaleidoscopes

I love intricate complexities.  I love doing kaleidoscopes.  I began the following quilt before the "Stack-n-Whack" craze started.  Enter that in your search engine and you will find lots of directions and at least one book.  I tried one once and was not successful.  My daughter has made several and they are beautiful.  Strange as it may seem, I am happy to work with a template and fussy cut each triangle like Paula Nadelstern directs in her "Kaleidoscopes and Quilts."


Many of the blocks of this quilt were created from the border print that surrounds the center.  I spent one whole weekend at quilt camp putting these together and never tired of it.  Each one turned out so cool although I liked some better than others.

I can't see how I quilted it and since my quilts are buried by more snow I can't get it out to look.  I think it is probably quilted in the ditch.  If I were to do this quilt today I would stitch a pretty design into the light blue border.  That would settle the puckering down.  Each kaleidoscope block would be perfect for interesting flowers, all different from each other.  I probably would have quilted around the motifs in the the border.  However, we have to start at the beginning to get better.

TIP:  How to fussy cut the kaleidoscope triangles:
1.  Cut a triangle template from clear template plastic, including the seam allowance.  The measurement of the triangle depends on your final shape.  A hexagon uses six 60º triangles.  An octagon uses eight 45º triangles.
2.  Move a hinged mirror around the fabric until you find a spot that makes a nice design.
3.  Lay the template over the chosen part of the fabric and make marks with pencil on the plastic so you can line up the template on the same part of another, same motif for the next triangle.  
4.  Line up the template on the fabric and mark around the edge with a fine marker.  Move it to another place on the fabric to the same motif and repeat as many times as necessary.
5.  Cut the triangles carefully on the marked line.
6.  Sew together carefully by hand or machine (that is another lesson).


Friday, February 7, 2014

Folded Flowers


Asian quilts attract me with their intricacies and unique techniques.  I found a pattern for this little quilt at Shibori Dragon, a quilt shop in the Seattle area.  I do not know to whom to attribute this pattern and can no longer find it in my files or on the Internet.  It was a fun project to take on a weekend, winter junket to Lake Wenatchee, WA, where I knew I would spend a lot of time indoors watching the unfolding beauty of an icy lake.  The flowers are made by folding fabric in ways that are similar to origami.


The background is made of square blocks pieced together.  The folded flowers are stitched onto he quilt by hand.  You can learn how to do make folded, fabric flowers in Rebecca Wat's book "Fantastic Fabric Folding."  I used antique buttons for the flower centers.

 The floating, green twigs are made with 1/8 inch silk ribbon.  I ran long, running stitches with ordinary thread and then wove the ribbon through the first stitch, then back the other direction through the second stitch, and so on, back and forth.  Finally, I turned the end under and blind stitched it down.  In the next photo you can see them more clearly.


Within the second border I did Sashiko embroidery.  It was fun to do a different design in each of the blocks.  You can use traditional designs found in Asian quilt books and magazines, on the Web, or make up your own.  The second photo shows a small bit of the sashiko.  Again, this quilt is in storage and I can't plow through the snow to pull it out for clearer photos.  

TIP:  Don't be afraid to try something new.  Quilting is an art that uses so many wonderful techniques.  Break out of your rut.  Try a new type of pattern or idea.  What you learn you will be able to use in future quilts.

If you can't figure out how to quilt your quilt, be sure to check out Leah Day's Free Motion Quilting Project.

Wednesday, February 5, 2014

A Class Quilt

Today's quilt is the result of a class taken by my daughter and myself many years ago.  Everyone in the class made the same quilt, but used different fabrics.  The main thing we learned was how to use freezer paper for appliqué.  We learned to secure the turned edges of the pieces to be appliquéd and then blind stitch them to the background.  The paper was then removed by making a slit in the background fabric.  I am not going to share the method we were taught in its entirety because it was very confusing and I generally don't use it.

The most interesting thing I learned was how to do Sashiko.  It is a type of decorative quilting sewn with relatively large running stitches and heavy, contrasting thread or yarn.  It is an Asian innovation to embroider the top fabric or to secure the top to the batting.  It does not go through the backing.


This is a very small quilt, only 12" x 12" and did not require extensive quilting.  At least we didn't do any!  Obviously this is one of my early quilts and I consider it a valuable learning experience.  The binding is horrible, but it was a start.  It takes time to learn to do a perfect binding.  Fodder for a future blog.  However, I will never look at this little effort of mine without remembering the fun it was to spend this time sharing quilting time with my daughter.

TIP:  Take classes.  I can guarantee that you will learn something no matter how little or how much experience you have had.

TIP:  Take time to share an activity with one or more family members.  It is very rewarding.

Monday, February 3, 2014

Little Crystal

If you are wondering why I am going back to my quilting beginnings I will give you two reasons.  One:  it is a good place to start my new blog.  Two:  I want you beginners to see that we all start at the bottom of the learning curve.  There is a lot to learn in quilting:  sewing, buying the right fabric, appraising values, organizing, measuring, putting it all together straight, quilting, and finishing it beautifully.  It takes time to learn the basics.  It takes time to achieve confidence.  Some of us have been sewing since childhood. Some have a natural talent for putting colors together.  Some have taken art classes, graphics classes, textile classes and more.  Others start from scratch.  The one thing we all have in common is that we like to sew and we like to create beautiful things.  That is my soap box for today.

Today's featured quilt is a little gem from a pattern called "Crystal" by Jinny Beyer, printed in "Quilts with Style" magazine in June 2004.  Using patterns is a great way to learn new techniques.  I had done some paper piecing, but this one was a challenging learning experience.  It is only 16 1/2" x 16 1/2" so the pieces are very small.  I don't think it could be done in any other way.  I discovered late in the process that one little piece was a tad bit too short and a tiny edge poked out, but it would be crazy to undo everything to get to it.  I left it as is because it was such a small imperfection and not really noticeable.  I was not into showing quilts yet and it will never be heavily used so it remains defective.  I will always know it is there, somewhere.  I am fussier now.


TIP:  When paper piecing be sure that the fabric covers the required area completely with seam allowance as necessary…as you go.

TIP:  Be sure to press the seam every time you stitch and press it all the way back away from the stitched join. I use Sulky Paper Solvy for the foundation, but if you have a lot of seams to press it gets scorched and brittle from the iron.  I now use the Hera Marker to do "finger pressing."  I find I do a better job of getting the fabric tightly pressed and I don't burn the paper or my fingers.  A toothbrush back also works.

This little quilt is quilted with the simplest looking, but a difficult type of quilting:  stitch-in-the-ditch.  It is good for a beginner to learn because while the foot helps maintain control, the eye must develop the ability to make sure the needle goes down in the right place.  Poorly done, it will show, but not nicely.  Well done, it will be invisible.

Bagged the Bag

My first attempt at a picnic bag was a fail.  You saw the pictures last week.  I kept revising the design.  I clipped where I shouldn't ...
