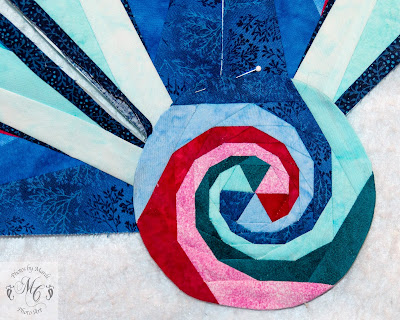
I was working along on my quilt wondering what to do with the center where I have 8 points with a seam down the center of each converging at the same stitch. I suppose this might be sewn into a perfect intersection, but I am not even going to try. If it is not perfect, it has to be redone, repeat, repeat... ad infinitum. Eventually you have spent too much time and become frustrated and discouraged. To top it off those bias or partial bias points have become stretched and frayed. Now it is really impossible. My solution is to put something pretty in the center. My present quilt does not lend itself to a star or floral solution so maybe something more geometric. Brilliant solution: I will make a spiral spiral!!
I love Illustrator as I can try out my ideas in detail and even put them on the virtual quilt. First I tried a hexagon. I liked it so I sewed it and it was OK for a couple of days on the design wall, but then it began to bother me that I was trying to fit a hexagon on a square quilt that has all the design elements in multiples of four. Poor design choice. Back to the computer.
 |
| Hexagon |
 |
| Octagon |
The outer ring ends up as narrow, dome shapes instead of triangles. The rest of the rings are made of triangles whose long dimension stretches from the center of one side of the hexagon to the center of the next side. Each ring repeats the pattern until the triangles get too small. There is still the center to deal with, but it is proportionately smaller. I simply divided it into six 60º triangles.
 |
| Diagram of hexagon in a circle. |
Once you get the triangle diagram drawn, it is just a matter of coloring the triangles so they make a spiral that spins:
 |
| How color makes the spiral spin. |
Now, there is still the center to deal with and it is the first thing you must resolve. Although you draw the pattern from the outside to inside, you sew from the center out. You can choose a single piece of fabric or get fancier. I made the center of 60º triangles carefully stitched to a single point - not paper pieced. This is simple with only 6 points to deal with, and I found it easy to start the paper piecing so that it matched up with the colors in the center.
TIP: Remember that the finished block is opposite to the front of the paper pattern. My first attempt turned out backwards because I forgot that little tidbit and I had to do it over.
TIP: For a center like mine sew three of the triangles together, then the other three. The stitching lines all end at the same spot of each point. Press the seams all one direction. Now, place the two sets of triangles right sides together to sew the center seam. Put a pin straight up through the centers to align the pieces so the stitches converge at one spot. GLUE the seam together with Elmer's School Glue, press and check. If it doesn't line up with a perfect center you can pull the glued edges apart easily and reposition. Sew when it looks perfect. Press the seam the same direction as the others, then open the little center rosette and press so all those seam ends in the center lay flat.
The beauty of my little, center spiral is that it is round. You don't even notice any discord with the fact that it is basically a hexagon sitting on a quilt that is divisible by four. I will hand appliqué it in place when the quilt is all sewn together, and cut away all the center spaghetti from beneath it. So happy.
Sew a happy seam this week. Try drawing a spinning spiral. |
| Four-inch circular hexi-spiral pinned to pieces of the quilt on my design wall. |


Well, this is way beyond my present skill level but it was an interesting read. I like the final spiral a LOT.
ReplyDeletexx, Carol
Very informative. You explained this technique very well. I feel like I could try it with some success! thanks
ReplyDeleteI hope you will try it. It is so gratifying to see the end result.
DeleteA very good solution for the center - I like it! Thanks for sharing on Midweek Makers
ReplyDeleteThe circle looks great. Nice solution!
ReplyDeleteExcellent tutorial. Makes me want to ditch my plans and try my hand at designing on EQ7. Quite the inspiration.
ReplyDelete