Monday, March 25, 2019

Cleaning up and Clearing Out

Cleaning up and clearing out!  We all need to do that now and then.  My sewing room turned into a disaster as I flung fabric bits all over during the construction of a pillow.  Not even a quilt...just a pillow!  It was pieced and quilted... as if that might be an excuse.  I will fly with with the pillow cover to where my granddaughter's shower is, buy the pillow form there and hand stitch the last seam.  No room in my suitcase for an 18 inch pillow.   I also made a stuffed puppy for my new great-grandson, which was left resting as I waited for Amazon to deliver the stuffing.  Now all is done.

"Puppy Dog Pete" designed by Pauline McArthur
(kit purchased from AQS)
I spent two hours sorting material ready to put some away.  The rest is tidied up ready for anticipated use in the near future.  There were also numerous spools and cones of thread to return to their respective boxes.

Now what?  Next I hemmed my dress for the wedding.  It is the weirdest material.  There is no hem...it is just cut off.  That makes it easy.  I will have to hem the lining however, but I can do that by machine.  The best part of the dress is that is doesn't wrinkle.  I bought it in CA and packed it into my suitcase very squished.  Not a wrinkle when I got home.

Originally I wrote this during great sewing weather.  We were hit by a major snow storm with over a foot of snow.  It was gorgeous.  Some places near us were pummeled with 90 mph wind, but for some reason we escaped that part of the storm.  I couldn't walk the dog when there was so much ice on the roads, but we had fun romping through the deep snow in the yard.

Our magnificent icicles.
I have finally returned to quilting my quilt.  Endless, but fun all at the same time.

Sew some happy seams this week.  I wish you time to enjoy the outdoors as well as time to sew.

Saturday, March 16, 2019

Walking Foot Quilting

I began quilting my star pillow cover with light colored thread and a fancy design.  Three hours of quilting and it looked awful.  Three more hours to pick it all out listening to a good audiobook.  OK.  Now what?  Clearly fancy, special quilting was not doing anything for the pillow cover.  Neither was the light colored thread.

TIP:  Sometimes fancy quilting is not the best way to quilt.

Fancy quilting is so beautiful on negative space.  It is stunning on a whole cloth quilt.  It doesn't work so well on fabrics with a busy design.

I threw my hands up and decided I didn't want to spend inordinate amounts of time on this project so I dug out my dual feed foot.  If you don't have one of those, a walking foot will do the same thing.  I have read that people do 1/4 inch lines with these feet, but on my foot the front tips curl up and I didn't think I would be able to gauge it right with my eyes since the tips are not flat on the fabric.  However, a red line runs down the foot 1/4 inch from the needle so I decided to give it a try.  Awesome!  It works.  My eyes adjusted to the spatial variation with no problem.  I didn't have to mark anything.

See how the tips curl up.  See the red guidelines.
I did yards and yards of straight-line, perfect quarter inch stitching, and do you know what?  It looks great.  It didn't even take very long. There is texture around the star, but it accentuates the star instead of fighting with it.   You don't want to fight with the stars!  (Scroll down to last week's post to see the whole block.)

Finished quilting
(pardon the fuzz - I was stuffing a puppy toy at photo time)

Sew some happy seams this week.  I wish you a trial with your special feet.  They can be fun.


Monday, March 11, 2019

Prepping and Planning

Back to sewing.  Life is still happening and getting in the way a bit, but I was able to spend time on the wedding shower pillow and I think it is going to fully cover the foam form.  For the back of the pillow I used mostly the same fabrics as the front to create a star, which I paper pieced.  It is always gratifying when all those pieces are nice and crisp and the seams go together well.  The seams can be problematic as they cannot be pressed in opposite directions to nest at the meeting place.

TIP:  [As you read this you must realize that I have cork board under my canvas ironing cover.]  I have two triangles that have been paper pieced.  I need to sew them together matching several seams.  Lay the triangles right side together and put a pin through all paper and fabric at the exact junction of the seam and the seam allowance line.  Carefully lift the top seam allowance and make sure that the seams align perfectly.  Then put a short line of glue in the seam allowance to hold the fabric in place.  Press. Sew.  Usually the seams line up without a problem.  If they don't I redo and sew the seam from the other direction.

Paper pattern with fabric sewn on to the reverse
(the other triangle is underneath so right sides are together)
I discovered in the process of making the triangles that the star didn't show up if I used the busy parts of the fabric next to it, and the yellow bands at the corners disappeared.

TIP:  Put a mirror next to the edges to get an idea of what it will look like when sewn to the next piece.
First edition.
There wasn't enough fabric to fussy cut so I cut the pieces so that the black areas mostly bordered the star and the yellow bands.  I also used a lighter color fabric for the outer layer of the star.  This made a nice contrast so those features now stand out.  The floral fabric retreated to the background.

Below is the completed star block with all seams stitched-in-the-ditch.


Sew some happy seams this week.  I wish you success in matching seams and happiness with the end product.

Sunday, February 17, 2019

Life Happens

Lots of unexpected things in my life lately, but not much sewing.

1.  I fell and broke my toe.  All healed now.

2.  I came down with shingles, but due to a vaccination several years ago it was mild.  The worst of it was the dragging lethargy and general malaise after the rash healed.  Too wussy to sew.

3.  My first great-grandchild was born four weeks early during the big Seattle snowstorm.  He was 6 lb 8 oz so all is good.  Can't wait to snuggle him.

His dad is responsible for the embedded caption!
4.  Though not unexpected, I went to CA for a week to shop with my daughter and grand-daughter for her (gr-dau's) wedding...and a little beach time.

*****************************

The above was scheduled to be automatically posted two weeks ago and never went out.  I probably forgot to click the "publish" button.  I am now home from California where I had a wonderful five days.  I got a beautiful dress, walked the beach, visited the venue where the wedding will take place, and had a great time with family.

5.  My computer went to the shop for more memory.  Withdrawal!  Wish my brain could get some more memory.

Having no computer to suck up my time I spent a lot of time sewing.  I made a stuffed dog for the baby (still have to purchase some stuffing).  I was also reminded of the reason that I usually don't make stuffed animals!  Some of the seams are incredibly challenging.

I made a block for my daughter's mother-in-law's birthday quilt.


I am also stitching a special pillow for granddaughter's wedding shower.  I know...same pattern.  I saw it on Pinterest with no attribution and created different sized versions.  It is a simple pattern, but the Flying Geese mean three points from each goose had to be watched to prevent them from being "chopped," so it required some careful planning.

TIP:  On the unpieced fabric that borders the geese I folded under a 1/4 inch seam allowance and starched it with a paint brush. Press.  This left a very sharp crease.  I put Elmer's Clear glue on the seam allowance of the Flying Geese and laid the folded edge of the unpieced fabric onto the seam allowance of the geese being careful to come to the exact point of each triangle.  Press.  Some of the glue catches the non-seam-allowance fabric of the unpieced fabric and you have to separate that so you can fold it back to see the crease line where you will stitch.


The second block is the pillow cover, which is much larger (18"x18") than the first block (fall motif), and I am quilting it.  The stitching really brings it alive.  The flowers puff and the birds look ready to fly.  The black background is completely flattened.  I haven't done the geese yet.

Of course my quilt is back in "hold" mode, folded up on the bed waiting for me to quilt the borders.  Sometimes life happens and takes control.  I hope 2019 will settle down now and let me drive for awhile.

Sew some happy seams this week.  I wish you only good things this week, unexpected or otherwise.

Sunday, February 3, 2019

Puzzling Pleats

I got a pleat in my backing.  I haven't done that in years.  The stitching in the ditch must take the blame, and it is just dumb luck that I discovered it before it was too late.

How does it happen?  It begins with the laying out of the backing when preparing the sandwich.  The backing is laid down first and must be secured snuggly.  Not too loose.  Not too tight.  Just right.  If you work on a carpet you can pin the edges down.  I work on my uncovered ironing board, on plywood.  I tape the edges with blue painter's tape.  It works like a charm...mostly.

I don't know how I blew it this time, but fortunately it was a very tiny pleat about 1 mm deep.  It was the result of a little too much backing fabric in that area.  When I stitched in the ditch it got doubled over and pulled some other bias-wise wrinkles in as well although they didn't pleat.  I was lucky it happened along the straight line of a border strip.  I hadn't done any fancy quilting there yet.

My fix required un-stitching about 3-4 inches along two seams, tying off the threads and straightening the fabric.  Then I carefully pinned the fabric in place, attached the duel feed foot, changed the thread and replaced the ditch stitching.

Specifically, I held the sandwich together, easing out the backing fabric with my fingers.  Then I pinned the sandwich together from the back with 1/2 inch of pin showing on the front across the seam. They were about 3/4 inch apart.

Pins in the back smoothed the backing

Pins as seen on the front of the quilt
I managed sewing this by doing something you must NEVER do. I sewed across the pins.   I stitched in the ditch very, very SLOWLY, and when I came to a pin I moved the needle by turning the hand control across the pin making sure that needle and pin did not tangle with each other.

WARNING:  Never sew over pins.  You can throw your machine out of timing and cause a great deal of expensive damage as well.  I could have basted with needle and thread, but I didn't.  Instead I used extreme care and was using the dual feed foot.  I did not attempt this with FMQ.  That would have spelled disaster and would have looked a mess (at least for me).

Success!  The pleat is gone although there was a fair amount of puffiness in the area that looked more like easing than anything else.  The affected border was quilted with piano keys and the stitching took up a lot of fabric.  It looks perfect after all is done, and I don't anticipate any more problems, but I will be watching.

The piano keys ate up all excess fabric with no pleating
Sew some happy seams this week.  I wish you a life without wrinkles.


Monday, January 28, 2019

What is a Well-planned Quilt?

A well-planned quilt is not mine.  It started off with definite direction and even the quilting designs made it to paper.  They didn't all make it onto the quilt.  Instead, improvisation and a bit of ripping rearranged the designs and even more were created.  Every quilt throws up a few challenges and they say that is good for your brain to keep it from dissolving into old age.  Today is my birthday and I am thankful that I can still write, sew, and research with gladness and joy.  Cleaning house is another story!

Have you ever had the creative side of  your brain get stuck in a rut?  Mine did this week.  My brain was stuck on creating a single quilting motif that would encompass a split triangle.  None of my ideas felt right.  They were too heavy.  They competed with the main motif in a larger, center triangle.  It made me restless.  Bad sign.  I have mostly learned to listen, ponder and wait for the light bulb to blink on.  I did and it did...finally.

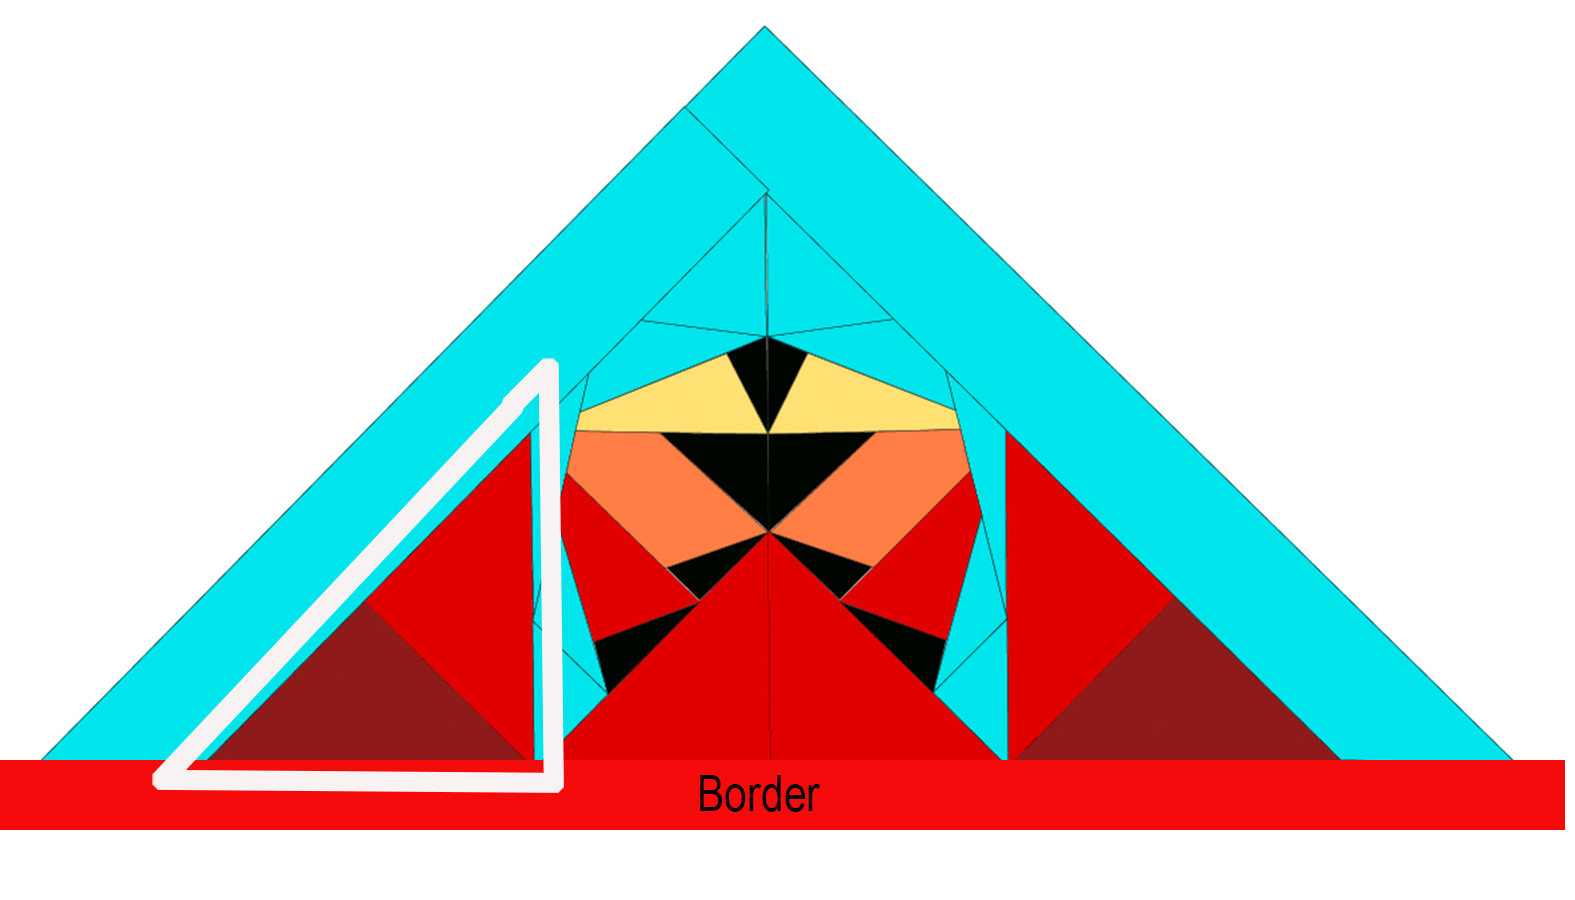
The part of the quilt I am working on.
The problem child here is outlined with a white stroke.   I was trying to create one motif for the split triangle.  It finally dawned on me that I designed them to be separate (see the color difference?).  So now I will be doing one motif in the dark half and some background, texture quilting on the red half.  Don't worry about the big red triangle in the center (outside of the white stroke).  It has its own design that mirrors one on the other side of the red border.  I just needed to change my perspective.

What does this do for my quilt?  There is now a line of quilted triangles that are in the same orientation along the border and will have similar (not exact) quilting designs with the same color threads.  Visualize the main quilt below this border.  They line up and look nice.  The red half triangle will slip into the background with nothing but texture to define it. It will not compete with the colored piecing.  It will also make that colored piecing stand out.  Happy days.  Now to see how it works.

Sew some happy seams this week.  I wish you good planning with space for creativity.


Sunday, January 20, 2019

Overload

Have you ever felt completely overloaded with the things that you MUST get done?  Sometime outside commitments impinge on life and other times you place the pressure on yourself.  I got home from our holiday travels and had so much to accomplish that I felt like I had bricks on my head.  We also had an unusual number of household breakdowns to deal with and really frigid weather.  And, of course, I broke my big toe.  That limited my exercise to the detriment of my general well being.  I had one photography related project that I figured I wouldn't finish for months, but found a better, faster way to accomplish the tedious task in a couple of hours.  I was so excited and wired over this success that I ran to my sewing room, sat down and worked on my quilt.  What joy!  I had been unable to go in there with my self-inflicted pressure weighing me down.  Stagnation has been banished!

Not only did I sew, I think I solved a problem on one quilt that has been nagging at me for weeks.  I am doing a quilt of my sweet Lady dog (deceased).  The bow on top of her head has been a thorn in my side.  I have tried several ways of doing it and finally got fabric pieces to look like ribbon, but it has no life.  I have tried painting and Inktense pencils to put in highlights, but neither look right.  I toyed with the idea of using real ribbon, but it wouldn't look right if/when it got crushed.  Back at the sewing machine my first task was to try thread painting and I see potential in this method.  More experimentation is needed, and some shiny or metallic thread may be the way, but it is gratifying to finally be on a positive track.

The photo below shows all the pieces pinned to a board.  The upper part shows the values of the ribbon (black and white).  There is also an isolated piece on which I tried the thread painting.  It is not quite right, but I didn't have quite the right thread and was kind of sloppy in my technique.  I didn't have any stabilizer under it either.

Pieces of fabric simulating the bow on Lady's head.
So much for that quilt for the moment.  I am back to quilting the quilt that has been my companion for over a year.  I WILL finish it!!  The big center part is done!  Now I am doing a 1 inch border with diamonds and filler.  To mark...or not to mark?  I decided to mark the diamonds because it is important that they look straight.  Wonky diamonds would spoil the effect.  I am doing closely stitched lines with slightly darker thread as filler in between the diamonds.  This should make them pop without overpowering the main quilt design.  I'm not too good with the filler.  Need a bit of practice, which I will get as I move around the quilt.

Diamond border
Sew some happy seams this week.  Depressurize and have fun stitching.


Bagged the Bag

My first attempt at a picnic bag was a fail.  You saw the pictures last week.  I kept revising the design.  I clipped where I shouldn't ...