Monday, November 19, 2018

Baby Bear

I need something to do during the holidays when I will be visiting family so I am taking my freshly repaired sewing machine to make a baby quilt for my first great-grandchild, a boy.  He is arriving in March so I have plenty of time.  It will be a fleece, rag quilt that looks like a bear.

Teddy bear baby blanket.
I ordered a pattern from an Etsy site and am so disappointed.  The pattern isn't exactly like this photo, but close enough.  The directions are sketchy and there is no photo.  It was advertised as a book (I thought), but came as two typewritten pages of "directions" and a big sheet with the the pattern pieces drawn out.  Fortunately, I have been sewing since the beginning of time and will make adjustments as I go along.  I have figured out how to make a rag quilt from U-tube tutorials.  I picked up a bunch of fleece that will give this baby lots to look at, and the rag seam edging will give texture for his little fingers to feel.  The backing is a soft, green...quiet and peaceful for those times when he needs quiet and less stimulation.  I can pack all my stuff into my Tuto bag with my machine, and my knitting needs will fit in there too.

Lots of fleece.
Until I looked at the above photo I didn't realize I had gotten two fabrics with dog paws.  I was mostly looking for bright colors.  It will fit right in though because the family has three dogs!  I should be able to give this to them for Christmas.

What are you thankful for this week?  I am thankful, among other things, for my large family.  They are so much fun, so caring and so loving.

Eat lots of turkey, trimmings and pie, and have a wonderful Thanksgiving.


Monday, November 12, 2018

Pressing Sheets

I promised a reader a recap of my experiences with ironing sheets so here goes.

1.  Flannel cloth
Early in my sewing life I had a piece of flannel that I stored on the crossed legs of the ironing board (I still have it!!).  That was my pressing cloth and it was great for laying on top of the "good" fabric to press out wrinkles or adhere a repair patch to my jeans.  It works well, but cannot do some things that I now require of a pressing sheet.

Flannel
2. Pressing sheet of undetermined content.
Joann's sells several brands of heat resistant pressing cloths.  They look like some that I purchased and I don't like.  Looking at the packaging pictured on the Internet I can't figure out the content.  They look like some sort of plastic, but of course don't melt.  However, with use they rumple up and I don't like them for creating something like a big flower or animal like Lady dog (scroll down to last week's post).  I want my sheet to lay and stay perfectly flat.  The rumply ones have their uses, like the flannel cloth, but mostly they stay in the drawer.

Undetermined content.
3.  Silicone sheet
My silicone sheet is 18 x 20 inches.  It lays flat and I can adhere fabrics (with fusible on the back) to it.  Then I can peel the fused fabric off without damage, ready to iron onto a background.  I was looking to buy a new one and cannot find it.  So onward.

Silicone.  Can only show a peek because Lady dog is lounging on it.
4.  Teflon coated fiberglass.
These are the ones that I find most available on the Internet.  I have two pieces about 5 x 7 inches that came with Bo-Nash fusing repair powder.  They are very useful for small pieces, but are too small for a major project.  They are brown in color, but you can see through them easily, and really well on a lightbox.  I see that Amazon is selling large sheets of this material 16 x 20 inches in packs of at least 3 sheets.  I am sold and will be putting in my order.

Teflon sheets
A good ironing sheet is a must if you plan to create a large project of fused pieces.  It is well worth the money and will last for years...unless you accidently cut it with your scissors.  Don't laugh.  I have done it, but so far not with my good silicone one.  I've only cut the ones I don't like.  Good way to get rid of them I guess.

Sew or fuse some happy seams this week.  I wish you lots of fun ironing little pieces if you are so inclined.


Monday, November 5, 2018

Onward Dog

My Lady dog is progressing.  You can't see the plexiglass extension table set-up very well, but it holds it all together.  A freezer paper pattern sits on the clear table.  A silicone ironing sheet sits on top of the pattern and they are held on with office clamps.  Tape will do the job as well.  I can put a flattened Ott light under the table if I need to see the lines more clearly.
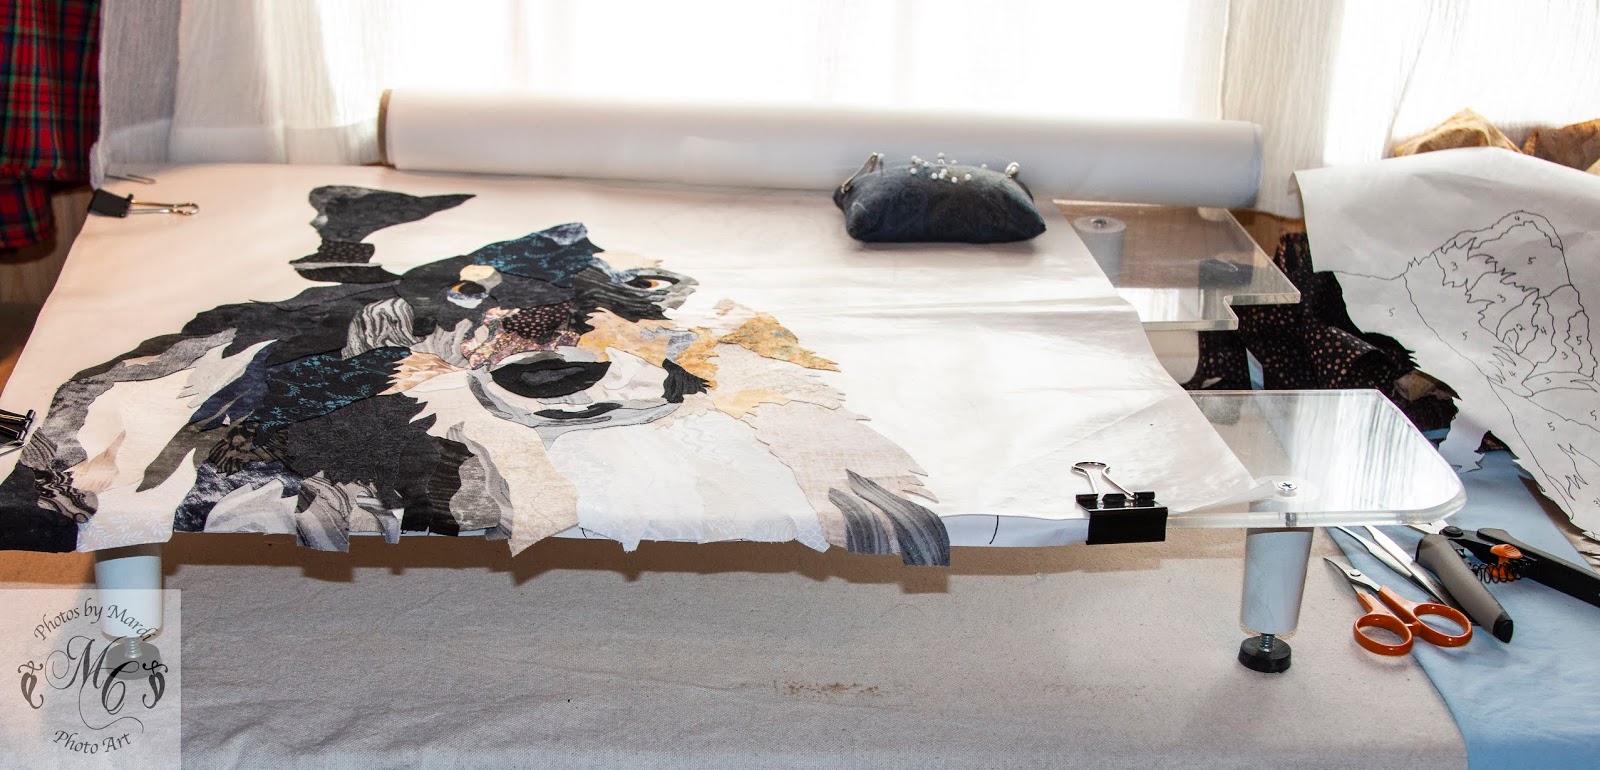
Set-up for fusing.
Here is sweet Lady dog so far.  The sharp edges of fabric will eventually be softened by quilting.


I lightly tack the fusible-backed fabric to the see-through ironing sheet, which lies over the paper pattern.  When all the pieces are in place I will move the ironing sheet to the ironing board for a good, solid pressing.  Then the dog will peel off the silicone in one big piece ready to iron onto a background.  I might just incorporate background fabric while it is still on the ironing sheet.  That works too.

Today I will explain how to get all those different pieces of fabric fused and cut with very little waste.  I have a big stash, but still hate throwing anything into the wastebasket.

1.  Cut the piece carefully from the freezer paper pattern.  Set it aside.

TIP:  These pieces are easy to lose.  I often pin them to my pincushion so they can't fly away while I am fussing with fabric and fusable.


2.  Cut a piece of fusible a bit bigger (1/4 inch or so) than the freezer paper pattern piece you just cut out.  I usually cut a rectangle or circle...something quick and easy to cut.  Both fusible (paper side up) and pattern piece are right side up.


3.  Choose the area of fabric you want for this piece and fuse the fusible to the back.  Leave the paper on for now.

TIP:  I use Soft Fuse, which has paper on only one side.  If you use fusible with paper on both front and back, you will have to take the bottom piece of paper off to fuse to the fabric.

4.  Cut from the back closely around the edges of the fusible.  You leave the back paper on so you can see where to cut.  This way you don't have any fabric with unseen fusible left on it.


TIP:  Those clippers are fabulous.  I got them in the gardening department of Home Depot.  Not expensive. Super sharp.  Super points.

5.  With fusing side down lay the freezer paper pattern shiny side down on the fabric.  Press to adhere and cut a about 1/16 inch larger than the paper pattern.

TIP:  Do all the ironing on a silicone ironing sheet.  That fusible stuff has a way a getting out and messing up your ironing cover.


6.  Now you can pull the fusible paper and the pattern piece off.  Your fabric piece is ready to tack to the silicone sheet in its proper place on the dog (or whatever creature you choose to make).


I end up with holes in fabric, but very little lands in the wastebasket and only a few small pieces are left with fusible on the back, which I use as I go along for the the tiny pieces that I need.

TIP:  Save all your freezer paper pattern pieces in a container.  Sometimes the fabric I choose doesn't look right and I need to pull it off and cut it again out of a different fabric.  It is a three ring circus finding the right piece, but it is in there somewhere!

Sew some happy seams this week.  I wish you a week of fabric immersion and contained fusible.


Monday, October 29, 2018

New Start

With my sewing machine out of town, I cleared off my sewing table and ironing board and set it up for fusing dog fur.  Not literally, but I am going to make a dog quilt.  Scroll down to last week to see the photo of Lady.  I dragged my feet a bit as it was a heavy week and my body was too tired to stand at the ironing board to do the work.  However, I spent the time thinking about the process and the materials needed.  I don't need to buy any fabric and that is always nice as I am a long way from the good quilt stores.  This is a stop-gap project and I will probably not finish it for awhile because I want to focus on the quilt that I am quilting...when my machine gets home from the repair shop.

I think I figured out how to do the bow.  Those tiny pieces look daunting to do in fabric so I decided to paint them.  I love to paint and have ordered a starter set of Textil paints from Marabu.  They are acrylic and reportedly bright and mixable.  The ad I saw says that they are slightly thinner that other acrylic fabric paint, go on fabric smoothly, and leave the fabric with a nice hand.  It sounds too good to be true, but it isn't expensive so I am giving it a try.  I got a starter kit with six basic colors.  I can do anything with that!  I might try to make the ribbon look shiny with a light coat of Mod Podge after the paint dries, but it will be awhile before I get to that.

Now to the dog:
1.  Turn the photo into black and white, then separate the photo into 5 black and white values (posterize in Photoshop).

2.  Draw lines around each value and label each value from 1 to 5, on mylar with a fine, black Sharpie.

3.  On a light box, trace the lines on freezer paper to put under a silicone ironing sheet to guide placement of fabric.

TIP:  I use a plexiglass sewing machine table extension for my light box.  The light is my Ott light, which opens out flat to lay under the table extension.

4.  Repeat step 3.  This copy will be cut to pieces on the lines as patterns for cutting fabric.

TIP:  Cut out one piece of the second freezer paper pattern at a time, using it to cut the fabric piece with fusible attached.  If you cut out all the pieces at once you will never find where anything belongs.

In the photo below you can see where I left out the ribbon.  I will do it separately.  The dark places (eyes and one piece of fur) have already been cut out so you see the dark floor through the holes.  I started with the eyes because they are critical and need to be exactly right.

Lady in outline
Next week I will show my progress in placing fabrics.  It looks daunting, but is really quite simple  I enjoy cutting out the pieces and seeing it all come together.  Each piece is cut 1/16 inch larger around the edges so it will lay under the next piece.  I am starting with the lightest value so I won't have dark edges showing through the white fabric.  I will progress to the next darker value and so on until I come to the black, which will go on last.  The final touch will be the bow, which I will make separately and attach all in one piece.

Sew some happy seams this week, or have fun fusing fabrics.


Sunday, October 21, 2018

Down and Out

I was stitching away enjoying my time and an audiobook.  Frustration took over as my needle refused to pull the bobbin thread up.  Re-thread the machine.  Nope.  Change the needle.  Nope.  I probably messed up the timing trying to micro-stipple over heavily layered fabric.  I  called my wonderful repairman.  Would you believe that he and his wife sold their business, retired and moved to Vegas?  I had no clue.  The new people will take a look at my machine, then transport it to a town 40 miles north.  I can have it back in three weeks.  What?!!  Forget that.  Ed would have had it fixed by the next day.  I found a new shop, BabyLock dealer and repair person in a different town, but same distance for me.  Hopefully they can help me in a more timely manner.

So....what do I do now?  I have another birthday card to make in Photoshop and/or I can do the prep work for my next quilt.  I plan to do another collie.  I really enjoy doing dogs.  I also have a photo of a raccoon that would be fun to do.  If the machine needs more time in the repair shop I may even start cutting bits of fabric.

Lady
I packed up the machine and headed down the canyon.

Prognosis:  The timing is fine.  The needle slipped off center.  The repairman is also replacing the circuit board that controls the On/Off button, which has not been working well.  Full service too with a one year guarantee.  Two weeks.  Grrrrrr!  My "studio" looks undressed.

Well, I will use my time to prepare Lady for a new life in fabric.  She was a wonderful, sweet pet.  That ribbon is going to be pain to create.  I'll have to think about that.  Any ideas out there?

Sew some happy seams this week.  I wish you a week of no mechanical problems.


Tuesday, October 16, 2018

My Studio

Have you ever spent time reading about and looking at photos of the beautiful quilting studios that some people have in their homes?  I look at them and drool, but living in a 700 sq ft cabin doesn't leave much room for an exotic studio.  I saw a cabinet on FB that looks like a fabulous solution, but I don't even have room for that!  You can see what they have at "Original ScrapBox."  My "studio" is a bedroom.  The closet is reserved for my husband's clothes.  I keep a twin bed in my studio because I need a guest bed now and then.  I have one domestic sewing machine - that's all I need.

Essentials of my "Studio."
The table under the window (right) is multi-purposed;
*It is a padded ironing table.
*It can be used to store items needed for quilting - as it is now.
*I can strip off the padding and use it for pinning a quilt in preparation for quilting.

Under the ironing table are six, large, plasic stacking drawers.  That is where my sewing supplies are kept right beside the sewing machine.

I can set up a card table if I need to design, trace or do some drawing.  It makes a place to fiddle and fuss while sitting down.  It is fills the room temporarily, but it works.

You can't see the design wall on the wall to the right of the sewing machine (in the photo) and parallel to it.  I have to reach over the machine to attach stuff to it.  Sometimes I need a little stool to reach the high parts, but I have a design wall and love it.  The fourth wall is my husband's closet.

So...where is my stash?  See below:

My stash shed behind the house.
   Yes, it is a little inconvenient, but I have just as much fun as the next person when I go out there and fondle fabric.

A portion of my stash.
It needs tidying up a bit, but that will  have to wait for warmer weather.  It was 5º out this morning.  I couldn't get far enough away to get a photo of all of it, but you can get the idea.

The point of this post is that you don't need much space to make quilts that are loved, warm and appreciated.  A spacious studio is nice, but not critical.  It does help to try to stay organized.

Sew some happy seams this week.  I wish you space if you really need it.

Monday, October 8, 2018

Motivation

Summer was like a feather, softly  floating down that briefly brushed my cheek before it was blown away.  I haven't sewed a stitch in three months.  What happened?  A busy summer filled with a lot of very physical yard work, a lot of visitors, sewing room used for guests, and some medical issues (DH - not me).

I am noticing what is jabbing me to get motivated again:
1.  DH is feeling better.
2.  Yard work is done so I am not so exhausted.
3.  I am back to my regular exercise routine.
4.  I downloaded an audiobook and am eager to listen to it.
5.  I bought a spool of thread that I need for quilting.
6.  Snow is predicted this week.
7.  I am getting tired of my genealogy research project.
8.  Most of all I am goal-driven and have no UFOs...and do not intend to start collecting now.

The sewing machine is calling louder every day...maybe tomorrow.

*******************

Two days later:  I DID IT!  I finally got out of the "do the chores" mentality and reconnected with my sewing machine.  I haven't forgotten how to quilt.  I sat down to the most tedious motifs and finished them all.

Problem:  Thread kept breaking.

Why:  There is one intersection of too many seams that is lumpy because this is paper pieced and I couldn't get the seam allowance adequately flattened at an early stage.  I am micro-stippling some very small pieces that are stitched together - black on black.  Urrrrgh!

The red circle is the nasty area of heavy seam allowance that defies the needle.

Trying to solve the problem:
Change the needle.  No help.
Change from the old thread to the new spool I bought last week.  No help.
Be careful.

Solution:  Be careful and gently work around the spot.  The presser foot sometimes gets too high over the bump so the needle can't connect with the bobbin thread.  I don't see that there is much else that can be done at this point.  It really isn't noticeable, but judges might ding me for it.  Oh well!

If you look closely you will see the stitches in the black seams.  I sewed the quilt together with medium gray thread.  If those stitches remain noticeable I will run a permanent black pen over them and they will magically disappear.  In other places a little glue shows, but it will disappear when I soak the finished quilt.

I am eagerly looking forward to tomorrow when I can do some quilting that is more fun than micro-stippling.

Sew some happy seams this week.  I wish you lots of motivation and no stitching problems

Bagged the Bag

My first attempt at a picnic bag was a fail.  You saw the pictures last week.  I kept revising the design.  I clipped where I shouldn't ...