Showing posts with label blanket stitch. Show all posts

Sunday, May 17, 2020

Filling in the Time

We are all getting a bit tired of COVID19 running our lives, but I feel lucky.  As a retired couple we don't go out much in normal times.  As a recent meme on Facebook said, "You realize how anti-social you are when a pandemic hits and things don't change that much for you."  I guess we are a bit introverted with our own activities that we enjoy.  We did break out for a trip to Costco, which netted us about 1/3 of what we had on our list.  They are having trouble filling their shelves because of supply problems.  Who would ever dream?  Meanwhile I clean, garden, sew, play on the computer, and enjoy the local wildlife.  I can walk in the early morning without a mask because I rarely meet anyone else.  I passed 18 curious, but non-threatening, deer on my walk the other morning.  Below is a huge elk that decided to sunbathe and chew his cud in our yard.  He is losing his winter coat so looks pretty scruffy at the moment.

Bull elk.
Several months ago I was all excited to finally buy a ruler foot that comes with a small ruler.  I tried it out on a sample square and was delighted.  Couldn't wait to use it on my quilt.  I have a wide border already quilted on my quilt and wanted to finish it off with a quiet border of piano keys.  I found that using the ruler and its accompanying foot wasn't working well with a heavy quilt to drag around.  Disappointing.

Solution:  Rip-it.  I decided to do the lines with my regular FMQ foot and was able to maintain the 1/4 inch distance between lines with the edge of the foot as a guide.  I also drew a straight line every so often with my Sewline marker to keep from wandering off at an angle.  Great way to learn to FMQ straight lines!   The lines are not as perfect as they would be with a ruler, but that is OK.  Do the best you can.

TIP:  Instead of using black thread on black fabric try a very dark, colored thread or dark charcoal.  It is much easier on the eyes than black on black and unnoticeable.  I thought my lines were quite perfect until I took this photo.  Clearly I was looking at them with "rose-colored glasses."

Piano Keys
I have also been working on the Mayan mask that will will be the show stopper at the top of the quilt.  I am stitching all the fused edges down with blanket stitch of various sizes.  I find this so satisfying.  It demands close attention as I go around corners and curves so it never gets boring.  In some spots I have stitched with clear, mono-poly thread and in others I have chosen appropriate colors or gold, metallic thread.  There is a narrow band under the eyes where I wanted to simulate the glow of animal eyes.  Gold thread was too much.  Yellow and orange were too much.  Tan didn't show up at all.

Silk thread under the eye.
Solution:  I finally settled on silk thread that is almost the same color as the fabric, which is actually a tan print (not orange as in the photo).  It is perfect.  It creates the glow with its sheen and adds the perfect bit of interest, but also blends.

Gold metallic on red.
Sew some happy seams this week.  I wish you straight lines, but no worry if they wiggle a bit.


Friday, June 20, 2014

Columbine

Columbine
Hiking in the mountains, I found this lovely grouping of columbine, my favorite flower.  My first thought was that it would make a pretty, little quilt.  I had recently taken a class on using hot ribbon to finish the edges of fused appliqué and that was my first idea.  If you are interested in that technique there is also a U-tube video.   I didn't like the results for this particular project so I shelved it and didn't revisit the idea for a long time.  Then I began doing blanket stitch appliqué and decided to try again.

The first step was to enlarge the photo on my computer and trace it in Illustrator with enough artist's license to make it sewable.  It took 13 drawings of various parts to assemble the final, full-sized composite with a 16x20 inch quilt in mind.  It turned out a little larger because of the borders, but the flowers remained the same.  I am an intuitive quilter and frequently adjust my patterns to the moment.

I first sewed the background together so it would be ready when the appliqué was cut and prepared to fuse.

Final Design
TIP:  Having the flowers spill out over the inner frame adds dimension to the design and creates a unique composition.

Columbine graphic (reversed)
You can see here that I have reversed the design and labelled each part with a system of numbers and letters so I could keep the many pieces straight.  Finally I traced all the pieces onto the paper side of Soft Fuse.  Since I had simply reversed the entire design, I didn't have to worry about reversing each part when tracing.  I had already assembled several blue, green and white-on-white fabrics.

TIP:  A design like this is more interesting and has more depth when different fabrics are used for separate petals and parts.  

I then laid the full sized pattern on my ironing board, covered it with a translucent, heat-resistant, silicon sheet, and laid out the pieces on that sheet, carefully following the pattern.  When I had everything arranged to my liking I laid another heat-resistant sheet on top and ironed it all together.  The idea was that all the pieces would stick together and I could peel it all off the silicone sheet as a unit and lay it on the background.  Oh dear!  The minute I lifted it up it all fell apart, pieces everywhere, no numbers or letters.  A few of the smaller pieces went AWOL and had to be traced, fused and cut again.  At that point I was done quilting for the day.

The next day, fresh for a new start I sorted the mess, and matched pieces to the graphic, which was now positioned under the background fabric on my light table.  The fabric had peeled right off the silicon sheet with the fusible still in place so all the pieces were still usable.  I iron-tacked the pieces to the background lightly, just to hold them in place.  When all was complete again I carefully moved fabric and bouquet off the light table and onto the ironing board.  I covered the fusible pieces, now directly on the background, with the silicon sheet and ironed them down with a vengeance.  Success!

TIP:  Fusing the pieces all together and lifting them onto the background is a great idea but there must be enough overlap among the pieces or it won't work.  Look at your design carefully and assess whether this technique will work for you.  Even so, I misjudged mine!

TIP:  Don't use the light table (mine is my acrylic extender table) as an ironing board.  It is OK to lightly tack a piece in place, but a plastic table will be ruined by the sustained, high heat that is needed for the final fusing.

The fun thing about this small quilt with lots of pieces was that I was able to make it entirely from my stash.  In my next post I will talk about some special touches, the quilting, and the finished product.

Friday, May 30, 2014

How to Machine Appliqué

Before I talk about blanket stitch appliqué I must spend some time explaining a few things about satin stitch, which will also apply to blanket stitch.  First of all the appliqué fabric is heavily starched, fused to fusible material, then the appliqué designs are cut and fused to the background fabric.  See my earlier post.

TIP:  Starching is optional, but I find it helps control the fabric.

Satin stitch is simply a zig zag stitch squashed tightly together to form a solid, edge around the appliqué.  This takes the right machine and some practice to get it even and uniform. I haven't gotten there.  I haven't practiced.  Someday I will learn to do it nicely, but right now it clings to the bottom of the bucket list.  Below is the anatomy of a satin stitch.


Finally, your choice of stabilizer is affixed to the back of the background fabric.  I use safety pins.

Satin stitch with no stabilizer
Satin stitch on cotton with two layers of stabilizer
As you can see, stabilizer makes a world of difference in the appearance of satin stitch, and equally so with blanket stitch.  In these examples you can see why I don't do satin stitch:  my machine does not allow the stitches to be any closer together.  The skinny example (far right) was done twice and I still am not happy with it.

TIP:  Using the same fabric and materials as in your quilt start stitching, adjusting tension, stitch length and width until you are satisfied with the result.  It is difficult to rip out this kind of stitching and it is hard on your fabric and your mental stability to do so.  Mark this tester scrap with your final choice of settings and put it on your design wall where it won't get lost or land in the wastebasket.

The fabric preparation for blanket or buttonhole stitch is the same as for satin stitch, including the practice sample...especially the practice sample.  The stitching runs along the edge of the fabric, tossing out a sideways stitch or two regularly as in the example below.

Blanket Stitch
Batik is a great fabric for blanket stitch appliqué, but more loosely woven fabrics can be used if they are not prone to heavy fraying.

TIP:  If you are using a fabric with some small tendency to fray you can treat the edges with Fray Block.  The tube has a fine tip, but this product is very juicy so I apply it with a toothpick to the very edges of the appliqué after fusing it to the background.  It is a form of plastic so I want it only on the edges.  It seems to work well and is invisible.  I also check for any fray threads as I stitch and either pull them out or snip them.  This is fussy stuff, but if you plan to show a quilt the judges will notice unattractive fuzz.

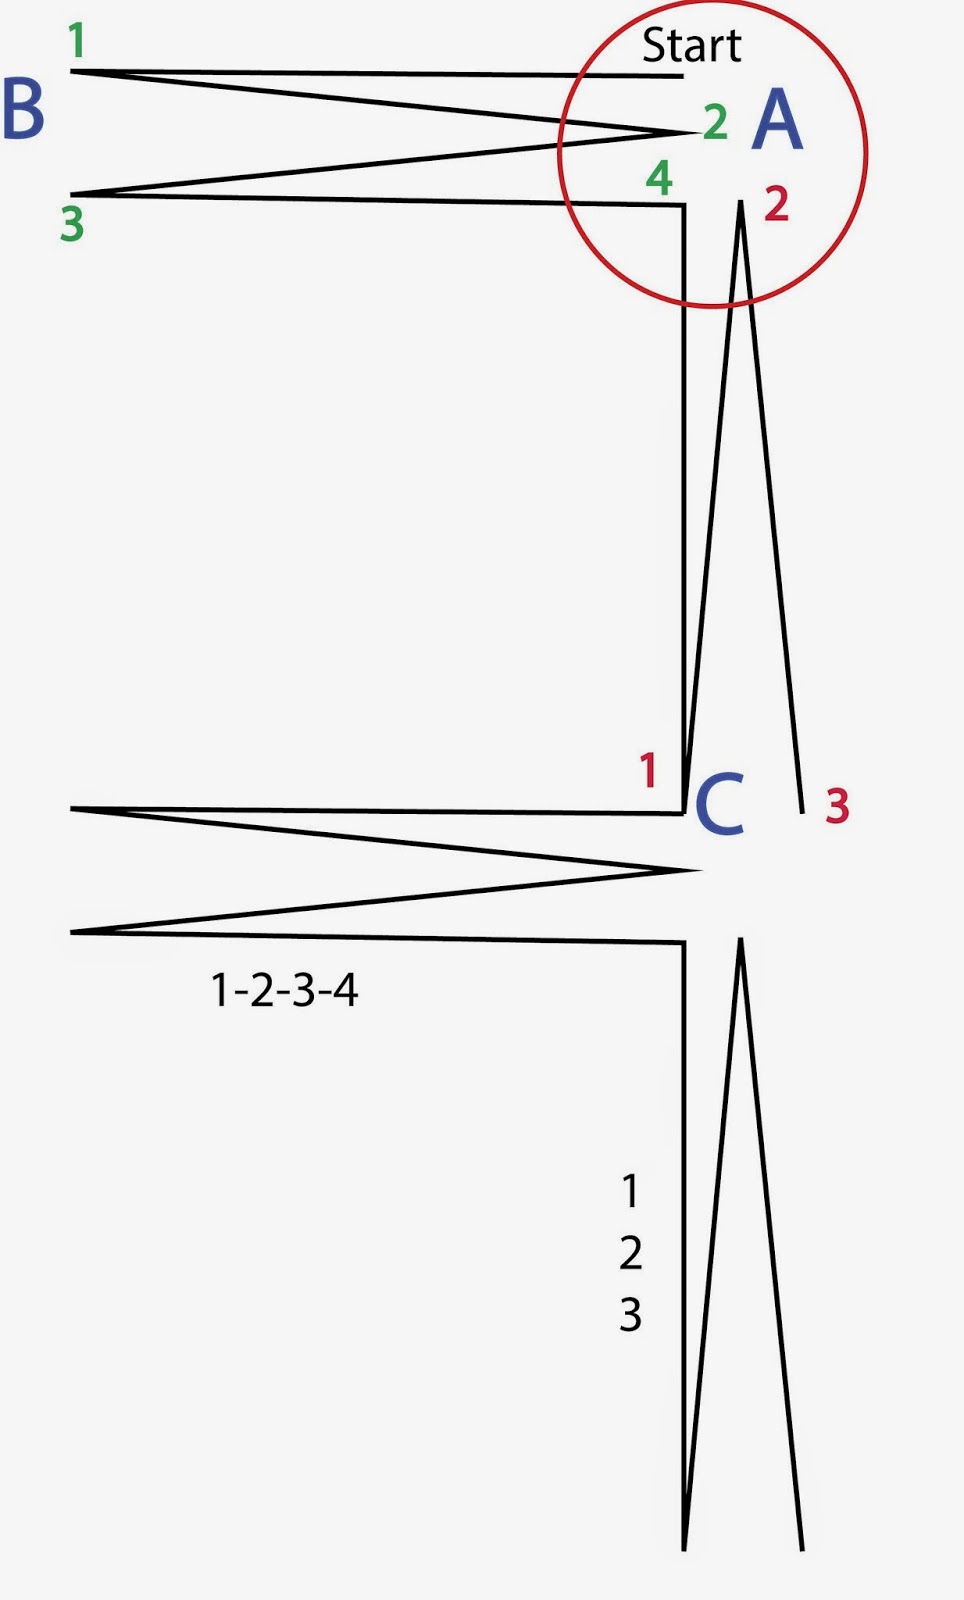
The machines I have used and heard about take several stitches in place sideways and then several stitches forward and backward.  Machines differ in the specifics of their blanket stitch, but below is the anatomy of the blanket stitch on my Viking Sapphire.


I start with about 5 tiny straight stitches to lock the thread.  Then the needle goes in at A, left to B(1), right to A(2), left to B(3) and right again to A(4).  Next it goes forward from A to C (1), back to A(2), forward to C(3).  You can name or number these steps any way you choose, but you need to establish a rhythm, and it helps to name each step.  When you get to points or corners you need to know where you are in the sequence.  BTW,  the needle goes into the same hole every time you come back to A, B or C (I opened it up in the diagram so you could see the steps).  Points A and C are right at the edge of the appliqué and should form an attractive, smooth finish.   There is a lot of stopping and turning as you negotiate curves and points so this is a perfect place to use the needle-down function if your machine has one.  The A to B stitches must be perpendicular to the edge of the appliqué.

TIP:  Slow your stitch speed to low if you can.  As you learn to do this stitch on appliqué I suggest that you turn off the tv, turn off the audio book, turn off the music, and turn off the kids.  You need to concentrate until you understand the rhythm of your stitch.  Why not music?  Music is all about rhythm, but it rarely, if ever, syncs with your sewing machine stitch, leaving you all mixed up crazy.  Say the names of the steps out loud with your variation of names and needle sequence:  1,2,3,4-1,2,3.  You have just created new music with the needle as your drum!

Finish with 5 tiny, locking stitches, which can be buried nicely in previous stitching.  Pull the threads to the back and cut, leaving a 1/2 inch tail.

TIP:  If the thread tails might show through the fabric to the front, pull them through some stitches on the back before cutting.

The points and corners will take some maneuvering. Slow down.  You may need to shorten the width of the sideways stitch sometimes, and you may need to lengthen or shorten the lengthwise stitch even to 0 on occasion.  So much depends on your machine so remember the old mantra:  practice, practice, practice.  This is where you need to remember where you are in the stitching sequence or you will find the needle flying off in the wrong direction.  Ask me again how I know!!  My seam ripper has a long and varied history.

TIP:  Save time and reduce pilot error.  Once you have your settings established, and if you can do this on your machine, program your stitches so you can select them automatically.  The appliqué I am working on now has two different width settings depending on what part I am working on so those are each programmed separately.  The third stitch I program is the tiny straight, locking stitch because it needs to be offset to the right to match the start of the blanket stitch (A). 

When you get the hang of this you can turn on your choice of noise.  However, I suggest you send the kids outside to play in a safe place or put them down for naps.

Bagged the Bag

My first attempt at a picnic bag was a fail.  You saw the pictures last week.  I kept revising the design.  I clipped where I shouldn't ...