Showing posts with label machine quilting. Show all posts

Sunday, January 18, 2015

Needles and Gadgets

I have sewn almost all my life, certainly since age six.  A needle, of course, is a necessary evil for those of us who sew, and there are many from which to choose.  I am talking today about the needles and gadgets I use during the machine quilting process.  You will need different styles for appliqué and hand quilting.

My go-to needle for burying threads into the nether regions of my quilt is a Quilt Basting Needle.  It is long.  It is thin.  It has a longish eye.  Length makes it possible to grab the needle easily to pull through the quilt.  Thin helps it go through tight places between stitches.  The long eye makes it easy to thread.  My #7 needles are 2 3/8 inches long.  Love 'em!  However, they can be hard to manage with short threads (read on for the work around).


Another option that I keep on hand are Easy Threading needles.  These allow the thread to slide through a gate from the top and are quick and easy to thread.  I find however that they can shred silk and polyester threads.  They may damage cotton thread, but it is not obvious.  If you are stuck with a short thread and the needle causes harm, you may find yourself squealing in frustration.  They are also shorter (mine are 1 7/8 inches), which may help with moderate length tails.


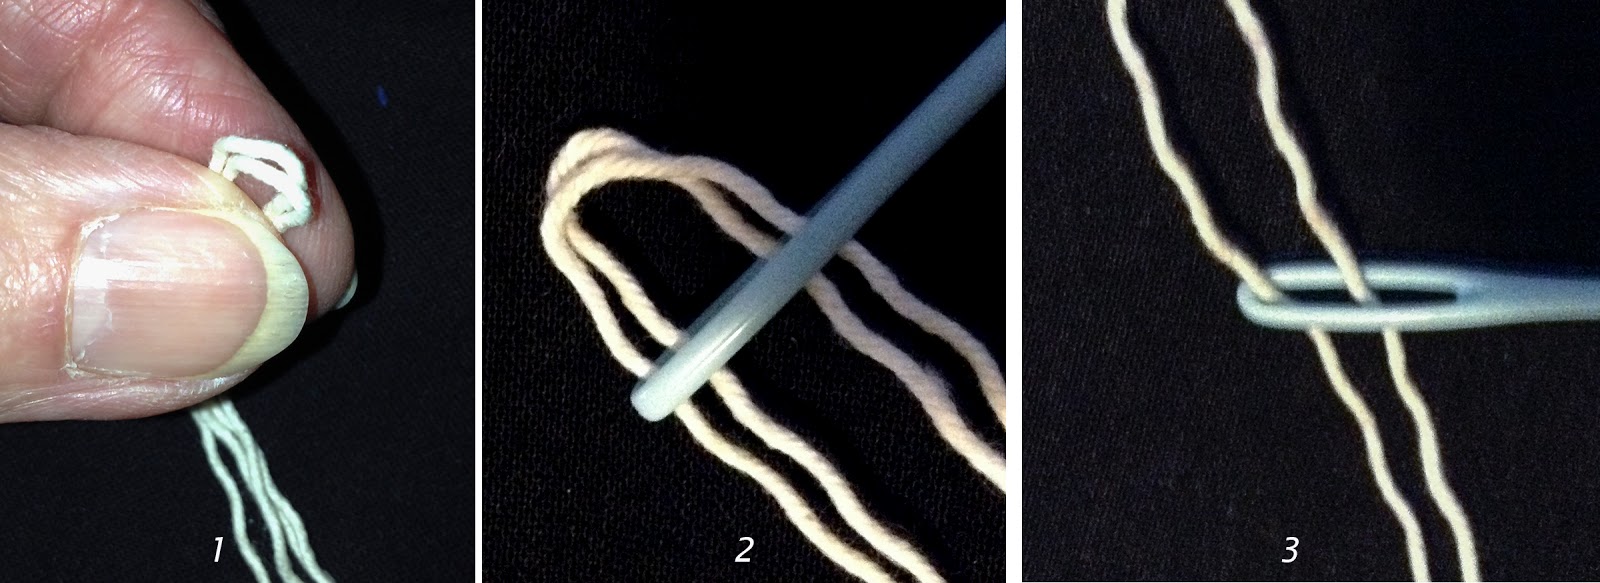
Sometimes it is hard to thread a standard needle, especially with two threads to manage.  I do it the way I was taught to thread a yarn needle.  Fold the two threads together as one, squash them between your thumb and forefinger and slip the eye of the needle over both loops.  Grab those loops and pull the ends of the thread through.  That's why I like the long eye of the basting needle.  In the photos I have used a yarn needle and string so it is easy to see.


Now for handling some problem situations.  Below are my favorite tools:


Looks like a surgical tray doesn't it?  I am sure you are familiar with the tweezers and needle threader.  The hemostat is a special tweezer that locks the grip of the pinchers.  It is a super tool for both medical and sewing needs!

Situation #1:  You have two threads that are only about 2-3 inches long.  By the time you have have the needle threaded you don't have enough thread leeway to get the needle into the fabric in the right place.
Solution:  Tie a square knot.  Use the tweezers to help if your fingers are getting in the way.  You can use a shorter needle.  You can try the Easy Threading needle, but if the thread shreds or breaks, you will have to move on to Situation #2.  I  like to run the long basting needle into the fabric and batting leaving the eye out about 1/2 inch.  Put the wire of the needle threader through the eye of the needle.  Using the tweezers pull the threads up through the wire and pull the threader with threads through the needle eye.  The hemostat pinchers are a bit thick for use with the needle threader so I use the skinny-pointed tweezers.

Situation #2:  You have two threads that are way to short to manage.  Never fear, you can do it.
Solution:  First you need to get a good knot tied.  The square knot and surgical knot are the options here.  I often get the threads tangled and have to start again, but the tweezers and hemostat will help greatly with the job.  I will grant you that it is not easy to tie short threads, but it is possible.  The hemostat is good for the surgical knot when one thread is a little longer.  Once the knot is tied you can get the threads through the eye of the needle with the needle threader as in Situation #1.

TIP:  If your threads are less than 1 inch long you need to rip a few more stitches out.  The knot should hold it under the fabric, but it will be more dependable with more tail attached.  I know that when I hand sew with silk thread the knot will pull right through if I don't beef it up a bit.

TIP:  If I know my thread tail length is iffy, I pull it through to a place where I know I will be quilting over it.  Just a little more insurance.

The hemostat is extremely useful for pulling a wedged needle through the fabric when it is hard to grasp and pull or if you have arthritic fingers.  Although not long, it can be a big help in turning a tube right side out.  It is one of my favorite gadgets.

I know this week's post is pretty basic, but it took time for me to develop reliable solutions to the needle and thread games so maybe it will help some of you.

I attended the AQS Quilt Show in Albuquerque last week and spent one day soaking up the fabulous work of award winning quilters such as Margaret Soloman-Gunn, Marilyn Badger, and Renae Haddadin among others.  The quilts were stunning.  The Egyptian tent makers were there too.  I plan to spend the next 2 or 3 posts on a vicarious visit to the show.  Please join me.

Saturday, June 7, 2014

Learning to Quilt

By definition a quilt must have a top, a filler (batting, flannel or, as in pioneer days, an old blanket), and a backing.  The sandwich must be fastened together.  A simple option is to tie it together with thread or yarn in multiple places.  Alternatively, the layers can be hand stitched with a varying amount of complexity.  A nicely done hand quilted quilt is a beauty to behold with a quality that cannot be duplicated by a sewing machine.  Today, with the world in such a big hurry, we want to speed up the process, so machine quilting has been reluctantly accepted and is also stunning when well done.

As with anything else, there is a learning curve.  Even a baby has to learn to feed itself and the first attempts can be pretty messy.  It takes time and practice to learn to coordinate the foot pedal, hand movement, machine speed, and even the movement of your eyes.  You can and should research the process via classes and/or reading, but YOU have to experience it yourself and practice.  You must learn about thread and needles in order to rein them in to work for you without causing alarming noises from your machine or broken needles and thread. You must learn what your machine likes and dislikes, and how to adjust the tension properly.  Lots to think about.

TIP:  Practice, practice, practice.  Start with paper and pencil to develop muscle memory of a design.  Make up fabric sandwich squares and spend some time each day to develop coordination.  Mark designs and learn to follow the lines.  Learn to stitch in the ditch.  Learn to do curves then straight lines.  Learn to draw freehand with the needle.  Inundate your brain with quilting ideas and improve your performance one step at a time.

Finally, the appliqué on Hallelujah Rhapsody was done.  It took a very long time.  I quilted it with numerous filler patterns, and that took a long time too, but I believe that on this quilt I became more competent than ever before, and I turned the corner into becoming interested in doing the quilting.  I always loved the sewing, but dreaded the quilting, because it never looked good enough.  They say that the quilting should be planned in the design process as it is an integral part of the quilt.  I knew that, but didn't yet know how to even think of quilting designs that wouldn't be executed for months yet.

TIP:  Before you begin quilting you should quilt around the outside of the appliqué.  I don't remember if I knew that when I made this quilt, but it is great FMQ practice and really improves the look of the quilt.  You can do it with invisible thread if you are worried about possible imperfections.

I quilted the Hallelujah Rhapsody on the fly with different filler designs.  There was no room for anything bigger.  I had chickened out on feathers and added them as appliqué.  Was that insane or what?  I have posted this picture before, but this time note the different fillers.


I learned how to do pebbles.  They are not easy, but invite a rhythm and commit you to strive to follow previous stitching lines perfectly.  They are a great exercise for developing control of the myriad parts that must interact in the process of quilting on a machine.  Among some of the pebbles I inserted flowers.  That was fun, and they make the quilting more interesting.  You will learn to either draw freehand with the needle or follow the marked lines, depending on your personal inclination.  I stippled some.  Did you know that stippling is one of the most difficult filler designs?  You have to constantly move in many directions and this is hard for a novice.  After finishing Hallelujah Rhapsody I found myself thinking about quilting ideas as I designed my quilts rather than as an afterthought.  Definitely a step in the right direction.

TIP:  In your early attempts at quilting try a more defined pattern and leave the stippling until later.  Don't distress too much over your imperfections.  If I had done so on this quilt it would still be in the UFO (Unfinished Objects) pile.

This quilt was my first to be juried into not one, but two shows.  I learned how to enter a show!  I was most gratified to have my quilt accepted even though it didn't win anything.  The judges offered several suggestions regarding my quilting:  attention to tension, strive for even stitches, watch starts and stops.  These comments were not unexpected as I was still very much a novice quilter so I worked on the areas in which I was judged deficient.

TIP:  Don't be discouraged by feedback such as this.  Just work on getting better.  The judges aren't mean, but they are very experienced, and I have found that even their negative findings are couched in positive terms on the evaluation.  Remember that you have achieved some level of competence to be juried into a show.  Very exciting!

Tuesday, February 18, 2014

Storm at Sea

Today I am returning to Memory Lane with a Storm at Sea quilt.  Unfortunately the color looks dull on this page.  It is really quite vibrant even though some of the colors are pastel.  I used Michael Miller's Fairy Frost fabrics for the light colors.

After the Storm


This is a fascinating pattern and has been done numerous times with almost as many variations as quilts.  It is interesting, it is colorful and it has amazing movement, and it all happens with only two blocks and a variation on one of those two blocks as demonstrated below.


These were drawn on Adobe Illustrator with precision in mind.  After I had drawn the basic pieces I set them together in the general design of the common "Storm at Sea" and began to add color.  I actually did only one quarter of it because all four quarters are exactly the same.  It is like working in a coloring book, which I loved doing as a child.

You don't have to, but I paper pieced the blocks because I like the precision I get with this technique, and the pieces are pretty small.  The blocks are only 4" square with the diamond being 2"x4."  Of course, they can be made any comparable size you want.  I have done a miniature with 2" blocks and have seen it done with 8" blocks.  I labeled every column (8 of them) with a letter.  I labeled every row with a number (1-8) and the center row with a capital C.  On each quarter I only needed one of the center row as the other center column (that would be the  "i" column) goes on the adjoining quarter.  A color print of this labeled quarter was pinned to my design wall to keep me on the straight and narrow.


I keep old envelopes in a sewing drawer for organization purposes.  These are just small mailing envelopes and I labeled each one in pencil (so I can erase and use them for the next project):  1a, 1b, 1c…….., 2a, 2b, 2c,…….., etc.  That is a lot of envelopes and each one ended up with four of its labelled block, one for each quarter of the quilt.  A shoebox is nice to keep them all corralled.  Once organized like this I was able to take my box of completed blocks to Quilt Camp and put it all together without having to think very hard.  Even so, when I got home I noticed 4 blocks either in the wrong place or turned 90º or 180º.  Yes, I had to haul out the seam ripper, turn, and restitch.  I think I had to make one block over again from scratch, but considering that I had 288 blocks all together it could have been worse.

Once complete, I added a seaworthy fabric as a frame.  The quilting is an edge-to-edge ocean wave sort of design.  See, I am getting better.  I tried a new pattern for my quilting and got lots of practice doing a simple, curvy design so I could concentrate on moving my quilt around and keeping my stitches even….and I didn't even have to mark the quilting lines after practicing on scraps.

The quilt blocks are not hard, but you just have to be careful putting them together right.  See the many variations of this design on Pinterest.  You can get a free pattern here or you can draw your own as I did.

TIP:  Color or mark your paper foundation to make sure you are putting the right color in the right place.  I print out my foundations with about 40% color opacity so I am sure to grab the right fabric as I am piecing. 

TIP:  Organization is critical for a quilt like this.  If you look closely, blocks with the same basic design often have colors placed differently.

TIP:  Check twice or more before sewing the pieces together.  It is too easy to get one of them turned.

TIP:  Watch your points so you don't clip them off as you sew the seams.   

TIP:  Practice your quilting.  It is the only way to improve.


Friday, January 17, 2014

Love of Lone Star

This post features my first Lone Star Quilt and I learned so much in doing it.  I used a pattern from "Lone Star Quilts and Beyond" by Jan Krentz, and strip pieced the diagonals in the points.  This made it so much easier, but dealing with the wonkiness of bias remained a challenge throughout.  I found that it is very important to create a template, pin the points securely to an ironing surface, measuring and adjusting to fit the template.  Then starch and press.  This made them go together very nicely.


Another challenge in Lone Star quilts are the Y seams.  See the U-tube directions of Kaye Wood on this subject.  When the seams are done well they lie flat and lovely as in the following close-up of the same quilt.


I love Asian fabric and I had these wonderful birds.  I chopped the fabric to pieces, cut out the bird motifs and attached them with needle-turn appliqué.  If you like handwork you can spend a lot of time doing this.  I wasn't exceedingly precise because my plan was to quilt over the edges to blend them into the background.  That plan worked out very well.

I mentioned that I love fussy cutting so I put the center together with eight triangles cut exactingly the same.  It is important to sew the center points carefully to the place where seam allowances come together.  If you press the seams all the same way they nest together on the back and form a flat, unseen flower.  This presents another problem if you have open seams at the Y-seams.  Somewhere you have to let the seams change direction and press.  Some people say this is a no-no, but others find it doesn't affect the finished product.  I have done it many times and am comfortable doing it.  After all, you want both the center and the Y-seams to be perfect.  Here is a close-up of the center kaleidoscope.


At this point I was just beginning to learn to machine quilt.  I did 1/4 inch lines in each diamond, breaking thread in every one.  It was insane, and I thought I would wear out the quilt turning it four times for each diamond.  The borders were also done with 1/4 inch straight lines.  The black background was medium stippling.  I am told that is a very difficult way to start, but I didn't know it at the time.  By the time I finished this quilt I had just about decided I never wanted to machine quilt ever again.  That has changed as you will see in future posts.


Wednesday, January 15, 2014

Learning to Quilt

I love to create and construct my own quilt designs.  This takes time and does not always go smoothly. I have shown a few of my quilts and won some awards, but I am not prolific as my quilts are complex and take a lot of time to design and put together.

I started sewing when I was a very young child by doing embroidery and then branching out to making doll clothes.  I would sit on my bed for hours stitching together my own designs.  Some worked and others didn't.  What a great introduction to sewing!  Eventually, I made my own clothes and then those of my children.  By the time the empty nest was looming one of my daughters began to quilt and teach others to do the same in China.  Longing for something to sew, I followed her example with a small, simple, Dresden Plate quilt using the English Paper Piecing technique.  It was done all by hand while I watched my grandson at his swimming lessons.  That was a little more than 20 years ago.  Below are a couple of quilts I made as I progressed.  It is important to start with the basics before tackling the more advanced designs and techniques.


"Crossings" is a simple quilt, but I had fun arranging the shading and cutting up a border print.  It incorporates basic, square blocks, made from triangles and thus required manipulating bias.  There are borders to line up, some paper piecing in the sashing, and fussy cutting.  The idea of redesigning fabric by fussy cutting has always appealed to me.


This Christmasy quilt is called "Shining Stars" because it was made during the Christmas season and incorporates some brocade and shiny satin.  My daughter and I were holed up in a hotel room for 2 1/2 months while she was attended by Mayo doctors to repair a badly injured leg.  With one sewing machine we were each able to make a quilt.  It elicits wonderful memories of our special activities together during a hard time.  This was my first attempt at stars, but by then I was able to manage the sewing.  I had more trouble with machine quilting because I didn't know what I was doing, and my thread kept breaking.  I crocheted four little round designs to cover up places where I didn't like the way the seams looked.  Sometimes you just do what it takes to make it look good!

That is enough for today.  I will share some more of my quilts in the next post.


Bagged the Bag

My first attempt at a picnic bag was a fail.  You saw the pictures last week.  I kept revising the design.  I clipped where I shouldn't ...
