Showing posts with label satin stitch. Show all posts

Saturday, August 23, 2014

Satin Stitch Epiphany

I have mentioned a time or two that I do blanket stitch appliqué because my machine does not do a nice satin stitch, no matter what I do.  An epiphany occurred today while watching a U-tube tutorial and I feel really stupid.  My machine has a preset satin stitch and I never knew it!  I might have found it if I had read the manual.  You may already know about such a preset, but I was thrilled and there may be a person or two that this will help.

TIP:  Read your machine's manual.  There is a wealth of informative material there.

Before I explain the stitches it is important to know which presser foot to use.  In figure 1 you see the top of three possible options.  A and B are general feet.  C is an appliqué foot, which does not have a bar in front.  It is free of visual obstruction so you can see what is ahead of the needle and thus you can be more accurate when sewing a complicated piece.

Figure 1
Figure 2 shows the bottom of the three feet.  A is flat on the bottom.  B and C have a recessed portion in the middle, which allows thick stitching to slide under the foot easily.  These recessed feet are what you should use.  I like option C because it allows me to see and guide the work more accurately.
Figure 2
Zig Zag
We all know about the zig-zag stitch.  It has been around for years.  Shortening the stitch length will create a satin stitch (sort of), but it does not make a nice edge for appliqué.  The reason is that each stitch is taken at an angle from the previous stitch.  When I tried to shorten the stitch length to make the stitches closer together than in the photo, it gummed up under my presser foot, and I created a rat's nest on the back.
Zig-zag stitch
Satin Stitch
The satin stitch is designed and preset into some machines to create a closer, more regular stitch.  The sequence of needle placement creates a stitch that is straight across first, then at an angle for the second stitch.  I was able to shorten the stitch length by one increment, but no further.  Still, it is shorter than the zig zag and looks tons better.  The actual stitching is a scant 1/8 inch wide and looks really spiffy, although the enlarged view in the photo shows the minor imperfections, which are not noticeable in the actual stitching.
TIP:  Test before using this stitch on your fine appliqué.  Every machine is different.

When using the preset it is still possible to make adjustments to stitch length and width according to your needs and preferences.  The preset is only a starting point for the correct stitch.  My Viking machine has three presets:  narrow, medium and wide.

Have fun with this useful stitch from your lexicon of decorative options.

Friday, May 30, 2014

How to Machine Appliqué

Before I talk about blanket stitch appliqué I must spend some time explaining a few things about satin stitch, which will also apply to blanket stitch.  First of all the appliqué fabric is heavily starched, fused to fusible material, then the appliqué designs are cut and fused to the background fabric.  See my earlier post.

TIP:  Starching is optional, but I find it helps control the fabric.

Satin stitch is simply a zig zag stitch squashed tightly together to form a solid, edge around the appliqué.  This takes the right machine and some practice to get it even and uniform. I haven't gotten there.  I haven't practiced.  Someday I will learn to do it nicely, but right now it clings to the bottom of the bucket list.  Below is the anatomy of a satin stitch.


Finally, your choice of stabilizer is affixed to the back of the background fabric.  I use safety pins.

Satin stitch with no stabilizer
Satin stitch on cotton with two layers of stabilizer
As you can see, stabilizer makes a world of difference in the appearance of satin stitch, and equally so with blanket stitch.  In these examples you can see why I don't do satin stitch:  my machine does not allow the stitches to be any closer together.  The skinny example (far right) was done twice and I still am not happy with it.

TIP:  Using the same fabric and materials as in your quilt start stitching, adjusting tension, stitch length and width until you are satisfied with the result.  It is difficult to rip out this kind of stitching and it is hard on your fabric and your mental stability to do so.  Mark this tester scrap with your final choice of settings and put it on your design wall where it won't get lost or land in the wastebasket.

The fabric preparation for blanket or buttonhole stitch is the same as for satin stitch, including the practice sample...especially the practice sample.  The stitching runs along the edge of the fabric, tossing out a sideways stitch or two regularly as in the example below.

Blanket Stitch
Batik is a great fabric for blanket stitch appliqué, but more loosely woven fabrics can be used if they are not prone to heavy fraying.

TIP:  If you are using a fabric with some small tendency to fray you can treat the edges with Fray Block.  The tube has a fine tip, but this product is very juicy so I apply it with a toothpick to the very edges of the appliqué after fusing it to the background.  It is a form of plastic so I want it only on the edges.  It seems to work well and is invisible.  I also check for any fray threads as I stitch and either pull them out or snip them.  This is fussy stuff, but if you plan to show a quilt the judges will notice unattractive fuzz.

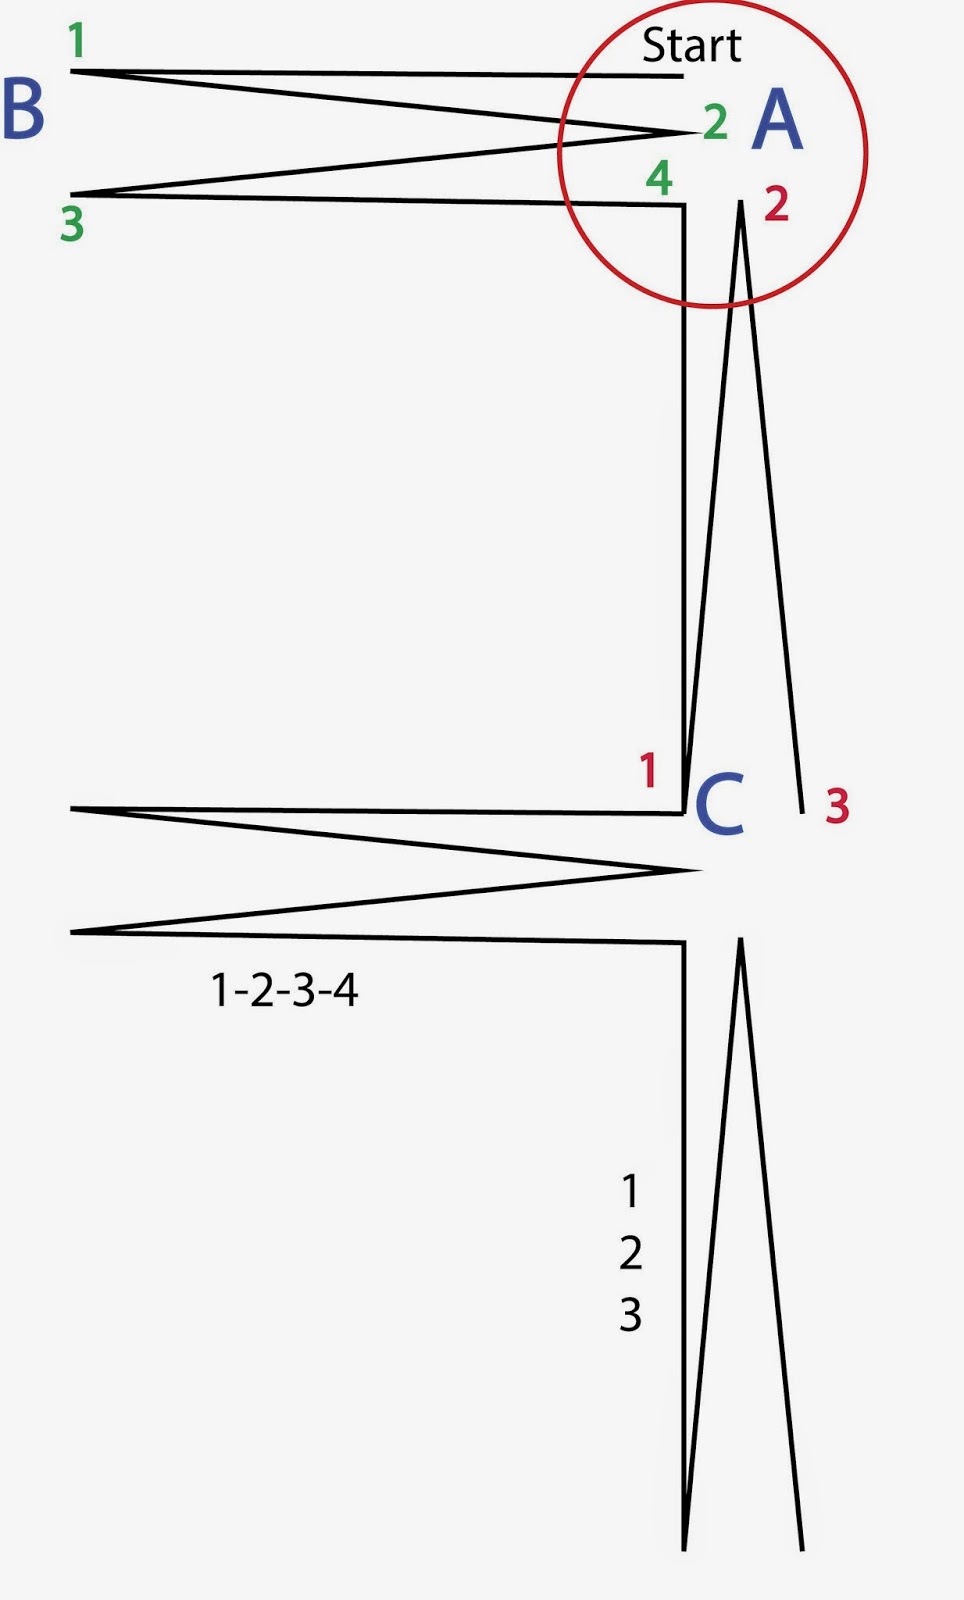
The machines I have used and heard about take several stitches in place sideways and then several stitches forward and backward.  Machines differ in the specifics of their blanket stitch, but below is the anatomy of the blanket stitch on my Viking Sapphire.


I start with about 5 tiny straight stitches to lock the thread.  Then the needle goes in at A, left to B(1), right to A(2), left to B(3) and right again to A(4).  Next it goes forward from A to C (1), back to A(2), forward to C(3).  You can name or number these steps any way you choose, but you need to establish a rhythm, and it helps to name each step.  When you get to points or corners you need to know where you are in the sequence.  BTW,  the needle goes into the same hole every time you come back to A, B or C (I opened it up in the diagram so you could see the steps).  Points A and C are right at the edge of the appliqué and should form an attractive, smooth finish.   There is a lot of stopping and turning as you negotiate curves and points so this is a perfect place to use the needle-down function if your machine has one.  The A to B stitches must be perpendicular to the edge of the appliqué.

TIP:  Slow your stitch speed to low if you can.  As you learn to do this stitch on appliqué I suggest that you turn off the tv, turn off the audio book, turn off the music, and turn off the kids.  You need to concentrate until you understand the rhythm of your stitch.  Why not music?  Music is all about rhythm, but it rarely, if ever, syncs with your sewing machine stitch, leaving you all mixed up crazy.  Say the names of the steps out loud with your variation of names and needle sequence:  1,2,3,4-1,2,3.  You have just created new music with the needle as your drum!

Finish with 5 tiny, locking stitches, which can be buried nicely in previous stitching.  Pull the threads to the back and cut, leaving a 1/2 inch tail.

TIP:  If the thread tails might show through the fabric to the front, pull them through some stitches on the back before cutting.

The points and corners will take some maneuvering. Slow down.  You may need to shorten the width of the sideways stitch sometimes, and you may need to lengthen or shorten the lengthwise stitch even to 0 on occasion.  So much depends on your machine so remember the old mantra:  practice, practice, practice.  This is where you need to remember where you are in the stitching sequence or you will find the needle flying off in the wrong direction.  Ask me again how I know!!  My seam ripper has a long and varied history.

TIP:  Save time and reduce pilot error.  Once you have your settings established, and if you can do this on your machine, program your stitches so you can select them automatically.  The appliqué I am working on now has two different width settings depending on what part I am working on so those are each programmed separately.  The third stitch I program is the tiny straight, locking stitch because it needs to be offset to the right to match the start of the blanket stitch (A). 

When you get the hang of this you can turn on your choice of noise.  However, I suggest you send the kids outside to play in a safe place or put them down for naps.

Monday, May 19, 2014

Appliqué to Background

Appliqué can be applied several ways.  It can be sewed on by hand (needle turned), and within that category there are tricks using freezer paper, starch or glue.  The fabric can be fused or glued to the background and the edges sewn down with the machine.  Satin stitch done with a tight zigzag is common and looks lovely when done well.  There are many special stitches on machines today that can be used. 

TIP:  Experiment with the fancy stitches on your machine.  They work best with stabilizer under the fabric.

My favorite method is to use a fusible material, iron the appliqué to the background, and sew it down with a machine blanket stitch.  I trace all my appliqué pieces onto Soft Fuse IN REVERSE.  It stays soft.  It has paper on only one side, and that paper stays on until you want to take it off.  It is easy to pull off when you are ready.


First the designs are drawn IN REVERSE on the paper side of the fusible material.   If you are using fusible with two paper sides, read the directions for which side to use.


TIP:  I often squeeze all the designs that will be made from the same fabric together about ¼-½ inch apart so there is little waste, and iron the whole bunch to one piece of fabric without cutting the fusible apart first.  You don’t have to worry about grain on the appliqué.

TIP:  Did you get that?  The designs must be drawn on the paper of the fusible IN REVERSE of how you want them on the quilt.  A new habit to develop! 

Now I sit down with an audio book in the player and carefully cut out all the pieces.  Watching TV is OK too.  I like to get all of the cutting done first to get it out of the way.  What I really want to do is sew and I don’t care to stop in between to cut.


TIP:  I find it helpful to put all the cut appliqué for one background shape into an envelope, label it and put it, the original tracing paper drawings, and the background piece into a folder...one folder for each background shape and its appliqués.  Everything is labeled of course.  It is nice to be able to find it all together when I am ready to work on that part.


Finally, I tear the paper off, lay the appliqué in its predetermined spot and iron it to the background according to the directions of the fusible material.

TIP:  Is it hard to get the paper off before ironing to the fabric?  Use a pin to lightly score the paper in the center of the appliqué piece.  The paper will pop up and is easily grabbed.


TIP:  Use a heat resistant ironing sheet over the appliqué.  It will protect your iron from any AWOL fusible goo.

MAJOR BIG TIP:  reverse (design) + wrong (side fabric) = RIGHT.  Two negatives make a positive! In this case two wrongs make right.  

Why am I do adamant about reversing the design on fusible?  I made a whole quilt backwards one time.  That's why!

Bagged the Bag

My first attempt at a picnic bag was a fail.  You saw the pictures last week.  I kept revising the design.  I clipped where I shouldn't ...