Showing posts with label quilt show. Show all posts

Sunday, April 15, 2018

Ripping Orange

I told you about my tension troubles and the resulting need to rip.  The thread that needed to come out is all orange.  It was a tedious task and needed to be carefully done.  I am so glad that I had stitched the seams in the ditch.  I didn't have to worry about distortion.  I spent three evenings watching free Amazon Prime movies with an Ott-light glowing over the quilt on my lap.  The first two movies were very enjoyable.  The third I was glad to shut off when the last stitch came out, I don't intend to watch the rest of it.  I am now off and stitching again and this time the tension is right and it looks like it is supposed to look.

Before sitting down to sew, I got down on the floor and pulled up all the loose thread flying around so it won't wrap around the vacuum cleaner brush.

The ironing board is a trap for all things extraneous.  Note to self:  Do something about it!

Dinner is left-overs.  Can't let them go to waste.

A little bit of housecleaning.  Not much.  I don't want to get addicted.

Keep the brain creating.  Photoshop has a new Technical Preview so I slowed down briefly to learn how to use it.  This could be a real time usurper, but I may be able to translate it to quilts or quilting in some form or another.

Butterfly Mandala

Physical Therapy is helping a bum arm.  Hiking helps to restore my whole body. I am accomplishing all kinds of dumb stuff that has been sitting around for weeks.

Mailed a quilt off to hang in the Utah Quilt and Sewing Marketplace Show.  It is a non-juried show, but the quilts are judged and ribbons and prizes awarded.  We'll see how it goes first weekend in May in Sandy, UT.  If you go to the show, say "Hi" to my quilt.

Sew some happy seams this week.  I wish you time to get lots done and have fun.


PS.  Photo from last week's hike.

Mills Lake, Rocky Mountain NP


PSUtah Quilting & Sewing Marketplace

Monday, April 17, 2017

Complete, Finished, Done!

Two quilts completed this week.  I know you have seen my dog ad nauseum, but it is now trimmed and sports a border.  Those two tasks really made her worth looking at.  As I have said before, much of the quilting is under par, because there were so many problems with the fusible.  I have to call this project a real learning experience.  I still love this little quilt and am now able to look at it with joy instead of disappointment.

Dixie
No hanging sleeve on this one.  Pardon the safety pins!
The larger, spiral quilt is also done.  I can't let you see the completed quilt until it has been accepted into a show, but as soon as that happens I will post it.  The binding went on beautifully and as I write this there are only a few more stitches to complete the hanging sleeve, which will be completed by the time I post this.

Hanging sleeve with a few more stitches to do.
Note the basting stitch in the lengthwise center of the sleeve.  It will be removed when the hand stitching is done.   It will provide 1" of excess fabric to create a tube that will accommodate a pole from which the the quilt will hang.  The quilt will hang straight and won't bend over the pole.  It is a pain in the neck to have to put this on when you are all done, but just smile and do a nice job.

What does it take to enter a show?

1.  Make a quilt with great care and precision.  Do your very best from the beginning.  The binding and back must also be excellent.  Keep track of the time you spend constructing your quilt.

2. When it is completed block the quilt carefully and accurately so it is perfectly square or rectangular, measuring the diagonals as well and the sides.

3.  Sew a hanging sleeve on the back.  This allows your quilt to hang straight if you have blocked it carefully.  Do this before photographing it because you want it to hang perfectly straight in the photo.  You don't want to try to skew it digitally.

4.  Photograph your quilt or have it done by a professional.  Many show sites today give you directions for doing your own photography.  They usually want an un-retouched photo of the whole quilt and a second one showing detail.

4.  Will you  have it appraised?  You might be very surprised at its value.  Now is the time to assemble the details.  That is a subject for another blog!

5.  Find a show you want to enter.  Most (but not all) shows today are entered via the computer, but either way they give you specific directions, which may differ from show to show.  You MUST follow these directions so read them carefully.  Fill out the forms.  Pay the entry fee (not refundable).

6.  Wait to hear whether your quilt made it into the show and then follow more directions for getting it there.


For the first time in a year I am off and running on a new project.  Well, not exactly new.  I have started this one twice and failed because I was having trouble with a shadow.  This is a portrait of my grandson and he has a shadow on one side of his face.  He has dark skin and I have consistently thread painted that shadow too dark, and I don't like that.  So off to try it again using a different technique, which I will share as it moves along.

Sew some happy seams this week.  I wish you the joy of a finished project.


Sunday, August 28, 2016

Time Off for a Show

My daughter and I went to the Rocky Mountain Quilt Festival.  This is where the Hoffman Challenge traditionally displays all the entries that were accepted into the show.  Imagine our surprise to find hardly any of the Challenge...maybe 15-20.  I didn't count.  No dolls.  No apparel.  No booth for information.  On the way out we asked about it, and apparently Hoffman has changed things around and this was all they sent.  The lady at the ticket table said they were as surprised as we were.  What a disappointment.  I did take a few photos of some of those Challenge quilts, which struck my fancy.  I did not look that closely at technique; that's for the judges.  I apologize to the quilters whose hard work created the following.  The labels were so small I could barely read them, let alone take photos of them.  The chosen fabric was littered with butterflies in many colors, and there was a "light" colorway and a dark colorway from which to work.  At the Hoffman Challenge website you can see the winners' quilts and if you scroll way down will find the butterfly fabric.

The following is a selection of those we viewed in person:

There were lots of butterflies within butterflies.
I found this one charming.
Unusual, interesting.
Lots of color.
Accessory fabrics within the stained glass framework.
Neat idea that spoke to me.
Love the precision.  Nicely executed.
Ten individually bound mini-quilts stitched to the turquoise background.
Like an entomologist's display.  Clever.
I like the overlaid embroidery on this one.
This one made me laugh.  Cute idea.
I must say that standing within a booth with five or six butterfly quilts I began to feel like there were too many bugs buzzing around.  Weird sensation, but the quilters really created their quilts with realistic butterflies on the brain.  Very few used the fabric only for color or texture.

The rest of the show was made up of exhibits by different groups.  The highlight for me was a booth with three of Sharon Schamber's beautiful quilts.  The detailing was spectacular.  I could have stood there for the next hour just taking in her incredible workmanship.  This particular show is not juried so there were no individual entries or prizes.  The exhibit I liked best was done by the Rocky Mountain Creative Quilters.  I didn't think to take any photos.  I must have left my brain at home.  They have a fine bunch of talented quilters in that group.  I don't know that I could have chosen any that I liked best - they were all amazing.

Caveat:  You may note some quilts that look like they are hanging poorly.  You are right!  The bars they were hanging from sagged in the middle.  This made the quilts slide toward the center so fold lines were accentuated, which made some quilts look crooked and bent.  Many of the bed-size quilts were dragging on the bare floor.  What a shame!

Next week I will get back to the saga of my binding redo and share a gorgeous binding on one of Sharon Schamber's quilts.

Sew a happy seam this week.  I wish you inspiration from the quilts above and others that you may encounter.

Sunday, January 18, 2015

Needles and Gadgets

I have sewn almost all my life, certainly since age six.  A needle, of course, is a necessary evil for those of us who sew, and there are many from which to choose.  I am talking today about the needles and gadgets I use during the machine quilting process.  You will need different styles for appliqué and hand quilting.

My go-to needle for burying threads into the nether regions of my quilt is a Quilt Basting Needle.  It is long.  It is thin.  It has a longish eye.  Length makes it possible to grab the needle easily to pull through the quilt.  Thin helps it go through tight places between stitches.  The long eye makes it easy to thread.  My #7 needles are 2 3/8 inches long.  Love 'em!  However, they can be hard to manage with short threads (read on for the work around).


Another option that I keep on hand are Easy Threading needles.  These allow the thread to slide through a gate from the top and are quick and easy to thread.  I find however that they can shred silk and polyester threads.  They may damage cotton thread, but it is not obvious.  If you are stuck with a short thread and the needle causes harm, you may find yourself squealing in frustration.  They are also shorter (mine are 1 7/8 inches), which may help with moderate length tails.


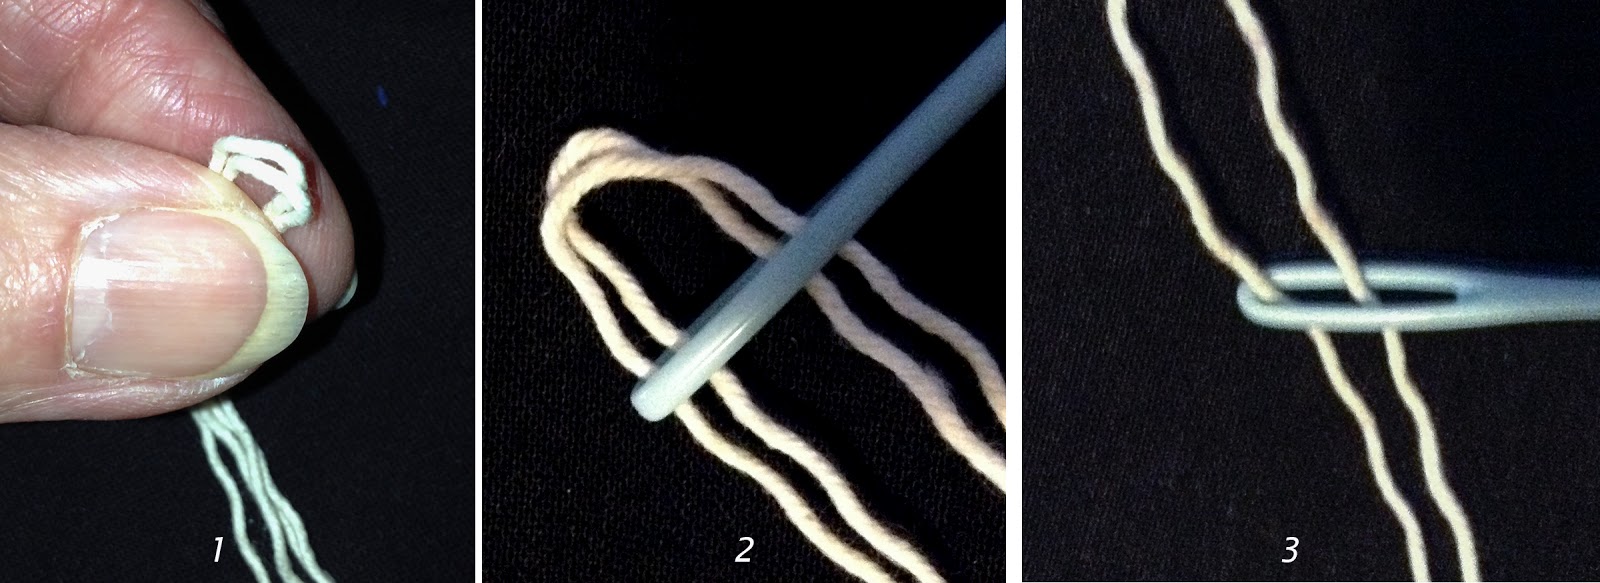
Sometimes it is hard to thread a standard needle, especially with two threads to manage.  I do it the way I was taught to thread a yarn needle.  Fold the two threads together as one, squash them between your thumb and forefinger and slip the eye of the needle over both loops.  Grab those loops and pull the ends of the thread through.  That's why I like the long eye of the basting needle.  In the photos I have used a yarn needle and string so it is easy to see.


Now for handling some problem situations.  Below are my favorite tools:


Looks like a surgical tray doesn't it?  I am sure you are familiar with the tweezers and needle threader.  The hemostat is a special tweezer that locks the grip of the pinchers.  It is a super tool for both medical and sewing needs!

Situation #1:  You have two threads that are only about 2-3 inches long.  By the time you have have the needle threaded you don't have enough thread leeway to get the needle into the fabric in the right place.
Solution:  Tie a square knot.  Use the tweezers to help if your fingers are getting in the way.  You can use a shorter needle.  You can try the Easy Threading needle, but if the thread shreds or breaks, you will have to move on to Situation #2.  I  like to run the long basting needle into the fabric and batting leaving the eye out about 1/2 inch.  Put the wire of the needle threader through the eye of the needle.  Using the tweezers pull the threads up through the wire and pull the threader with threads through the needle eye.  The hemostat pinchers are a bit thick for use with the needle threader so I use the skinny-pointed tweezers.

Situation #2:  You have two threads that are way to short to manage.  Never fear, you can do it.
Solution:  First you need to get a good knot tied.  The square knot and surgical knot are the options here.  I often get the threads tangled and have to start again, but the tweezers and hemostat will help greatly with the job.  I will grant you that it is not easy to tie short threads, but it is possible.  The hemostat is good for the surgical knot when one thread is a little longer.  Once the knot is tied you can get the threads through the eye of the needle with the needle threader as in Situation #1.

TIP:  If your threads are less than 1 inch long you need to rip a few more stitches out.  The knot should hold it under the fabric, but it will be more dependable with more tail attached.  I know that when I hand sew with silk thread the knot will pull right through if I don't beef it up a bit.

TIP:  If I know my thread tail length is iffy, I pull it through to a place where I know I will be quilting over it.  Just a little more insurance.

The hemostat is extremely useful for pulling a wedged needle through the fabric when it is hard to grasp and pull or if you have arthritic fingers.  Although not long, it can be a big help in turning a tube right side out.  It is one of my favorite gadgets.

I know this week's post is pretty basic, but it took time for me to develop reliable solutions to the needle and thread games so maybe it will help some of you.

I attended the AQS Quilt Show in Albuquerque last week and spent one day soaking up the fabulous work of award winning quilters such as Margaret Soloman-Gunn, Marilyn Badger, and Renae Haddadin among others.  The quilts were stunning.  The Egyptian tent makers were there too.  I plan to spend the next 2 or 3 posts on a vicarious visit to the show.  Please join me.

Bagged the Bag

My first attempt at a picnic bag was a fail.  You saw the pictures last week.  I kept revising the design.  I clipped where I shouldn't ...